
You can roast Hatch peppers in your oven. Roasting them brings out their sweet, smoky flavor and makes their skin easy to peel. This guide shows you the simple steps to do it right at home. You’ll learn how to get that perfect char, peel them cleanly, and keep them for later use. Roasting turns these fresh chiles into a versatile ingredient for many tasty dishes.
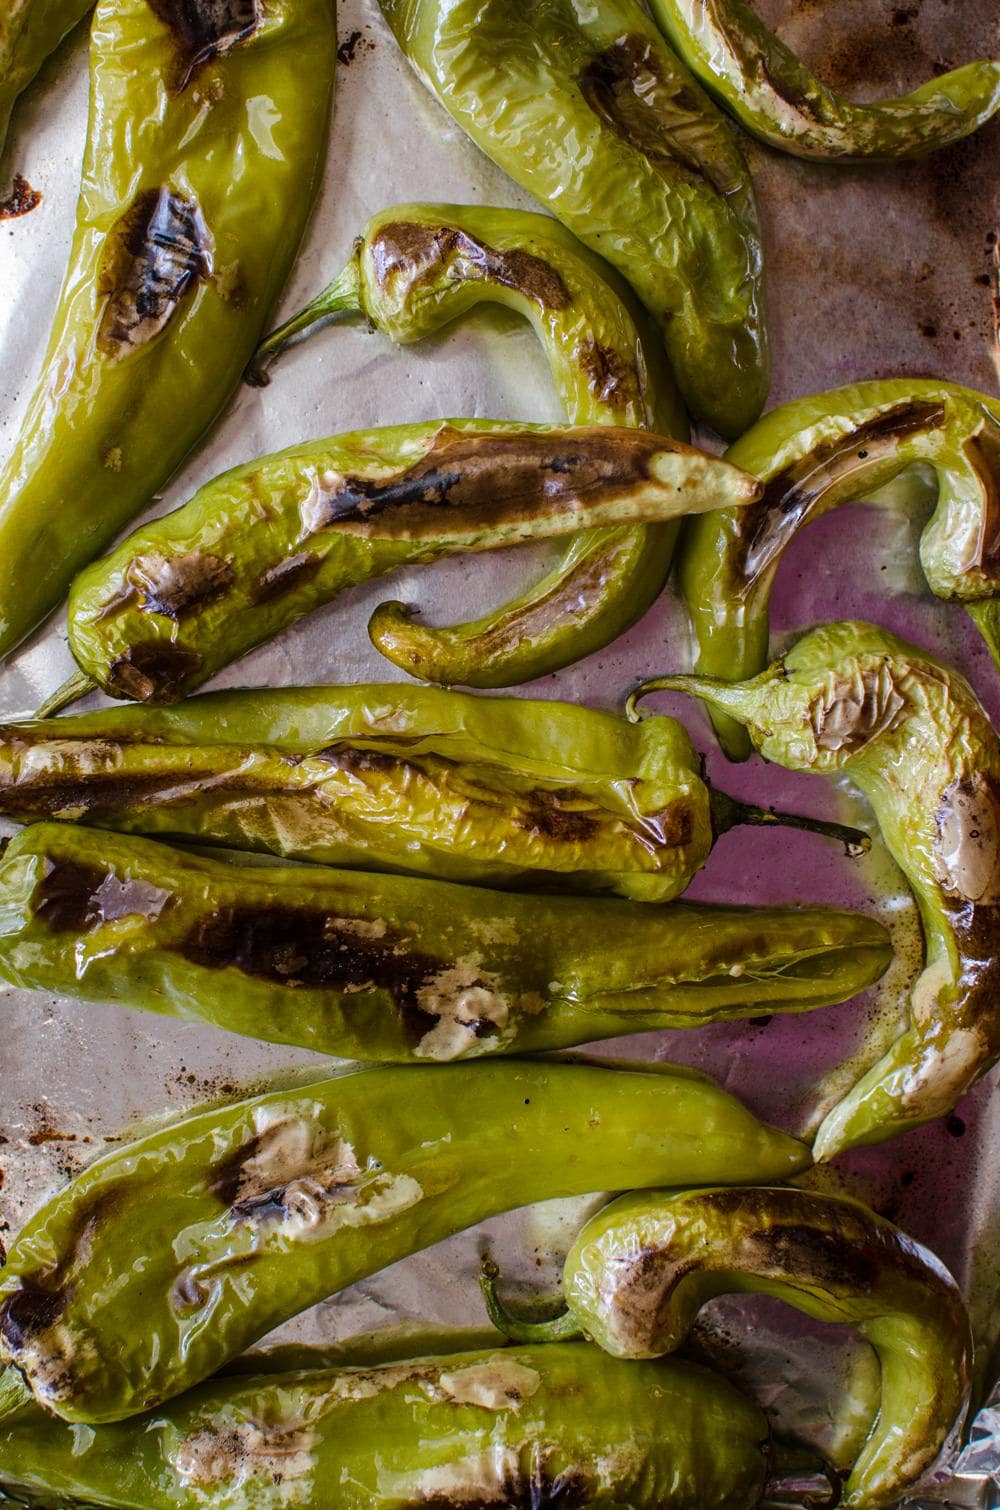
Image Source: www.theflavorbender.com
Getting Ready: What You Need
Before you start roasting, gather your tools and ingredients. This makes the process go smoothly. You need a few simple things.
- Fresh Hatch peppers: Pick peppers that are firm and bright green or red. Avoid soft or bruised ones.
- Baking sheets: Use sturdy baking sheets. You might need two depending on how many peppers you roast. A good baking sheet for roasting peppers helps them char evenly.
- Parchment paper or foil (optional but helpful): This makes cleanup much easier.
- Large bowl.
- Plastic wrap or a clean kitchen towel.
- Tongs.
- Sharp knife.
- Cutting board.
- Gloves (highly recommended!): Pepper oils can burn your skin.
Picking Your Peppers
Choosing the right peppers is the first step. Hatch peppers come from the Hatch Valley in New Mexico. These New Mexico hatch chiles are famous for their unique flavor. They have a buttery taste with varying levels of heat.
Hatch chile heat levels range from mild to very hot. The heat depends on the specific variety and when they are picked. Mild ones are great for a subtle flavor. Hotter ones add a real kick to your food. You can often find labels saying “Mild,” “Medium,” “Hot,” or “Extra Hot.” Pick the heat level you like best.
Look for peppers that are:
- Bright in color (green or red).
- Smooth and firm, not wrinkled.
- Heavy for their size.
Preparing the Peppers
Once you have your peppers, you need to get them ready for the oven. This is a quick step.
- Wash the peppers: Rinse them under cool water. Gently rub off any dirt.
- Dry them well: Pat them completely dry with a towel. Wet peppers steam instead of charring. Charring peppers in oven is key for flavor and peeling.
You can roast them whole or cut them open. Roasting them whole is the easiest way. If you cut them open, you can remove the seeds and membranes first. This makes the peppers less hot. Roasting whole keeps all the flavor inside and makes peeling easier later. For this guide, we will roast them whole.
Oven Temperature for Roasting Peppers
Getting the oven temperature right is important. A high temperature helps the skin blister and char quickly. This charring is what gives roasted peppers their smoky taste. It also helps loosen the skin for easy peeling.
What is the best oven temperature for roasting peppers? Most people use a temperature between 400°F (200°C) and 450°F (230°C).
- 400°F (200°C): This is a good temperature for an even roast with good charring.
- 425°F (218°C): This is a popular choice for faster charring.
- 450°F (230°C): This is very hot and will char the skins very quickly. Watch them closely so they don’t burn completely.
We will use 425°F (218°C) as a good middle ground for this guide.
Setting Up the Oven
Preheat your oven to 425°F (218°C). Make sure a rack is in the middle position of the oven.
Line your baking sheet for roasting peppers with parchment paper or foil. This catches drips and makes cleanup simple. If you don’t have paper or foil, you can lightly grease the baking sheet.
Place the dried peppers in a single layer on the prepared baking sheet. Do not crowd the pan. The peppers need space around them for the heat to circulate. This helps them char instead of steam. If you have many peppers, use two baking sheets.
Roasting Time Hatch Peppers
How long does it take to roast Hatch peppers? The roasting time for hatch peppers depends on several things:
- Your oven’s temperature.
- The size of the peppers.
- How hot your oven actually is (some ovens run hotter or cooler than the setting).
- How much char you want on the skin.
Generally, roasting takes about 20 to 30 minutes at 425°F (218°C).
Here’s what to do:
- Place the baking sheet with peppers in the preheated oven.
- Roast for 10-15 minutes.
- Use tongs to turn each pepper. You want to turn them so different sides face up. This helps them char evenly on all sides.
- Continue roasting for another 10-15 minutes.
- Keep an eye on them. The skins should be blistered and blackened in many spots. This is charring peppers in oven. Some areas might be completely black. This is okay! That’s the char you want. Pull them out when most of the surface looks charred and blistered. The peppers should also look softened.
Be careful not to let the peppers turn to ash. Some char is good, but you don’t want them completely burned through.
Cooling the Roasted Peppers
This is a very important step for peeling roasted hatch chiles easily. As soon as the peppers come out of the oven, they need to steam. This steaming makes the charred skin loosen from the flesh.
Here’s how to do it:
- Carefully remove the hot baking sheet from the oven using oven mitts.
- Quickly transfer the hot peppers from the baking sheet into a large bowl. Use tongs for this.
- Cover the bowl tightly with plastic wrap. Or, cover the bowl with a clean, damp kitchen towel.
- Let the peppers sit in the covered bowl for at least 20-30 minutes. You can even let them sit longer, up to an hour. They should be cool enough to handle before you move to the next step.
The steam trapped inside the bowl works wonders on the skins. Do not skip this step!
Peeling Roasted Hatch Chiles
Now comes the part where you remove the charred skins. Peeling roasted hatch chiles is simple after the steaming step.
- Put on gloves! This is crucial. The oils in chiles, especially if they are hot varieties, can cause a burning feeling on your skin. This feeling is called “chile burn” and it can last for hours. Wearing gloves (like latex, nitrile, or even plastic food-handling gloves) protects your hands.
- Take one cooled pepper from the bowl.
- Hold the pepper gently over your cutting board or a bowl to catch seeds and scraps.
- Starting at the stem end, gently rub or pull the loosened skin away from the flesh. The charred skin should come off easily.
- Most of the skin should peel right off. Some stubborn spots might need a little coaxing with your fingers or the dull side of a knife. Do not rinse the peppers under water to remove skin. Rinsing washes away some of the delicious smoky flavor.
- After peeling the skin, you can carefully remove the stem.
- You can also split the pepper open and remove the seeds and internal membranes if you prefer less heat. Use the tip of your knife or your fingers to scrape them out.
- Place the peeled, and optionally seeded, peppers in a clean container.
Repeat this process for all the roasted peppers. The peeled peppers are now ready to use or store.
Storing Roasted Peppers
Once your Hatch peppers are roasted and peeled, you need to store them correctly to keep them fresh. Storing roasted peppers means keeping them safe for later use.
You have a couple of main options: refrigerating and freezing.
Refrigerating Roasted Peppers
If you plan to use the peppers within a few days, refrigeration is a good choice.
- Place the peeled peppers in an airtight container.
- You can add a little bit of olive oil to the container. This helps preserve them and adds flavor.
- Seal the container tightly.
- Store in the refrigerator.
How long do they last in the fridge? Roasted Hatch peppers kept in an airtight container in the refrigerator will last for about 4-7 days. Check for any signs of mold or strange smells before using if they have been in the fridge for several days.
Freezing Roasted Hatch Peppers
For longer storage, freezing is the best method. Freezing roasted hatch peppers lets you enjoy them months after roasting.
Here are different ways to freeze them:
Method 1: Whole or Halved
- Place the peeled, and optionally seeded, peppers on a baking sheet lined with parchment paper. Make sure they do not touch.
- Put the baking sheet in the freezer until the peppers are solid (about 1-2 hours). This is called flash freezing.
- Once frozen, transfer the solid peppers to a freezer bag or airtight container.
- Remove as much air as possible from the bag to prevent freezer burn.
- Label the bag or container with the date and the type of pepper (e.g., “Roasted Mild Hatch Chiles – Aug 2023”).
Flash freezing prevents the peppers from sticking together. You can then take out just the amount you need from the bag.
Method 2: Chopped or Pureed
If you know you will use the peppers chopped or blended, you can prepare them that way before freezing.
- Chop the peeled peppers to your desired size.
- Or, puree them in a food processor to make a sauce or paste.
- Place the chopped peppers or puree into ice cube trays or small freezer-safe containers.
- Freeze until solid.
- Transfer the frozen cubes or blocks to a freezer bag or airtight container.
- Label the container with the date and contents.
This method is great for adding pre-measured amounts to soups, stews, or sauces.
How long do they last in the freezer? Freezing roasted hatch peppers keeps them good for 6-12 months. For best quality, try to use them within 6 months. They will still be safe to eat after that, but their texture or flavor might change slightly.
Remember to thaw frozen peppers in the refrigerator overnight before using them in most recipes.
Uses for Roasted Hatch Peppers
Roasted Hatch peppers are incredibly versatile. Their smoky, slightly sweet, and spicy flavor adds depth to many dishes. Knowing the uses for roasted hatch peppers helps you plan how to enjoy your freshly roasted batch.
Here are just a few ideas:
- Chile Verde: This classic stew uses roasted green chiles as the base. It’s often made with pork, but chicken or vegetarian versions are also popular.
- Salsas: Add chopped roasted peppers to fresh or cooked salsas for a smoky kick.
- Sauces: Blend roasted peppers into creamy sauces for pasta, vegetables, or meats.
- Soups and Stews: Stir chopped or pureed roasted chiles into soups and stews for flavor and heat. Think potato soup, chicken soup, or bean chili.
- Dips: Mix chopped peppers into queso, spinach dip, or hummus.
- Eggs: Add chopped roasted peppers to scrambled eggs, omelets, or breakfast burritos.
- Sandwiches and Wraps: Layer roasted peppers on sandwiches or add them to wraps.
- Casseroles: Include chopped peppers in your favorite casseroles, like mac and cheese or potato bakes.
- Cornbread: Fold chopped roasted chiles and cheese into cornbread batter before baking.
- Burgers and Pizza: Top burgers or pizzas with roasted peppers for extra flavor.
- Simply Eaten: Enjoy them as a side dish with a little salt and olive oil.
The possibilities are endless! The unique taste of New Mexico hatch chiles enhances so many different types of food.
Grasping Hatch Chile Heat Levels
As mentioned before, one of the interesting things about New Mexico hatch chiles is their range of heat. Understanding hatch chile heat levels helps you choose the right peppers for your taste.
The heat comes from a compound called capsaicin. The amount of capsaicin determines how hot a pepper is. The heat level is often measured using the Scoville Heat Unit (SHU) scale.
Hatch peppers typically fall into these general categories:
| Heat Level | Typical SHU Range | Description | Best Uses |
|---|---|---|---|
| Mild | 400 – 800 SHU | Very little heat, mostly flavor. | Flavor where you want no spice; good for kids. |
| Medium | 800 – 1,500 SHU | A gentle warmth, noticeable but not strong. | Adds a little kick without overpowering other tastes. |
| Hot | 1,500 – 2,500 SHU | A good amount of heat, builds slowly. | When you want significant spice in your dish. |
| Extra Hot | 2,500 – 5,000 SHU | Can be quite spicy, makes your mouth tingle. | For those who love heat; use sparingly if unsure. |
| (Some types) | 5,000 – 20,000+ SHU | Very spicy, not for the faint of heart. | Used in small amounts for extreme heat lovers. |
Note: These numbers are estimates. The actual heat can vary based on growing conditions like sun, water, and soil.
When you buy Hatch peppers, the grower or seller often labels them by heat level. If they aren’t labeled, you can ask. Or, if you buy a mix, assume they are medium unless told otherwise.
If you roast a batch and find they are hotter than you expected, you can reduce the heat by removing all the seeds and white membranes inside the pepper after peeling. Most of the capsaicin is in these parts.
Deciphering Why Roasting is Best
Why go through the process of roasting instead of just using fresh peppers? Roasting does several wonderful things to the peppers:
- Flavor: High heat caramelizes the sugars in the pepper flesh. This brings out a deep, sweet, smoky flavor that you don’t get from fresh peppers. Charring peppers in oven adds that unique smoky note.
- Texture: Roasting softens the pepper flesh. It becomes tender and almost buttery. Fresh peppers are crisp or firm.
- Peeling: Roasting and then steaming makes the tough outer skin easy to remove. Pepper skins are hard to digest and can be unpleasant in cooked dishes.
- Versatility: Roasted peppers can be used in more ways than fresh ones. They blend into sauces, mix into dips, and integrate smoothly into cooked meals.
So, while you can use fresh Hatch peppers for some things, roasting unlocks their full potential for rich, complex dishes.
Tips for Success
Here are a few extra tips to make sure your oven roasting goes perfectly:
- Don’t crowd the pan: Giving peppers space is key for proper charring. Overcrowding leads to steaming.
- Watch your oven: Every oven is different. The roasting time for hatch peppers might be shorter or longer in your oven. Check on the peppers halfway through and towards the end.
- Black is okay: Don’t be scared of black spots on the skin. That’s the char you want! Just make sure the pepper isn’t turning into a crispy, burnt shell.
- Steam them well: The steaming step is vital for peeling. Don’t rush it. Let them sit and steam until they are cool to handle.
- Wear gloves: Seriously, wear gloves when peeling and handling roasted peppers, especially if they are hot varieties.
- Clean carefully: Chile oils can transfer easily. Wash your cutting board, knives, and hands (even after gloves) thoroughly after handling.
Troubleshooting Common Issues
Sometimes things don’t go exactly as planned. Here are solutions to a couple of common roasting problems:
Problem: The skins aren’t peeling easily.
- Possible Cause: Not enough steaming time.
- Solution: Put the peppers back in the covered bowl for longer. Make sure the bowl is sealed well. The steam needs to be trapped inside.
- Possible Cause: Not enough charring.
- Solution: The skin needs to blister and separate from the flesh during roasting. If they didn’t char enough, they might be harder to peel. Gentle rubbing is usually enough for areas with good char. For less charred areas, you might have to scrape a bit more carefully.
Problem: The peppers taste too burnt.
- Possible Cause: Left in the oven too long, or the temperature was too high for the time used.
- Solution: Next time, check the peppers sooner. If they are very charred, some parts might taste bitter. You can try to scrape off the most heavily burnt parts during peeling, but if the flesh itself tastes burnt, there’s not much you can do for that batch. Adjust roasting time or temperature for the next batch.
Problem: The peppers steamed instead of charred.
- Possible Cause: Overcrowding the baking sheet.
- Solution: Use two baking sheets next time. Ensure peppers have space around them.
- Possible Cause: Peppers were wet when they went into the oven.
- Solution: Make sure peppers are completely dry after washing.
Comprehending Quantity and Time
You might be roasting a small batch for a single recipe or a large amount to freeze for the year.
- For a small batch (1-2 lbs): One baking sheet is usually fine. Roasting time will likely be on the shorter end (20-25 minutes).
- For a large batch (5-10 lbs): You will definitely need multiple baking sheets and may need to roast in batches if you only have one oven rack with space. The oven temperature for roasting peppers remains the same, but the total time commitment for prepping, roasting, and peeling will increase.
- Remember to factor in the cooling/steaming time (at least 30 minutes) and the peeling time per pepper (a few minutes per pepper, adds up for many).
Knowing the roasting time hatch peppers need on average helps you plan your kitchen time.
Fathoming the Versatility
The wide array of uses for roasted hatch peppers really highlights why they are so popular. They aren’t just about heat. They bring a unique flavor that pairs well with many cuisines, especially Southwestern and Mexican dishes.
Think about:
- Roasting them alongside other vegetables like onions, bell peppers, and zucchini.
- Making a simple pasta sauce by blending roasted Hatch with tomatoes, garlic, and olive oil.
- Adding chopped roasted chiles to cornbread batter for a savory twist.
- Stuffing them with cheese and baking them (like a mild, roasted chile relleno).
Having a stash of frozen roasted Hatch peppers in your freezer means you can add this special flavor to meals any time of the year, even when they are not in season.
FAQ – Frequently Asked Questions
Here are some common questions about roasting Hatch peppers.
Q: Do I have to peel the peppers after roasting?
A: Yes, it is highly recommended. The skin is tough and doesn’t break down well when cooked. Peeling roasted hatch chiles results in a much better texture in your dishes.
Q: Can I roast peppers under the broiler?
A: Yes, you can. The broiler is faster and gets a very dark char, but you must watch the peppers constantly as they can burn quickly. The oven method is more hands-off.
Q: Can I roast other types of peppers this way?
A: Absolutely! Bell peppers, poblanos, and other thick-skinned peppers roast beautifully in the oven using the same method. The roasting time might vary slightly based on size and skin thickness.
Q: My roasted peppers seem watery. What happened?
A: This can happen if the peppers weren’t dried well before roasting, or if the baking sheet was too crowded, causing them to steam. Also, sometimes larger, juicier peppers release more liquid.
Q: How do I remove pepper burn from my skin?
A: Prevention (wearing gloves!) is best. If you do get chile burn, try washing your hands with soap and cold water, or soaking them in milk or yogurt. The fat in dairy can help dissolve the capsaicin.
Q: What’s the difference between green and red Hatch peppers?
A: Green Hatch peppers are unripe. Red Hatch peppers are ripe. Red peppers are often sweeter and can be slightly hotter than green ones from the same plant because the capsaicin develops as they ripen.
Q: Where can I buy New Mexico hatch chiles?
A: During their season (late summer/early fall), you can find them in grocery stores, farmers’ markets, and online. Some stores even have special “roasting events” outside.
Wrapping Up
Roasting Hatch peppers in your oven is a simple process with big rewards. It transforms the fresh chiles into a flavorful ingredient ready for countless recipes. By following these steps – from picking the right peppers and setting the oven temperature for roasting peppers, to understanding the roasting time hatch peppers need, mastering peeling roasted hatch chiles, and knowing how to handle storing roasted peppers and freezing roasted hatch peppers – you can easily enjoy the taste of New Mexico hatch chiles year-round. Happy roasting!