
Can I make my RV air conditioner quieter? Yes, you absolutely can make your RV air conditioner quieter using several methods ranging from simple do-it-yourself fixes to more involved modifications or even replacement. RV ACs can be loud. They often sit right over your living or sleeping area. This guide helps you tackle that noise. It covers why they are loud and how to make them quieter. You can get better sleep and enjoy your trips more.
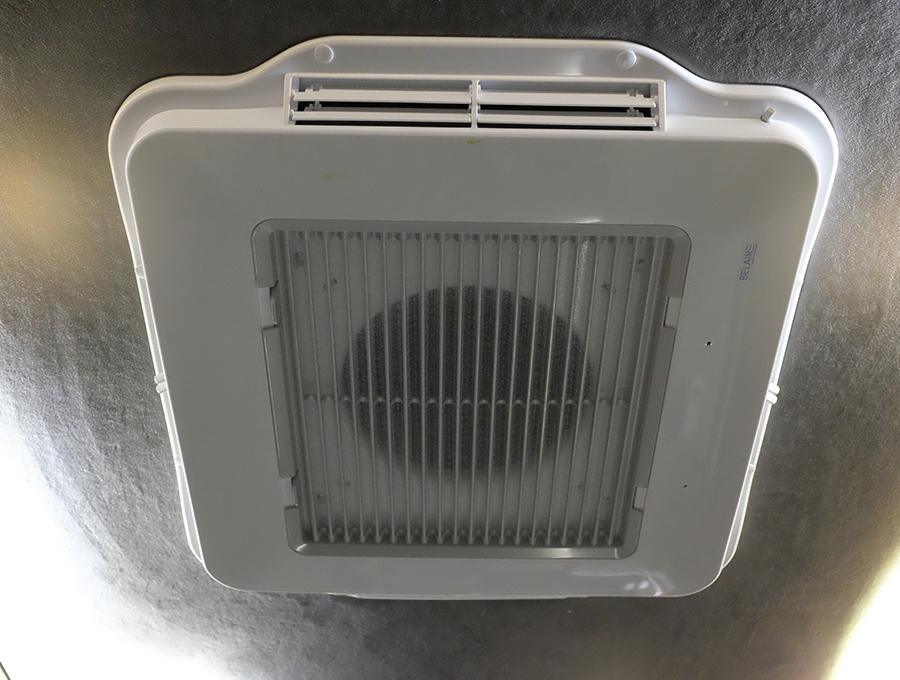
Image Source: www.upfittersresource.com
Why RV Air Conditioners Make Noise
RV air conditioners make noise for a few main reasons. They work hard. They move air and cool it down fast.
- Fan Noise: The fan pushes air. This air moves through ducts or into the room. Moving air makes noise. The fan blades themselves cut through the air. This causes sound too. A dirty or unbalanced fan makes even more noise. How to quiet a noisy RV AC fan is a common question.
- Compressor Noise: The compressor is the heart of the AC. It pumps the stuff that cools the air (refrigerant). This motor and pump action makes humming and vibrating sounds.
- Vibration: The whole unit sits on your RV roof. It has parts that move. These parts vibrate. This shaking travels through the roof and into your RV walls and ceiling. It can make the whole RV hum. Reduce RV air conditioner vibration is key to reducing noise.
- Airflow Noise: Air moving through the AC unit and vents can be loud. Turns and small spaces in the ducts make air speed up and get noisy.
- Age and Wear: Older units or those not cared for can get louder. Parts loosen up. Bearings wear out. This adds more noise.
Interpreting The Sources of RV AC Noise
You need to know where the noise comes from to fix it. Is it a hum, a buzz, or a rushing air sound?
- Humming or Buzzing: This often comes from the compressor or electrical parts. It can also be vibration transferring through the roof.
- Rushing Air: This is usually fan noise or airflow noise.
- Rattling or Clicking: This might mean a loose part, debris in the fan, or a worn motor bearing.
Pinpointing the noise helps you choose the right fix. RV AC noise reduction often involves tackling these different sources.
Simple DIY RV AC Noise Reduction Steps
You can do many things yourself. These steps are often cheap and easy. They can make a big difference. DIY RV AC noise reduction is a good place to start.
- Clean Your AC Filters and Coils: Dirty filters make the fan work harder. This makes it louder. Clean or replace your air filter regularly. The coils inside the unit also get dirty. Dirt makes the unit work harder and increases noise. Clean them gently.
- Check the Fan Blades: Turn off the power first! Look at the fan blades. Are they clean? Is there anything stuck in them? Even a small bit of dirt or a leaf can make the fan unbalanced. An unbalanced fan vibrates and makes noise. Clean the blades carefully.
- Tighten Loose Screws: Vibration can loosen screws. Check the screws on the inside cover of your AC unit. Check screws on the fan motor mount. Tighten them gently. Don’t overtighten. Loose screws let parts rattle.
- Clear Debris from the Rooftop Unit: Leaves, twigs, or bugs can get into the top part of the AC. This can block airflow or hit the fan blades. Turn off power. Remove the rooftop shroud. Clean out any debris.
These simple steps cost little to nothing. They improve how your AC works and make it quieter.
Using Sound Dampening Materials
Sound dampening materials help stop noise from traveling. They absorb sound waves or stop things from vibrating. RV air conditioner sound dampening uses special foams or materials.
h4. Types of Sound Dampening Materials
- Foam Sheets: Acoustic foam or simple foam padding can absorb sound. Open-cell foam works best for absorbing airborne sound.
- Mass Loaded Vinyl (MLV): This is a heavy, flexible material. It’s good at blocking sound. It adds weight to surfaces to stop them from vibrating easily.
- Rubber Mats or Pads: These can go under vibrating parts. They soak up shakes and stop them from passing into the RV structure.
- Butyl Rubber Mat with Foil (Car Sound Deadening Mats): These sticky mats are used in cars to stop metal panels from vibrating. They are heavy and stick well. They work on plastic AC covers too.
h4. Where to Apply Sound Dampening
You can add these materials in a few key places.
- Inside the AC Return Air Grill: This is the plastic cover inside your RV where the air gets sucked into the AC. It often rattles. It also lets noise from the fan and compressor directly into your living space.
- Remove the grill cover.
- Cut foam or MLV to fit inside the cover.
- Attach it using spray adhesive or tape. Make sure it doesn’t block the air holes.
- You can also line the inside of the air box above the grill. Use sticky sound deadening mats here. Cover the flat surfaces. Don’t block any moving parts or electrical items.
- Around the Compressor: Some AC designs let you add material around the compressor. This is harder. Only do this if you are comfortable working near electrical parts and pipes. Use dense foam or rubber mats. Be careful not to block airflow needed for cooling the compressor.
- On the Rooftop Shroud: The plastic cover on top of the RV can vibrate. Lining the inside of this shroud with sound deadening mats can help. This stops the shroud itself from making noise. It also helps a little with noise escaping upwards, but most noise comes down into the RV.
Soundproofing RV air conditioner involves adding mass or absorption. Dampening focuses on stopping vibration and soaking up sound near the source or entry points.
h4. Step-by-Step: Dampening the Indoor Grill Area
This is one of the most effective DIY RV AC noise reduction steps.
- Turn off all power to the RV, especially the AC circuit breaker. Safety first!
- Remove the indoor AC cover/grill. There are usually screws or clips holding it on.
- Look inside the air box. See where the noise comes from. You’ll see the fan and maybe some ducting.
- Plan where to put material. You want to cover flat plastic or metal surfaces in the air return path. Avoid putting material near moving parts (like the fan blades) or heating elements (if you have a heat pump). Do not cover intake vents fully, just line the inside surfaces.
- Cut your material. Use scissors or a utility knife. Measure the surfaces you want to cover. Sticky mats are easiest.
- Apply the material. Clean the surface first. Peel the backing (if it’s sticky) and press the material firmly onto the plastic or metal. Cover as much open, flat surface as possible inside the air box walls and ceiling.
- Add material to the grill cover. Cut pieces to fit flat areas on the inside of the plastic grill cover. Stick them on. Make sure the air vents are not blocked.
- Reinstall the grill cover. Screw it back on securely. Make sure it fits snugly.
- Restore power and test the AC. You should notice a reduction in noise, especially buzzing and rattling from the cover itself.
This method works well because it stops sound from coming straight down into the room. It’s a key Quiet RV AC solution for many RVers.
Insulating The RV AC Unit
Insulating RV AC unit helps in two ways: it keeps the cool air in better (improving efficiency) and it helps block sound. Insulation adds a barrier that sound has trouble passing through.
h4. Types of Insulation for RV AC
- Foam Board: Rigid foam insulation can be cut to fit specific spaces.
- Spray Foam (Minimal Expansion): Can fill small gaps. Use RV-specific foam that won’t damage materials. Be very careful around wires and moving parts.
- Fiberglass or Mineral Wool Batts: Common insulation types. Need to be kept dry. Might need a vapor barrier. Less ideal inside the AC unit itself due to moisture risk.
- Reflective Foil Insulation: Often used in RVs. Can help with heat and noise transfer.
h4. Where to Insulate
- Around the Air Box: The plastic air box that connects the roof unit to the ceiling grill can be thin. Wrapping or lining this box with insulation can block sound traveling through its walls. Use thin foam board or sticky foam insulation.
- Between the AC Unit and the Roof Opening: There is a seal here. Sometimes noise leaks through or around it. Adding more sealing material or a layer of thin insulation can help. You might need to access this from the roof (requires removing the entire AC unit, a bigger job) or from inside.
- Inside the Ceiling Plenum/Ducts (If Applicable): Some RVs have ducts in the ceiling. Sound travels through these. Lining the ducts with acoustic insulation or duct liner can help. This is a more advanced project.
Insulating specifically targets the sound that travels through the structure and the thin plastic parts. It complements sound dampening which focuses on vibration and direct airborne noise.
Reducing RV Air Conditioner Vibration
Vibration is a major source of noise. It rattles things and makes a deep hum. Reduce RV air conditioner vibration using these steps.
- Check Mounting Bolts: The main AC unit is bolted to the roof. These bolts go through the roof and into a frame inside the RV ceiling, often near the air box. If these bolts are loose, the unit can vibrate more.
- Access the bolts from inside the RV (usually hidden under the trim or air box).
- Tighten the bolts carefully. Don’t overtighten, as this can crack the plastic frame or compress the roof seal too much. Tighten them evenly.
- Add Anti-Vibration Pads: You can place rubber or foam pads between the AC unit and the roof mounting frame. This usually requires removing the unit from the roof. This is a bigger job, often needing two people. These pads soak up vibration before it enters the RV structure.
- Balance the Fan: An unbalanced fan wobbles as it spins. This causes vibration.
- Turn off power.
- Access the fan (usually from the roof).
- Check for anything stuck to the blades.
- If the blades look clean but it still vibrates a lot, the fan might need balancing. This is similar to balancing a car tire. Small weights are added to the blades. This is often a job for an HVAC technician unless you are very comfortable working on the unit.
- Check Compressor Mounts: The compressor sits on rubber mounts inside the rooftop unit. These mounts can wear out. Worn mounts don’t absorb vibration well. Replacing these mounts is usually a job for a qualified technician.
Addressing vibration is crucial for RV AC noise reduction. Loose parts and unbalanced components create significant noise.
Quiet RV AC Solutions From The Manufacturer
Sometimes the noise is due to the AC unit’s design. Some models are just louder than others. However, manufacturers also offer parts or kits to help.
- Improved Air Grills: Some manufacturers sell updated indoor air grills or plenums (the box above the grill). These might have better airflow design or include built-in sound dampening. These are designed to fit your specific model.
- Insulation Kits: Some brands offer insulation kits to improve the seal or add insulation inside the air box.
- Quieter Fan Motors or Blades: Rarely, a manufacturer might have an updated fan motor or blade design that is quieter. This is less common but worth checking if your unit is a known noisy model.
Check your RV AC unit’s brand and model number. Look up parts or accessories offered by the manufacturer. Sometimes aftermarket companies make specific kits for popular RV AC models.
Maintaining Your RV Air Conditioner for Less Noise
Regular maintenance is key to keeping your AC running smoothly and quietly. A well-maintained unit makes less noise than a neglected one.
- Regular Cleaning: Clean filters often (every month of heavy use). Clean coils yearly. Keep the rooftop unit clear of debris.
- Check Seals: The seal between the rooftop unit and the RV roof prevents leaks. A good seal also helps reduce vibration transfer. Inspect the seal periodically.
- Inspect Fan Motor Bearings: Listen for squealing or grinding sounds from the fan motor. This could mean the bearings are going bad. Lubricating or replacing bearings is possible but requires some technical skill.
- Check Refrigerant Levels: Low refrigerant can make the compressor work harder and louder. This requires a professional to check and refill.
Good maintenance prevents problems that cause noise later on. It keeps your unit running at its best.
Considering A Quieter RV Air Conditioner Replacement
If your current AC unit is old, inefficient, or simply too loud even after trying fixes, replacing it with a quieter model might be the best option. Quieter RV air conditioner replacement can be a significant investment but provides the most drastic noise reduction.
h4. What Makes an RV AC Unit Quiet?
Newer units often use improved technology:
- Better Fan Design: More aerodynamic blades move air more quietly.
- Improved Airflow Paths: Smoother internal designs reduce air rushing noise.
- Advanced Compressor Technology: Some use variable-speed compressors which run slower and quieter when less cooling is needed.
- Better Insulation and Dampening: Manufacturers build in more noise reduction materials from the start.
- Softer Starts: Some units ramp up slowly, avoiding a sudden loud jolt when they turn on.
h4. Choosing a Quieter Unit
- Check Noise Ratings: Look for units that list decibel (dB) levels. Lower numbers mean quieter operation. This information might be in the product specs or reviews.
- Read Reviews: Look for reviews from other RVers who have installed the unit. Do they mention if it’s quiet?
- Consider Brand Reputation: Some brands are known for making quieter units than others.
- Think About Features: Variable speed or ‘soft start’ features usually mean quieter operation, especially at night.
Replacing your unit is the most expensive solution. But it offers a fresh start with a modern, quiet design. It’s a permanent Quiet RV AC solution.
Advanced Soundproofing RV Air Conditioner Techniques
For those wanting to go further, more advanced soundproofing RV air conditioner methods exist. These often involve modifying the air distribution box or plenum inside the RV.
h4. Modifying the Air Box (Plenum)
The plastic box that sits flush with your RV ceiling is often the main culprit for noise transfer.
- Adding Internal Baffles: Baffles are structures that force air to turn corners. This can slow air down and absorb some sound waves. You can make simple baffles from foam board lined with acoustic foam. Install them carefully inside the air box, making sure not to block too much airflow.
- Creating a Layered Box: Some DIYers build a second, insulated box around the existing air box inside the ceiling. This is like building a soundproof room within a room for the AC unit’s lower part. This requires carpentry skills and access to the ceiling space around the AC.
- Lining with MLV and Foam: A high-level approach is to line the inside of the air box structure thoroughly. Use MLV to add mass and block sound, then cover the MLV with acoustic foam to absorb sound. This is best done when the AC unit is removed.
These advanced methods require more effort and materials. They can provide excellent RV AC noise reduction if done correctly. They are definitely part of the DIY RV AC noise reduction approach but are more complex than simple grill dampening.
The Role of Airflow
Good airflow is important for both cooling performance and noise levels.
- Blocked Vents: Make sure all your RV’s AC vents are open and not blocked by curtains or items stored nearby. Blocked vents make the system work harder and push air faster through the open vents, increasing noise.
- Clean Ducts: If your RV has ducted AC, the ducts can get dirty. This restricts airflow. Cleaning the ducts can help.
- Proper Sizing: An AC unit that is too small for your RV will run constantly at full power, making maximum noise. One that is too large might cycle on and off loudly. Ensure your unit is the right size for your space.
Optimizing airflow helps the unit run efficiently and reduces the need for the fan to push air harder than needed.
Summary of Quiet RV AC Solutions
Making your RV AC quieter involves several steps.
- Start Simple: Clean filters, check for debris, tighten loose screws.
- Add Dampening: Use sticky mats or foam inside the air grill and air box to stop vibrations and absorb sound. This is effective for RV air conditioner sound dampening.
- Insulate: Add insulation around the air box to block sound transfer through the structure. Insulating RV AC unit improves the sound barrier.
- Reduce Vibration: Check mounting bolts. Add anti-vibration pads if possible. Address fan balance. These steps help Reduce RV air conditioner vibration.
- Maintain: Keep your unit clean and serviced.
- Advanced DIY: Modify the air box with baffles or extra layers for more soundproofing.
- Replace: If needed, install a newer, quieter model for a permanent solution (Quieter RV air conditioner replacement).
Combining these methods gives the best results for RV AC noise reduction. Tackling the noise from different angles (fan, compressor, vibration, airflow) provides the most effective Quiet RV AC solutions. Don’t forget that RV rooftop air conditioner noise travels directly below, so fixes inside the RV are often the most impactful.
Table of Common RV AC Noise Sources and Fixes
| Noise Source | Sound Type | Primary Cause | Fixes | Difficulty | Cost |
|---|---|---|---|---|---|
| Fan | Rushing Air, Whining | Airflow, Blade design, Imbalance | Clean fan, Check for debris, Balance fan, Quieter fan replacement | Easy to Med | Low to Med |
| Compressor | Humming, Buzzing | Motor operation, Vibration | Add dampening near compressor, Check mounts, Quieter unit replacement | Med to Hard | Med to High |
| Vibration | Rattling, Deep Hum | Loose mounts, Unbalanced parts | Tighten bolts, Add anti-vibration pads, Balance fan | Easy to Med | Low to Med |
| Air Box/Grill | Rattling, Direct Noise | Thin plastic, Lack of dampening | Add dampening mats/foam inside grill/box, Insulate air box | Easy | Low |
| Airflow through Vents | Rushing Air | Restricted flow, Vent design | Clean filters/coils, Unblock vents, Clean ducts, Improve air box design | Easy to Med | Low to Med |
| Age/Wear | Various | Worn bearings, Loose parts, Decay | Maintenance, Replacement of worn parts, Full unit replacement | Med to Hard | Med to High |
Frequently Asked Questions (FAQ)
h3. Can I make my old RV air conditioner completely silent?
No, you likely cannot make it completely silent. All air conditioners make some noise because they move air and have moving parts. The goal is to make it much quieter and less annoying.
h3. Is it safe to add materials inside my RV air conditioner?
You must be very careful. Turn off all power first. Only add materials to static surfaces in the air return or supply path. Do NOT put anything near moving parts (like the fan) or heating elements. Do NOT block air intake or exhaust vents. Use materials safe for use in air handling systems (non-flammable, non-toxic). When in doubt, consult the AC manual or a professional.
h3. Will cleaning my RV AC make it quieter?
Yes, often cleaning filters, coils, and removing debris from the fan and top unit can make a noticeable difference. Dirt makes the unit work harder and can cause imbalance or restricted airflow, leading to more noise.
h3. How much does it cost to quiet an RV air conditioner?
Simple DIY steps like cleaning or adding cheap foam might cost $10-$50. Using specialized sound deadening mats and insulation might cost $50-$200 depending on how much you use. Professional repairs (like balancing a fan or replacing mounts) could cost $100-$500+. Replacing the entire unit with a quiet model can cost $800-$2000 or more, plus installation.
h3. Should I buy a special quiet RV air conditioner cover for the roof?
Some aftermarket companies sell ‘quiet covers’ or ‘soft start’ kits. The covers are usually designed to change the airflow pattern or add some dampening. Reviews are mixed. They might help a little with noise escaping upwards, but they often don’t significantly reduce the noise heard inside the RV. A soft start kit helps with the loud jolt when the compressor kicks on but doesn’t change the running noise level much.
h3. How often should I do RV AC maintenance?
Clean filters monthly during heavy use. Clean coils and check for debris on the roof unit at least once a year, or more often if you camp in dusty or leafy areas. Check mounting bolts yearly.
h3. Can a technician help reduce the noise?
Yes, a qualified RV technician or HVAC technician can help. They can diagnose mechanical issues like worn bearings, unbalanced fans, or bad compressor mounts. They can also check refrigerant levels and ensure the unit is running efficiently. They can also professionally install anti-vibration pads or replace the unit with a quieter model.
h3. Does the age of the RV AC unit matter for noise?
Yes, older units are often louder due to older technology, less built-in noise reduction, and potential wear and tear on parts like bearings and mounts.
h3. Is DIY RV AC noise reduction difficult?
Simple steps like cleaning and adding dampening to the indoor grill are easy. More advanced steps like accessing the rooftop unit or modifying the air box require more comfort with tools and working on your RV. Always turn off power and follow safety guidelines.
h3. What is the most effective way to quiet an RV AC?
Often, a combination of methods is most effective. Dampening the indoor air box/grill and addressing any obvious vibration sources are usually the best first steps for DIYers. For maximum reduction, replacing an old unit with a modern, quiet model is the most impactful but most expensive option.
Getting better sleep in your RV is possible. By tackling the noise from your air conditioner, you make your space more comfortable. Use these tips to find the quiet RV AC solutions that work for you. Enjoy your travels, and sleep well!