
Can you extend speaker wire? Yes, you absolutely can extend speaker wire. Many people need longer cables for their sound systems. You might move a speaker, change your room layout, or set up speakers far from your amplifier. Knowing how to extend speaker cable safely and effectively is key to keeping good sound quality. This guide will show you the best ways to extend your audio cable extension and connect everything correctly.
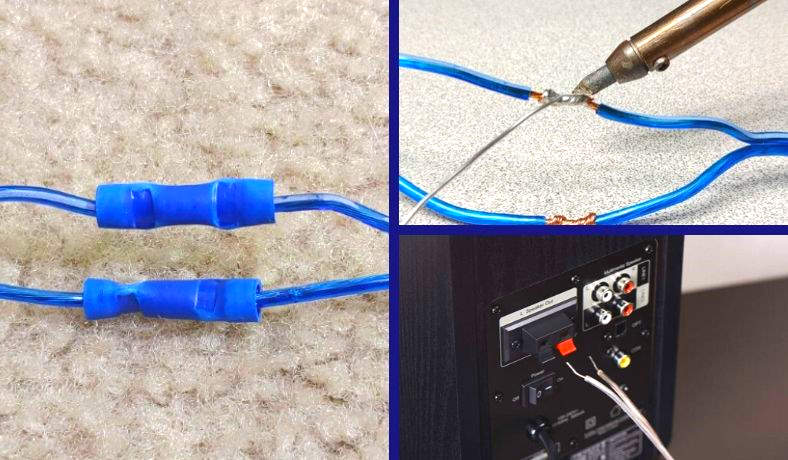
Image Source: soundcertified.com
Why You Might Need Longer Cables
Sometimes the cables that come with speakers or that you bought originally are just too short. You might want to place surround sound speakers across a large room. Maybe you are hiding wires inside walls or under floors. You could be setting up outdoor speakers. In all these cases, you need extra length. Extending the speaker cable lets you put your speakers exactly where you want them for the best sound or look in your space.
What Happens When You Make Cables Longer
Making a speaker cable longer can sometimes affect the sound. This is called signal loss speaker cable. A longer wire adds more resistance. Resistance makes the electrical signal that carries the sound a little weaker. It can also change the sound quality slightly, especially the bass.
The amount of signal loss depends on a few things:
* How much longer the cable is.
* How thick the wire is (speaker wire gauge). Thicker wire has less resistance.
* The quality of the wire and the connections you make. Good connections are very important.
Using the right type and thickness of wire helps a lot. Making strong, clean connections also helps reduce signal loss.
Choosing the Right Wire
Picking the right speaker wire is a big deal when you extend it. Speaker wire gauge tells you how thick the wire is. Gauge is measured with numbers. A smaller number means a thicker wire. For example, 12 gauge wire is thicker than 16 gauge wire.
Thicker wire has less electrical resistance. This is important for longer cable runs. If you use thin wire for a long distance, you will have more signal loss. Your speakers might not sound as good or as loud as they should.
Here is a simple guide for choosing speaker wire gauge based on length:
| Length of Cable (Each Speaker) | Recommended Speaker Wire Gauge | Notes |
|---|---|---|
| Up to 50 feet (15 meters) | 16 gauge | Good for most common setups. |
| 50 to 100 feet (15-30 meters) | 14 gauge | Better for slightly longer distances. |
| Over 100 feet (30 meters) | 12 gauge or 10 gauge | Best for very long runs or high power. |
Using wire that is too thin is a common mistake. Always go a little thicker if you are unsure, especially for longer runs or powerful amplifiers. Make sure the new wire you use to extend matches the quality of your existing wire if possible.
Different Ways to Extend Speaker Cable
There are a few main methods to extend speaker wire. Each method has its good points and bad points.
- Method 1: Buy a new, longer cable. This is often the best way if you can do it. It avoids making any splices or connections in the middle of the cable run. This keeps the signal path clean and simple, which means less signal loss. However, it might mean buying a completely new cable for each speaker.
- Method 2: Splice speaker wire. This means joining the ends of two pieces of wire together. You can do this using mechanical wire connectors for speakers or by soldering the wires together.
- Method 3: Use speaker terminal blocks. These are small boxes or strips that let you connect wires together using screws or clips.
Let’s look at splicing methods in more detail.
Getting Ready to Splice
Before you start cutting and joining wires, get everything ready.
- Gather your tools: You will need wire strippers, wire cutters, and possibly a soldering iron, solder, and heat shrink tubing depending on the method. You will also need the new speaker wire.
- Turn off power: Always turn off your amplifier or receiver before working with speaker wires. Unplug it from the wall power source just to be safe. This prevents damage to your equipment or yourself.
- Plan your path: Figure out where the extended cable will go. Measure the distance carefully so you buy the right amount of new wire. Add a little extra for mistakes and turns.
- Check your wires: Speaker wire has two conductors, usually covered in red and black insulation. Red is usually positive (+), and black is negative (-). It is very important to keep this straight when you make your connections. Mixing them up (reversing polarity) will make your speakers sound weak and strange.
How to Splice Wire Using Wire Connectors
Using mechanical wire connectors for speakers is one of the easier ways to splice speaker wire. These connectors join the wires together without heat. They are good for many home setups.
There are different types of wire connectors you can use:
- Twist-on wire nuts: These are cone-shaped plastic caps that you twist onto twisted bare wires.
- Crimp connectors: These require a crimping tool to squeeze a metal sleeve onto the wires.
- Lever connectors (like Wago connectors): These have small levers you lift to open a slot, push the wire in, and then close the lever to hold the wire tight. These are often considered very reliable and easy to use.
Here are the steps using lever connectors as an example, as they are user-friendly:
h4: Steps for Splicing with Lever Connectors
- Cut the existing wire: Cut the speaker wire where you need to add the length. Cut it cleanly.
- Strip the ends: Use wire strippers to remove about 1/2 inch (about 1-1.5 cm) of insulation from the end of the existing speaker wire. Do this for both the red and black wires. Be careful not to cut any of the small wire strands.
- Prepare the new wire: Take the new speaker wire you are adding. Strip about 1/2 inch of insulation from one end. Do this for both the red and black wires.
- Open the connector levers: Take a lever connector (you will need one for the red wires and one for the black wires). Flip the small levers up to open the slots.
- Insert the wires: For the red connector, push the bare end of the red existing wire into one slot. Push the bare end of the red new wire into another slot on the same connector. Make sure the bare wire goes all the way in.
- Close the levers: Push the levers back down. They should click and hold the wires tightly in place.
- Repeat for black: Do the same thing for the black wires using a second connector. Push the bare end of the black existing wire into one slot of the second connector. Push the bare end of the black new wire into another slot. Close the levers.
- Check the connection: Gently pull on the wires to make sure they are held firmly by the connector.
- Secure the connection: The connectors themselves provide some insulation, but it’s a good idea to wrap each connector separately with electrical tape for extra safety and to prevent them from touching each other. You can also wrap both connected connectors together to make the splice neat.
h5: Pros of Wire Connectors
- Easy and fast to do.
- Does not require special skills like soldering.
- Connectors like Wago provide a very solid grip on the wires.
h5: Cons of Wire Connectors
- Can be bulky.
- Lower quality connectors might not make a perfect connection, leading to slight signal loss over time.
- Twist-on wire nuts can sometimes come loose if not done correctly.
How to Solder Speaker Cable
Soldering creates a very strong electrical connection by melting solder to join the wires. Many audio lovers prefer soldering because it makes a solid bond with less chance of signal loss over time compared to some mechanical connectors. However, it requires a bit more skill and tools.
h4: Tools Needed for Soldering
- Soldering iron
- Solder (resin core is good for electronics)
- Wire strippers
- Wire cutters
- Heat shrink tubing (best way to insulate the solder joint)
- Heat gun or lighter (to shrink the tubing)
- Helping hands tool (optional, but very useful for holding wires)
- Safety glasses
h4: Steps for Soldering Speaker Cable
- Cut the existing wire: Cut the speaker wire cleanly where you need to extend it.
- Strip the ends: Strip about 1/2 inch (1-1.5 cm) of insulation from the ends of both the existing wire and the new wire. Be careful not to cut the wire strands.
- Slide on heat shrink tubing: THIS IS IMPORTANT! Before you join the wires, slide two pieces of heat shrink tubing onto one of the wires you are joining. One piece should be large enough to cover the final splice. The other piece should be smaller, just big enough to cover a single soldered joint (one for red, one for black). Slide them far down the wire away from the ends you will be working on. You will not be able to get them on after soldering.
- Twist the strands (optional but helpful): Gently twist the small wire strands of each bare wire end together.
- Tin the wires: Turn on your soldering iron and let it heat up. Apply a small amount of solder to the tip of the iron. Then, touch the heated tip to the bare wire ends and touch the solder to the wire (not the iron tip). The solder should melt and flow into the wire strands. This is called “tinning” and makes joining easier.
- Join the red wires: Take the tinned bare end of the red existing wire and the tinned bare end of the red new wire. Twist them gently or overlap them side-by-side.
- Solder the red joint: Touch the heated soldering iron tip to the twisted/overlapped wires. Then touch the solder to the joint (not the iron). The solder should melt and flow smoothly, covering the twisted wires and joining them together. Remove the solder, then remove the iron. Let the joint cool for a few seconds without moving it.
- Insulate the red joint: Slide one of the smaller pieces of heat shrink tubing over the cooled solder joint. Make sure it covers all the bare wire and solder.
- Shrink the tubing: Use a heat gun (best) or carefully use a lighter moved back and forth to heat the tubing. It will shrink down tightly around the soldered joint, making a secure, insulated connection. Be quick if using a lighter to avoid burning the wire insulation.
- Join and solder the black wires: Repeat steps 6-9 for the black wires, using the second piece of smaller heat shrink tubing.
- Insulate the whole splice: Slide the larger piece of heat shrink tubing over both the red and black insulated joints. This covers the entire splice area.
- Shrink the large tubing: Heat the large tubing until it shrinks tightly, covering both connections and making the splice neat and protected.
h5: Pros of Soldering
- Creates a very strong, reliable electrical connection.
- Less likely to loosen over time compared to some mechanical connectors.
- Preferred method for many audio enthusiasts.
h5: Cons of Soldering
- Requires specific tools (soldering iron, solder, heat gun).
- Requires more skill and practice than using connectors.
- Heat is involved, so there is a risk of burns or damage if not careful.
Using Speaker Terminal Blocks
Speaker terminal blocks are another way to make a connection. They are often used when setting up complex wiring, like in audio racks or wall plates. They provide a screw or spring-clip terminal for each wire.
h4: How Terminal Blocks Work
Terminal blocks usually have pairs of connectors. You connect the end of your existing speaker wire into one side (e.g., using screws to hold the bare wire). Then you connect the end of your new speaker wire into the other side of the same connector pair.
h4: Steps Using a Terminal Block
- Prepare the wires: Strip about 1/2 inch (1-1.5 cm) of insulation from the ends of both the existing speaker wire and the new speaker wire.
- Connect existing wire: Open the terminal block’s screws or clips for one connection pair (one for red, one for black). Insert the bare end of the existing red wire into the red terminal. Tighten the screw or close the clip firmly to secure the wire. Do the same for the existing black wire into the black terminal.
- Connect new wire: Insert the bare end of the new red wire into the matching red terminal on the other side of the block. Tighten the screw or close the clip. Do the same for the new black wire.
- Check connections: Gently pull on the wires to ensure they are held tight.
- Mount the block: If the terminal block is meant to be mounted, secure it to a wall or panel.
h5: Pros of Terminal Blocks
- Makes neat, organized connections.
- Easy to change wiring later.
- Provides secure connections if screws are tight.
h5: Cons of Terminal Blocks
- Adds another point of connection in the signal path, potentially adding a tiny bit of resistance.
- Can be bulkier than soldered or simple connector splices.
The Best Way: A New, Longer Cable
While splicing is possible, the very best way to get a longer speaker cable run is to replace the existing cable with a single, new cable of the needed length.
h4: Why Replacing is Often Better
- Purest Signal: There are no splices or connections in the middle. This means the signal travels from the amplifier speaker connection all the way to the speaker terminal blocks (or bare wire connection speaker points) in one clean piece of wire.
- Least Signal Loss: Fewer connection points mean less added resistance and less chance of signal degradation.
- Most Reliable: No splice means no splice to fail or come loose over time.
- Cleaner Look: One continuous cable often looks neater than a spliced cable, especially if the splice isn’t hidden well.
If replacing the cable is an option (e.g., the original cable isn’t built into a wall, and the cost of new wire is reasonable), it’s usually the recommended approach for the best audio performance and long-term reliability.
Connecting to Your Amplifier and Speakers
After you have the cable the right length, you need to connect it properly. You will connect one end to your amplifier or receiver and the other end to your speaker.
h4: Amplifier Speaker Connection
Amplifiers and receivers have speaker terminals on the back. These usually look like:
* Binding Posts: These are common on higher-end equipment. They have a post you can connect bare wire, spade connectors, or banana plugs to, and a cap you screw down to tighten.
* Spring Clips: These are often found on smaller or older units. You push a clip down, insert the bare wire, and let the clip go to hold the wire.
h4: Steps for Amplifier Connection (Binding Posts)
- Prepare the wire: Use wire strippers to remove about 1/2 to 3/4 inch (1-2 cm) of insulation from the very end of the speaker wire.
- Twist the strands: Gently twist the bare wire strands together into a neat bundle.
- Unscrew the binding post cap: Loosen the cap on the correct speaker terminal (make sure you are connecting the correct channel – left speaker to left terminal, right to right). Notice the red (+) and black (-) posts.
- Insert the bare wire: Push the twisted bare wire end into the hole on the side or top of the binding post. Make sure no stray strands are sticking out.
- Tighten the cap: Screw the cap back down firmly. This clamps the wire in place. Do not overtighten, just make it snug.
- Check connection: Gently pull on the wire to make sure it’s secure. Make sure the red wire goes to the red post and the black wire to the black post for that speaker channel.
h4: Steps for Amplifier Connection (Spring Clips)
- Prepare the wire: Strip about 1/2 inch (1-1.5 cm) of insulation from the end of the speaker wire.
- Twist the strands: Twist the bare wire strands together neatly.
- Press the clip: Press down on the spring clip for the correct terminal (red for +, black for -).
- Insert the bare wire: Insert the twisted bare wire end into the slot that opens up.
- Release the clip: Let go of the clip. It will spring back and hold the wire.
- Check connection: Gently pull to make sure it’s held. Verify red to red, black to black.
h4: Speaker Terminal Blocks (Connecting to Speakers)
Speakers also have terminals. These are often binding posts or spring clips, just like on the amplifier. Some speakers use push terminals or have the wire permanently attached.
If your speaker has binding posts or spring clips, follow the same steps as connecting to the amplifier terminals.
If your speaker has a bare wire connection speaker point where you just insert the wire directly into a hole and tighten a screw, follow these steps:
h4: Steps for Bare Wire Connection Speaker
- Prepare the wire: Strip about 1/4 to 1/2 inch (about 0.5-1 cm) of insulation from the end of the speaker wire.
- Twist the strands: Twist the bare wire strands together.
- Loosen the screw: Find the screw next to the wire entry hole on the speaker terminal. Loosen it, but don’t remove it.
- Insert the bare wire: Insert the twisted bare wire end into the hole or slot next to the screw.
- Tighten the screw: Tighten the screw down firmly onto the bare wire. This clamps it in place.
- Check connection: Gently pull on the wire to check it. Make sure you connect the red wire to the positive (+) terminal and the black wire to the negative (-) terminal on the speaker. Speakers usually mark these clearly.
h5: Importance of Polarity
Always connect red to red (+) and black to black (-) at both the amplifier and the speaker. This keeps the speaker cones moving in the correct direction (forward and backward) in time with the music. If you mix up the polarity on one speaker, it will be “out of phase” with the others. The sound will be thin, lack bass, and sound strange. Double-check your connections before turning on the system.
Protecting Your Connections
Once you have made a splice or connection, protect it.
- Insulation: Use electrical tape or heat shrink tubing to cover any bare metal parts. This prevents short circuits, which can damage your amplifier.
- Strain Relief: Make sure the connection point is not under tension. Secure the wires nearby so the splice or terminal block isn’t constantly being pulled or bent.
- Protection from Environment: If the splice is in a wall, ceiling, or damp area, use appropriate junction boxes and weather-rated connectors or sealants to protect it from moisture and physical damage.
Things to Avoid When Extending Speaker Cable
- Using household electrical wire: Speaker wire is designed for audio signals. Do not use standard electrical wire meant for lights or outlets.
- Making poor connections: Loose or corroded connections are major causes of signal loss and bad sound. Take your time and make them right.
- Using wire that is too thin: As discussed, thin wire on long runs causes signal loss. Refer to the gauge table.
- Mixing up polarity: Red to red, black to black, always!
- Leaving bare wires exposed: Always insulate connections to prevent short circuits.
Testing Your Extended Cable
After you have made all your connections, it’s time to test.
- Double Check: Look over all your connections again. Are they secure? Is the polarity correct? Is bare wire insulated?
- Connect Equipment: Plug your amplifier/receiver back in.
- Turn Volume Low: Start with the volume very low.
- Play Audio: Play some music or audio.
- Listen Carefully: Listen to each speaker individually if possible (some receivers have balance controls or test tones). Do they sound clear? Is there any buzzing or humming? Does the bass sound right?
- Check All Speakers: Make sure all speakers connected with the extended wire are working correctly and sound good together.
If the sound is weak, distorted, or lacks bass, recheck your connections, wire gauge, and polarity. A faulty splice or incorrect polarity is a common issue.
Recapping Speaker Wire Extension Methods
To sum up the audio cable extension options:
- Best Quality (If Possible): Replace the entire cable with a single, longer piece of the correct speaker wire gauge.
- Good Splicing Method: Soldering provides a strong, reliable connection, especially when insulated with heat shrink tubing.
- Easier Splicing Method: High-quality wire connectors for speakers (like lever connectors) offer a quick and secure splice without heat. Twist-on nuts and crimp connectors are also options but may be less reliable if not done perfectly.
- Organized Connection: Speaker terminal blocks are useful for neat wiring points, especially in installations.
No matter which method you choose to splice speaker wire, the quality of the connection matters greatly. A bad connection can ruin even the best speaker wire and equipment.
Caring for Your Speaker Cables
Once your speaker cables are set up with the right length, a little care helps them last and perform well.
- Avoid Sharp Bends: Don’t bend the cables too sharply. This can damage the wires inside.
- Protect from Damage: Keep cables away from places where they might be stepped on, chewed by pets, or pinched by furniture.
- Secure Cables: Use cable clips or ties to secure cables along walls or baseboards. This looks neater and prevents tripping hazards or accidental damage.
- Keep Connections Clean: If connections are exposed (like at the back of an amplifier), keep them clean and dust-free.
Extending your speaker cables lets you customize your audio setup for the best sound and look in your room. By choosing the right wire, using a proper extension method, and making careful connections, you can enjoy great sound quality even with longer cable runs.
Frequently Asked Questions
h3: FAQ
h4: Will extending speaker wire reduce sound quality?
Yes, extending speaker wire can reduce sound quality slightly, mainly due to signal loss from increased resistance. This effect is usually small if you use a thick enough wire (correct speaker wire gauge) for the length and make high-quality connections (like soldering or good wire connectors for speakers). Using a new, longer single cable is often the best way to avoid this.
h4: What is speaker wire gauge and why does it matter?
Speaker wire gauge is a measure of how thick the wire is. A lower gauge number means a thicker wire. Thicker wire has less electrical resistance. For longer cable runs, thicker wire is better because it reduces signal loss speaker cable and helps maintain sound quality, especially bass.
h4: Is soldering speaker wire necessary for a good connection?
No, soldering is not always necessary. High-quality mechanical wire connectors for speakers, like lever connectors, can also provide a very good and reliable connection. Soldering makes a permanent bond that many people prefer for long-term reliability and minimal signal loss, but it requires tools and skill.
h4: Can I just twist speaker wires together and tape them?
Twisting wires together and taping them is generally not recommended for speaker wire extension methods. The connection is not very secure, can come loose, may corrode over time, and the tape might not provide proper insulation, risking short circuits. Using proper connectors or soldering is much better for sound quality and safety.
h4: How do I make sure I connect the wires correctly (polarity)?
Speaker wire usually has markings to show polarity, typically red for positive (+) and black for negative (-). Some wire has a stripe or text on one wire instead of color. Always connect the positive terminal on your amplifier speaker connection to the positive terminal on your speaker terminal blocks (or bare wire connection speaker points). Connect the negative on the amp to the negative on the speaker. Do this for every speaker. Consistency is key.
h4: What happens if I mix up the red and black speaker wires?
If you mix up the red and black wires on one speaker, that speaker will be out of phase. Its sound waves will move in the opposite direction from your other speakers. This makes the audio sound thin, weakens the bass, and makes it hard to tell where sounds are coming from (poor imaging). It won’t damage your equipment, but it will sound wrong. Just swap the wires back to fix it.
h4: What are speaker terminal blocks used for?
Speaker terminal blocks are connection points that use screws or clips to hold speaker wires. They are often used for organizing wiring, such as connecting wires from the wall to speakers, or as a central point for multiple wire runs. They provide a secure way to join wires without direct splicing, useful in installations.