
Can you dry cherries in a regular oven? Yes, absolutely! Your regular home oven is a great tool for making delicious dried cherries right in your kitchen. It works much like a food dehydrator, just using a very low temperature and airflow to slowly remove water from the fruit. This guide will show you the simple steps. You can turn fresh cherries into a chewy, sweet snack. This is the oven dehydrating cherries method many people use.
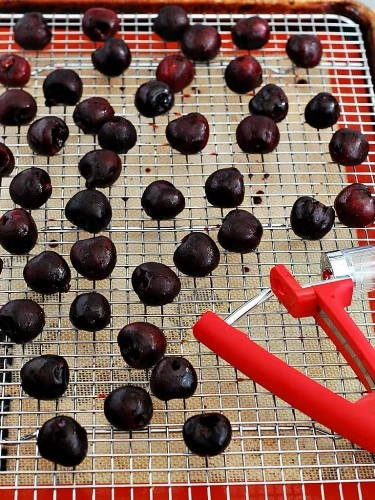
Image Source: www.theredheadbaker.com
Why Make Oven Dried Cherries?
Why dry cherries at home? There are many good reasons.
* Fresh cherries don’t last long. Drying them helps keep them for many months.
* Dried cherries are a tasty snack. They are sweet and a little tart.
* You can add them to food. Put them in oatmeal, granola, baked goods, or salads.
* You control what goes in. No added sugar or oil, just the fruit.
* Save money. Drying fresh cherries you bought or picked can cost less than buying dried ones.
* It is a simple project. Making homemade dried cherries oven is easy once you know how.
Grasping the Basics: How Oven Drying Works
Making dried cherries in the oven is simple. You use gentle heat. This heat takes out the water. Removing water stops bad things from growing. It makes the fruit safe to store. It also makes the fruit chewy.
Think of it like slow baking. But the heat is much lower. You want to dry the cherries, not cook them. A very low temperature is key. Air moving around helps too. This helps the water leave the cherries faster.
What You Need
You do not need fancy tools. You likely have most things already.
* Fresh cherries. Pick ripe ones.
* A knife or cherry pitter. For taking out the pits.
* Paper towels or a clean cloth. To dry the cherries.
* Baking sheets. Flat pans that go in your oven.
* Parchment paper or a silicone mat. To put on the baking sheet. This stops cherries from sticking.
* An oven. Your regular kitchen oven is perfect.
* An oven thermometer (helpful). To check the real temperature of your oven. Some ovens are not exact.
* Airtight containers. For storing your dried cherries. Jars or plastic containers work well.
Picking the Right Cherries
The kind of cherry matters a little. Both sweet and tart cherries work.
* Sweet cherries: Like Bing or Rainier. They dry into a very sweet snack.
* Tart cherries: Like Montmorency. They dry into a tangier snack. They are great for baking.
Drying sweet cherries in oven often results in a sweeter chew. Tart cherries might need a little sugar if you want them sweeter, but they are good plain too.
Choose cherries that are ripe and firm. Do not use soft or bruised ones. Wash them well under cool water.
Step-by-Step Guide: Your Oven Dried Cherries Recipe
This is your basic plan for making homemade dried cherries oven. It is easy to follow.
Step 1: Prepare Your Cherries
This is a very important step.
* Wash: Wash all your cherries. Put them in a colander. Rinse them under cool running water. Get rid of any dirt or stems.
* Dry: Dry the cherries well. Use paper towels or a clean kitchen towel. Gently pat them dry. Extra water means longer drying time. So dry them as much as you can.
* Stem: Pull off all the stems.
* Pit: This is the biggest job. You need to take out the hard seed inside.
* You can use a cherry pitter tool. This is the fastest way. It pops the pit out.
* You can use a small knife. Cut around the cherry. Like cutting a peach. Twist the halves. Pull out the pit. This takes more time.
* You can use a pastry tip or chopstick. Push the wide end of a pastry tip or a chopstick through the stem end. Push the pit out the other side. It takes practice.
Make sure all pits are gone. Dried cherries are hard. A pit inside could break a tooth.
Step 2: Set Up Your Baking Sheets
Get your baking sheets ready.
* Cover your baking sheets. Use parchment paper or a silicone baking mat. This stops the cherries from sticking badly.
* Do not use wax paper. It can melt in the oven.
Step 3: Place Cherries on Sheets
Spread the pitted cherries on the covered baking sheets.
* Arrange them in a single layer. The cherries should not touch each other.
* If they touch, they will not dry well. Air needs to get all around each cherry.
* Use as many baking sheets as you need. Do not crowd the pans.
Step 4: Preheat Your Oven
This is where the heat comes in.
* You need a very low temperature. This is key for drying cherries in oven low temperature.
* Set your oven to its lowest setting. This is usually between 150°F and 200°F (about 65°C to 90°C).
* What is the best temperature for drying cherries in oven? Many people like 175°F (about 80°C). This is a good middle ground. It is low enough not to cook them. It is warm enough to dry them over time.
* If your oven goes lower, even better. As low as 135°F (57°C) is great if your oven can do it. The lower the temperature, the longer it takes. But it is safer for keeping the fruit natural.
* If your oven does not go below 200°F, you can still dry cherries. You might need to watch them more closely. You might also prop the oven door open slightly. (More on this later).
* Let the oven get to the right heat. Give it 15-20 minutes. If you have an oven thermometer, check the real temp.
Step 5: Start the Drying
Put the baking sheets with cherries into the preheated oven.
* Place them on different racks. This helps air move.
* You can dry multiple sheets at once. Just make sure air can still move.
Step 6: Help Air Move (Optional but Recommended)
Good air movement helps water leave the cherries.
* If your oven does not have a fan (convection), you can help air move.
* Open the oven door a tiny bit. You can use a wooden spoon. Stick the handle in the door. This keeps the door open just an inch or two.
* This lets moist air leave the oven. It lets drier air come in. This speeds up drying.
* Be careful doing this. The oven is on. Keep kids and pets away.
Step 7: Dry Them Low and Slow
This is the drying cherries in oven low temperature part.
* You will dry the cherries for many hours. It takes time.
* How long to dry cherries in oven? There is no single answer. It depends on:
* Your oven’s exact temperature.
* How juicy the cherries are.
* How big the cherries are.
* How dry you want them.
* It usually takes between 4 to 10 hours. Sometimes it can take a bit longer.
* Check the cherries now and then. Look at them every 1-2 hours at first. Later, check more often.
Step 8: Rotate and Check
While they dry, do a few things.
* After 2-3 hours, rotate your baking sheets. Move the top sheet to the bottom. Move the bottom sheet up. This helps them dry evenly.
* You can also turn the cherries over. This helps the bottom part dry. It is okay if you do not turn every single one. But turning helps.
Step 9: Check for Doneness
Knowing when they are done is important. This is part of the how long to dry cherries in oven process.
* Start checking after about 4 hours.
* Take a cherry out. Let it cool for a minute.
* Squish it between your fingers. What does it feel like?
* A perfectly dried cherry should be:
* Wrinkled. It will look smaller and have lines on it.
* Chewy. It should not be hard like a rock.
* No longer squishy inside. If you tear it open, it should not look wet inside. There should be no juice.
* Bendable. It should bend without juice coming out. It should not break easily.
* They should feel like raisins. Maybe a little firmer than raisins.
* If they feel wet or squishy inside, they need more time.
* If they are hard like pebbles, they might be over-dried. This happens if the temp was too high or they dried too long. But usually, they just get very chewy.
* Keep checking every 30-60 minutes after about 4 hours. Different size cherries on the same sheet will dry at different speeds. Take out the ones that are done. Leave others in longer.
Step 10: Cool the Dried Cherries
Once they are chewy and not wet inside, take them out of the oven.
* Leave them on the baking sheets. Let them cool completely.
* This takes an hour or two.
* As they cool, they get a little firmer.
* Cooling fully helps you know if they are truly dry enough for storage.
Step 11: The Conditioning Step
This is a step many people skip, but it helps. It makes sure your homemade dried cherries oven will store well.
* After cooling, put the dried cherries in a glass jar. Do not fill it all the way.
* Close the lid loosely. Or cover it with a cloth and rubber band.
* Let the jar sit at room temperature for a week. Shake the jar each day.
* What you are doing: If any cherry had a little bit more moisture than others, this moisture spreads out. It makes the dryness level equal among all the cherries.
* If you see any moisture drops inside the jar, the cherries are not dry enough. Put them back in the oven for an hour or two. Then cool and condition again.
* If they all seem good after a week, they are ready for storage.
Storing Oven Dried Cherries
Now you have your finished product. Learning about storing oven dried cherries is important so they last.
* Use airtight containers. Glass jars with tight lids are best. Plastic containers that seal well also work.
* Make sure the container is clean and dry.
* Fill the container with your dried cherries.
* Close the lid tightly.
* Store the containers in a cool, dark place. A pantry or cupboard is good. Room temperature is fine if the spot is cool and dark.
* For longer storage, you can keep them in the refrigerator.
* For very long storage (many months), you can freeze them. Put them in a freezer bag after they are dried and conditioned. Squeeze out extra air.
* Properly dried and stored oven dried cherries can last for 6 months to a year at room temperature. In the fridge, they last even longer. In the freezer, they last for a year or more.
* Always check them before eating. Look for any signs of mold. If you see mold, throw them away.
Quick Look: Oven Drying Cherries
| Step | Action | Why |
|---|---|---|
| 1. Prepare | Wash, dry, stem, pit cherries | Cleanliness, faster drying, safety |
| 2. Set up sheets | Cover pans with parchment/silicone | Prevents sticking |
| 3. Place fruit | Single layer on sheets, no touching | Allows air flow, even drying |
| 4. Preheat oven | Set to 150°F – 200°F (65°C – 90°C) low temp | Dry, don’t cook (best temperature) |
| 5. Start drying | Put sheets in oven | Begins water removal |
| 6. Help air move | Prop oven door slightly (optional) | Lets out moist air, speeds drying |
| 7. Dry slow | Leave in oven for hours (4-10+) | Time needed to remove most water |
| 8. Check/Rotate | Check dryness, move sheets/turn cherries | Ensures even drying, avoids burning |
| 9. Check done | Cool a cherry, check texture (chewy, no juice) | Tells you when drying is complete |
| 10. Cool | Let cherries cool completely on sheets | They get firmer as they cool |
| 11. Condition | Put in loose jar, shake daily for a week | Balances moisture for safe storage |
| 12. Store | Put in airtight container, cool/dark place | Keeps them fresh for a long time |
This table gives a fast view of the oven dehydrating cherries method.
More Tips for Success
- Use ripe cherries: They have the best flavor.
- Pit carefully: Do not leave any pits behind.
- Dry very well: If they are not dry enough, they can get moldy later. A little chewy is good. Wet inside is bad.
- Use a low temp: This is why drying cherries in oven low temperature is said so often. Higher temps cook or burn them. The best temperature for drying cherries in oven is the lowest your oven can go, ideally 150-175°F.
- Be patient: How long to dry cherries in oven is many hours. It is not a fast job.
- Check different sizes: Small cherries dry faster than large ones.
- Check your oven temp: Oven thermometers are cheap. They tell you the real heat inside. This is very helpful.
Can You Dry Cherries In A Regular Oven? Yes, And It’s Easy!
We answered this at the start. Yes, you can you dry cherries in a regular oven. You just need to set it low. You are basically using your oven like a simple food dehydrator. The main difference is a food dehydrator has a fan to move air. An oven might not. That is why propping the door open can help in an oven without a fan. It helps create airflow. This helps the water leave the cherries. It speeds up the process a little. It also stops moisture from building up inside the oven. Too much moisture inside the oven slows drying.
This oven dehydrating cherries method is simple. It uses tools you already have.
Drying Different Types: Drying Sweet Cherries In Oven vs. Tart
The basic steps are the same for both types.
* Sweet Cherries:
* They are often bigger and juicier. They might take a little longer to dry.
* They will be very sweet when dried. Good for snacking right from the jar.
* Tart Cherries:
* They can be smaller. They might dry a little faster.
* They are tart when dried. Great for baking, making sauces, or adding to things like granola where the tartness is nice.
* If you want them sweeter for snacking, you can lightly toss the pitted cherries with a tiny bit of sugar before drying. Or roll the dried ones in sugar after they cool.
Either way, drying sweet cherries in oven or tart ones uses the same low heat, long time process. The texture and chewiness will be similar. The taste will be the main difference.
Comparing Oven Drying to Other Methods
- Food Dehydrator: This is the best tool for drying fruit. Dehydrators have fans. They move air around very well. This makes drying faster and more even. They also have very accurate low temperature settings. If you plan to dry a lot of fruit often, a dehydrator is a good buy. But the oven method works great if you do not have one.
- Sun Drying: Drying fruit outside in the sun. This works well in hot, dry places. You need many days of sunny weather. You also need to protect the fruit from bugs and dirt. The oven method is faster and you do not need special weather.
- Air Drying (Indoors): Some fruits can be air-dried indoors. This is very slow. It might not be safe for juicy fruits like cherries. Mold can grow before the fruit dries enough. The oven method is safer because the heat helps stop bad things from growing.
So, while other ways exist, the oven dehydrating cherries method is a great choice for home cooks. It is easy, safe, and uses common kitchen tools.
How Long To Dry Cherries In Oven – Let’s Look Closer
We touched on this. But let’s think more about the time.
* Temperature: A lower temperature means a longer time. A slightly higher low temperature (like 200°F) might be faster than 150°F. But stick to the lowest safe temp your oven can hold for best results.
* Cherry Size: Small cherries dry quicker than big ones. If you have cherries of different sizes, the small ones will finish first.
* Cherry Juiciness: Some types of cherries are juicier than others. Very juicy cherries take longer to dry.
* How Dry You Want Them: Do you want them very chewy? Or a little softer? Softer means less drying time. Very chewy means more drying time. Make sure they are dry inside though, not just chewy on the outside.
* Oven Airflow: An oven with a fan (convection) dries faster than one without. Propping the door helps airflow in ovens without a fan.
This is why giving an exact number of hours is hard. It’s usually between 4 and 10 hours. But it could be up to 12 hours or more for very large, juicy cherries in a slow oven.
Check Early and Often: Start checking around the 4-hour mark. Feel them. Look inside one. Check every 30-60 minutes after that. This is the best way to know how long to dry cherries in oven for your batch.
Troubleshooting Common Issues
- Cherries are still wet inside after many hours:
- Is your oven temperature low enough? If it’s too high, they cook, not dry. Use an oven thermometer to check the real temp.
- Is the oven door propped open for airflow? If not, try propping it.
- Are the cherries touching? Spread them out.
- Are they very large or juicy? They just need more time. Be patient.
- Cherries are getting hard and crunchy:
- The temperature might be too high. Check your oven temp.
- They might be over-dried. Take them out now. Crunchy ones can still be used in baking (they soften up) or ground into powder.
- Cherries are sticking badly to the paper:
- Did you use parchment paper or silicone? Wax paper causes sticking.
- They might need a little more drying time. Sometimes very slightly under-dried fruit sticks more.
- Mold appears during conditioning:
- This means they were not dry enough. Put them back in the oven at a low temp for another hour or two. Then cool and condition again in a clean jar.
Summing Up the Oven Dehydrating Cherries Method
The oven dehydrating cherries method is simple and works well. You clean and pit cherries. You spread them on a tray. You put them in a very low oven for many hours. You check them until they are chewy and not wet inside. You cool them. You condition them. Then you store them in a tight jar.
Using a drying cherries in oven low temperature setting is crucial. The best temperature for drying cherries in oven is around 175°F. How long to dry cherries in oven varies, but checking after 4 hours is a good start. Drying sweet cherries in oven or tart ones uses the same steps. Storing oven dried cherries in airtight containers in a cool, dark place keeps them fresh.
Making homemade dried cherries oven is a rewarding way to save fruit. You get a healthy snack or ingredient. It is easy to do with basic kitchen tools. Give it a try next time you have fresh cherries.
Frequently Asked Questions
h4: Do I need a special oven to dry cherries?
No, you do not need a special oven. You can use your regular kitchen oven. The key is setting it to a very low temperature.
h4: What is the lowest temperature I should use?
The lowest temperature your oven can safely hold is usually best. This is often between 150°F and 175°F (65-80°C). Do not go much higher than 200°F (90°C) as this can cook the cherries instead of just drying them. This is the drying cherries in oven low temperature method.
h4: How can I tell when the cherries are done drying?
Check a cherry by cooling it and squishing it. It should be chewy and wrinkled. There should be no wetness or juice inside when you tear it open. They should feel like raisins. This is how you know how long to dry cherries in oven is enough.
h4: Can I leave the oven on all night?
Many people do leave the oven on all night at a very low temperature. However, always be careful when leaving appliances on while sleeping or away. Make sure your oven is stable at the low temperature. Some people feel safer drying when they are awake to check.
h4: Do I have to pit the cherries?
Yes, it is highly recommended to pit the cherries before drying. Dried fruit is hard. A pit inside a dried cherry could be a danger to teeth. It is best to remove them all before drying.
h4: My cherries are hard and crunchy, what happened?
They were likely dried at too high a temperature or for too long. They are over-dried. Crunchy dried cherries can still be used in recipes like muffins or bread, where they will soften when baked.
h4: How long will my homemade dried cherries last?
When properly dried until chewy but not wet inside, and stored in an airtight container in a cool, dark place, storing oven dried cherries like this allows them to last 6-12 months. They last even longer in the fridge or freezer.
h4: Can I add sugar before drying?
You can lightly toss tart cherries with a small amount of sugar before drying if you want them sweeter for snacking. For drying sweet cherries in oven, adding sugar is usually not needed as they are already very sweet.
h4: Do I need to use parchment paper?
Using parchment paper or a silicone mat is strongly recommended. It stops the cherries from sticking to the baking sheet. This makes them easy to remove after drying.
h4: Is this the same as dehydrating?
Yes, drying fruit in a low-temperature oven is a form of dehydration. You are removing water from the fruit. The oven dehydrating cherries method uses your oven instead of a special dehydrator machine.