
Are you asking how to cool a keg without a fridge? Yes, you certainly can! Keeping a beer keg cold without a standard refrigerator is very possible. You can use simple materials like ice and coolers to create effective, temporary chilling systems. These methods are great for parties, outdoor events, or when a fridge is just not available. They rely on the power of ice and good insulation to keep your beer perfectly cold for hours. Let’s look at the best ways to do this.
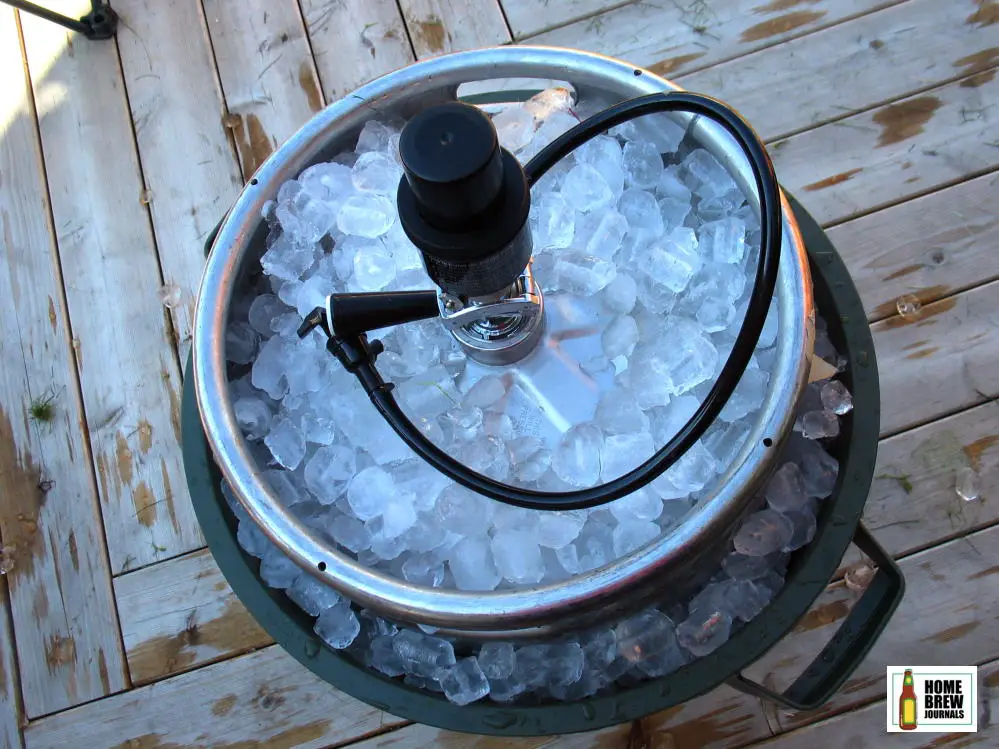
Image Source: homebrewjournals.com
Why Cool a Keg Without a Fridge?
Sometimes you need cold beer but don’t have a big fridge. Maybe you are outside. Maybe you are at a party somewhere new. A full keg is too big for most home fridges anyway. This is where clever methods come in. You need ways for temporary keg chilling. These ways use things you can find easily. They make sure your beer stays cold and good to drink.
Key Ideas for Non-Electric Keg Coolers
Cooling a beer keg with ice is the most common way. Ice takes heat away from the keg. This makes the beer cold. Good insulation is also key. Insulation acts like a blanket. It stops the cold from leaving. It stops heat from getting in. A good non-electric keg cooler uses both ice and insulation well. This lets you keep keg cold outside for a long time.
Method 1: The Basic Keg Ice Bath
This is the easiest way. You need a big tub or container. It must be bigger than your keg. A large plastic tub works well. Or even a big bucket.
What You Need:
- A big container (tub, bucket, cooler)
- Lots of ice
- Water (optional, but helps)
How to Set Up a Keg Ice Bath:
- Get your big container ready. Make sure it is clean.
- Put the keg in the container.
- Start adding ice around the keg. Fill the space around the sides. Cover the top of the keg if you can.
- Pour some cold water over the ice. Water helps the ice touch more of the keg. This makes cooling faster. Cold water is better than warm water.
- Check the ice often. Add more ice as it melts.
Why This Works:
The ice takes heat from the keg metal. This cools the beer inside. Water helps move the cold faster. It fills the small gaps between ice pieces. This method is simple. It works for a few hours. It’s a great temporary keg chilling fix.
Tips for the Ice Bath:
- Use crushed ice if possible. It fills space better than big cubes.
- Make sure the water level is high. It should touch as much of the keg as possible.
- Place the setup in a cool, shady spot. Sun makes ice melt fast.
Method 2: The Trash Can Keg Cooler
This is a step up from a simple bath. It uses a common item: a clean trash can. This creates a larger ice bath. It can also be insulated better. It’s a popular DIY keg cooler.
What You Need:
- A clean plastic trash can (large enough for a keg)
- Lots of ice
- Water (optional)
- Insulation materials (optional, like bubble wrap or foam)
How to Build a Trash Can Keg Cooler:
- Get a new, clean plastic trash can. Make sure it’s big enough for the keg plus ice.
- You can add insulation inside the can walls first. Tape bubble wrap or foam sheets around the inside if you want. This helps insulate beer keg.
- Put the keg in the trash can.
- Add a layer of ice at the bottom first. Then put the keg in.
- Fill the space around the keg with lots of ice. Pack it in tight.
- Put ice on top of the keg too.
- Add cold water to fill gaps if you like. This speeds up cooling.
- Put the lid on the trash can if it has one. This helps keep the cold in.
Benefits of the Trash Can Method:
- Trash cans are tall. They can hold a lot of ice around the whole keg.
- Lids help keep cold air inside. This is better than an open tub.
- You can easily add more insulation. This makes it a better DIY keg cooler.
- It’s usually easy to find a large trash can.
Making it More Effective:
- Pre-chill the keg first if you can. Even a few hours in a cold place helps.
- Use block ice and crushed ice. Blocks melt slowly. Crushed ice fills gaps well.
- Place the trash can out of the sun.
Method 3: Using Insulated Ice Chests
Big ice chests or coolers are made to keep things cold. Using one for a keg is smart. It’s a type of ice chest keg setup. These coolers have good insulation built-in. This makes them great non-electric keg coolers.
What You Need:
- A very large, well-insulated ice chest or cooler (check size first!)
- Lots and lots of ice
How to Use an Ice Chest for a Keg:
- Find a cooler big enough for your keg. This is important. Not all coolers are big enough. Kegs are heavy and bulky.
- Put a layer of ice at the bottom of the cooler.
- Carefully lower the keg into the cooler. This might need two people.
- Fill all the space around the keg with ice. Pack it tight.
- Cover the top of the keg with ice.
- Close the cooler lid tightly. Make sure it is sealed well.
Why Coolers Are Good:
- They have thick, insulated walls. This is key to keep keg cold outside for a long time.
- Lids seal well. This stops cold air from escaping. It stops warm air from getting in.
- Good coolers can keep ice for days. This means longer temporary keg chilling.
Tips for Ice Chest Cooling:
- Choose a cooler known for good ice retention. Brands like Yeti, RTIC, or high-end Igloo work best.
- Pre-chill the cooler itself with some ice before adding the keg.
- Use block ice mixed with cubes for the longest cooling time.
- Don’t open the lid more than you need to. Every time you open it, cold air escapes.
Method 4: Building a DIY Keg Cooler Box
For a more custom solution, you can build a special box. This is a true DIY keg cooler project. It focuses on great insulation to keep keg cold outside.
What You Need:
- Large sheets of foam insulation (like rigid foam board)
- Strong tape (like duct tape)
- A sharp knife or saw to cut foam
- Optional: Plywood or cardboard for an outer shell
- Lots of ice
How to Build a DIY Keg Cooler Box:
- Measure your keg. Plan a box that is a few inches wider and taller than the keg on all sides. This space is for the ice and insulation.
- Cut the foam insulation into pieces. You will need a bottom, four sides, and a top.
- Tape the pieces together strongly to form a box shape. Make sure the seams are sealed tight. This is important to insulate beer keg well.
- You can build an outer shell of plywood or strong cardboard around the foam box. This protects the foam. It makes the box stronger. Leave a gap between the shell and the foam. This adds more insulation (air gap).
- Add a hinged lid or a removable top piece made from foam and the outer material.
- Place the keg inside the box.
- Fill the space around the keg with ice. Use lots of ice.
- Close the lid tightly.
Benefits of a DIY Box:
- You control the size. You can make it fit your keg perfectly with enough ice space.
- You can use very thick insulation. This makes it very good at keeping things cold.
- It can be built to last longer than a trash can setup.
- It’s a truly non-electric keg cooler built for the job.
Making Your DIY Cooler Better:
- Use foam that is at least 2 inches thick. Thicker is better.
- Seal all seams with tape very well. No gaps!
- Paint the outside white or use a light color. Dark colors soak up sun heat.
- Add a drain plug at the bottom. This lets water out as ice melts without opening the box.
Method 5: Using Cooling Wraps or Jackets
These are less common for full kegs but exist. Some companies make special jackets or wraps. These items have pockets for ice packs or gel packs. They wrap around the keg. This is a portable keg cooling idea.
What You Need:
- A cooling jacket or wrap made for kegs
- Ice packs or gel packs
How to Use Cooling Wraps:
- Freeze the ice packs or gel packs fully.
- Place the frozen packs into the pockets of the cooling jacket.
- Wrap the jacket tightly around the keg. Secure it well.
How This Works:
The cold packs directly touch the keg surface. This cools the metal. The jacket itself usually has some insulation. This helps keep the cold in.
When to Use This:
- This method is good for smaller kegs or pony kegs.
- It works for shorter times compared to a full ice bath or cooler.
- It’s more portable than a big tub or trash can. It allows for easier portable keg cooling.
Limits of Wraps:
- They might not cool the whole keg evenly.
- They often don’t hold enough ice/packs for long events.
- The cooling effect can be less strong than being fully surrounded by ice water.
Comparing the Methods
Let’s look at how these methods stack up.
| Method | Ease of Setup | Cooling Speed | How Long it Stays Cold | Cost | Best For |
|---|---|---|---|---|---|
| Keg Ice Bath | Very Easy | Fast | A few hours | Low (tub cost) | Quick needs, shorter parties |
| Trash Can Keg Cooler | Easy | Fast | Several hours | Low (can cost) | Longer parties, good balance of cost/time |
| Insulated Ice Chest Setup | Medium | Fast | Very long time | High (cooler cost) | All-day events, needing longest cold time |
| DIY Keg Cooler Box | Harder (build) | Medium/Fast | Very long time | Medium (material) | Custom needs, best insulation goal |
| Cooling Wraps/Jackets | Easy | Slower/Uneven | Shorter time | Medium (jacket cost) | Small kegs, portability, not main cooling |
This table helps you pick the best method for your needs. Think about how long you need the keg to be cold. Think about what materials you have or want to buy.
Tips for Any Non-Electric Keg Cooler
No matter which method you choose, follow these tips to get the best results:
- Start Cold: If possible, chill the keg in a fridge or cold room before putting it in your cooler setup. A cold start helps a lot.
- Use Enough Ice: Don’t be shy with the ice! More ice means longer cooling. It should surround the keg fully.
- Add Water (Sometimes): For ice baths and trash cans, adding cold water helps ice touch more surface. This cools faster. For sealed coolers, maybe skip the water to keep ice longer, unless you need super-fast cooling.
- Insulate Well: Good insulation is key. Seal gaps. Use thick materials. This keeps the cold in and heat out. This is vital for keep keg cold outside.
- Location Matters: Put your cooler setup in the shade. Keep it away from direct sun. Keep it away from hot surfaces like asphalt.
- Limit Opening: Only open the cooler or lid when you need to tap the beer or add more ice. Every time you open it, cold escapes.
- Mix Ice Types: A mix of block ice and cube ice is often best. Block ice lasts longer. Cube or crushed ice fills spaces well for good contact.
- Keep It Full: As beer is used, the space inside the keg fills with gas. The keg weight changes. Keep ice packed around it.
- Consider a Jacket: Even within an ice bath or cooler, some people add a neoprene jacket around the keg. This adds another layer to insulate beer keg.
Detailing the Ice Process: Cooling a Beer Keg with Ice
The basic idea is simple: ice pulls heat from the keg. When ice melts, it uses a lot of energy (heat) from its surroundings. This energy comes from the warm keg. The melted water is also very cold (close to freezing). This cold water touching the keg is very effective at cooling.
To cool a keg quickly with ice, you need maximum contact. That’s why an ice bath with water works fast. The cold water wraps around the whole keg surface. This is faster than just ice cubes touching in a few spots.
To keep a keg cold for a long time with ice, you need lots of ice and great insulation. The insulation slows down how fast heat gets into the system. This means the ice melts slower. This keeps the beer cold for many hours. This is the core idea behind a good non-electric keg cooler.
When setting up, don’t just dump ice on top. Build a bed of ice first. Then put the keg on it. Then pack ice all around the sides and on top. Think of the keg needing to be buried in the cold stuff.
The Importance of Insulation: How to Insulate Beer Keg Effectively
Insulation is the unsung hero of temporary keg chilling. It doesn’t make cold, but it saves the cold you already have. Materials like foam, thick plastic walls (in coolers), or even layers of cardboard and tape create barriers. These barriers slow down the flow of heat from the warmer air outside to the colder space inside your cooler setup.
Imagine a hot day. Heat wants to move from the hot air into your cold keg. Insulation makes this harder. It traps air in small pockets. Air is a poor conductor of heat. So, the heat moves very slowly through the insulation layers.
To insulate beer keg well, you need to cover all sides: bottom, sides, and top. The top is often forgotten, but cold air falls, and heat rises. A well-sealed lid or top piece is crucial. Sealing gaps with tape or making sure cooler lids close tightly stops cold air from leaking out. It also stops warm air from sneaking in.
Double-wall construction is also good. This is why store-bought coolers work well. They have an inner and outer shell with foam in between. Your DIY keg cooler can copy this idea with foam and an outer box.
Portable Keg Cooling Solutions
Most methods we talked about offer some level of portable keg cooling.
- Ice Chests: These are designed to be moved. They have handles. If the keg fits, the whole setup is portable. But a full keg in a big cooler is heavy!
- Trash Can Coolers: A trash can setup can be moved, but be careful. They can be wobbly. The can might not have strong handles meant for that much weight.
- DIY Boxes: You can add handles to a DIY box. Make it strong enough to carry the weight. This can be quite portable if built well.
- Cooling Wraps: These are the most portable. They wrap around the keg itself. You can move the keg with the wrap on it. But remember their cooling limits.
When thinking about portable keg cooling, also think about the weight. A full 15.5-gallon keg weighs about 160 pounds! Add the weight of ice and the container. Moving a fully loaded setup takes effort, maybe two people or a hand truck. For true portability where you move the keg often, a wrap might be the only way, accepting shorter cooling times. For moving to a party spot and staying put, an ice chest or trash can is better.
Planning Your Temporary Keg Chilling
Before you need a cold keg, plan ahead.
- Know Your Keg Size: Is it a half barrel (about 15.5 gallons), quarter barrel (about 7.75 gallons), or a sixth barrel (about 5.2 gallons)? This tells you how big your cooler or container needs to be.
- How Long: How many hours do you need the beer to stay cold? A few hours? All day? Overnight? This helps you pick the right method and how much ice you need.
- Location: Will the setup be inside or outside? In sun or shade? This affects how fast ice melts.
- Materials: What do you have? A big tub? A trash can? A large cooler? What can you easily get?
- Ice Source: Where will you get lots of ice? How will you get more if you need it? Plan this before the party starts. A gas station might run out!
Thinking about these things helps you choose the best method for keeping keg cold outside or inside without a fridge.
Setting Up the Tap System
Keeping the beer cold is just one part. You also need to tap the keg to get the beer out. Most temporary setups use a hand pump (picnic pump).
Using a Hand Pump:
- Make sure the pump is clean.
- Attach it to the keg valve.
- Pump air into the keg. This pushes the beer out.
- Pour beer.
Important Note About Hand Pumps:
Hand pumps push regular air into the keg. This air has oxygen. Oxygen makes beer go bad faster. Beer from a hand-pumped keg should be drunk within 24 hours, ideally sooner. If you need the keg to last longer (like a few days), you need a CO2 system, not a hand pump. But CO2 systems are more complex and less common for simple temporary setups. For most parties using a non-electric keg cooler, a hand pump is fine, just plan to finish the keg.
When using the hand pump with an ice bath or trash can cooler, the pump might stick out the top. Make sure the lid or covering still fits reasonably well to keep the cold in. Some DIY setups build a hole for the tap.
Why Temperature Matters for Beer
Serving beer at the right temperature makes it taste best. Beer that is too warm can taste flat or off. Beer that is too cold hides flavors. For most lagers and ales from a keg, a temperature around 38-42°F (3-5°C) is good. Your ice cooling methods should aim for this range.
An ice bath can get the beer very cold, sometimes even too cold if left for a long time and packed tight with ice. Good insulation helps keep a stable, cold temperature once the beer is chilled. Using a thermometer to check the beer temperature (if you can safely get to it) is the best way to know it’s just right.
Troubleshooting Common Issues
- Ice Melting Too Fast: Not enough insulation. Too much heat getting in (sun, warm location). Not enough ice used at the start. Solution: Add more ice, improve insulation, move to shade.
- Beer Not Getting Cold Enough: Not enough ice. Ice not touching enough of the keg (need water for better contact). Not enough time. Solution: Add more ice, add cold water, wait longer.
- Leaking Cooler: Your container might have a crack. Or the drain plug is open. Solution: Check for leaks, fix cracks with tape, close the plug.
- Heavy Setup: Full kegs and ice are heavy. Solution: Plan where it will sit. Don’t try to move it far once full. Use a dolly or hand truck if you must move it.
- Condensation: The outside of your cooler setup might get wet. This is normal. It means it’s working. The cold inside is meeting warm air outside. This is less of a problem than heat getting in.
The Environmental Angle
Using a non-electric keg cooler is also energy efficient! It uses no power. It just uses ice, which takes energy to make, but often less than running a large fridge unit just for one keg for a short time. Reusing containers like trash cans or building a DIY box from leftover materials is also good. Proper disposal of water (maybe water plants?) and recycling of containers afterwards is smart.
Beyond the Basics: Advanced DIY
For someone who wants a really robust non-electric keg cooler, you could build a wooden box with thick foam insulation inside. Make it strong enough to sit on or use as a table. Add a hinged lid with good latches. Include a drain with a valve. You could even add wheels for easier moving. This becomes a dedicated piece of party gear, built to last and provide excellent portable keg cooling and temporary keg chilling whenever you need it.
These kinds of projects really lean into the ‘DIY keg cooler’ spirit. They are more effort upfront but pay off over many uses by keeping ice longer and providing better performance. The goal is always to insulate beer keg as much as possible and surround it completely with the cooling medium (ice and cold water).
Final Thoughts on Keeping Kegs Cold Without Power
You have many ways to keep a keg cold without a fridge. The best method depends on your needs, time, and budget.
A simple keg ice bath is fast and cheap for quick needs.
A trash can keg cooler offers more space for ice and better temporary chilling.
An insulated ice chest keg setup gives the longest cooling time thanks to good insulation.
A DIY keg cooler box lets you build the best possible non-electric cooler for your needs.
Cooling wraps offer portability for smaller kegs but less powerful cooling.
Cooling a beer keg with ice is the core of all these methods. Adding insulation is what makes them work for hours. Remember to use lots of ice, insulate well, and keep it in the shade. With the right setup, you can enjoy perfectly cold draft beer anywhere, no fridge needed. Cheers!
Frequently Asked Questions
h4 How long will ice keep a keg cold?
It depends on the method and how much ice you use. A basic ice bath might last a few hours. A well-insulated ice chest or DIY box can keep a keg cold for 12-24 hours, or even longer with enough ice and good conditions.
h4 How much ice do I need for a keg?
You need a lot! For a half-barrel keg, you might need 40-80 pounds or more of ice to surround it fully in a typical setup. The more space you have around the keg, the more ice you will need. Plan on buying more than you think.
h4 Can I use salt with the ice?
Adding salt to ice makes it colder, but it also melts the ice faster. It can also make the outside of the keg too cold, which is bad for the beer’s taste and might cause problems with the tap system freezing up. It’s usually not needed or recommended for chilling beer kegs. Just use plenty of plain ice and maybe cold water.
h4 Does the keg need to be upright or on its side?
Kegs are meant to be stored and served upright. Keep the keg upright in your cooler setup.
h4 How fast will a warm keg get cold in an ice bath?
Getting a warm keg down to serving temperature takes time. In a good ice bath with water and lots of ice, it might take 1-3 hours to get the bulk of the beer cold, depending on how warm it was to start. Starting with a pre-chilled keg is much faster.
h4 Can I reuse the water in the ice bath?
Yes, the cold water is part of the cooling system. As ice melts, it adds more cold water. You might need to drain some water if the container gets too full, especially if adding more ice. Some setups include a drain for this.