
You want to cook big, tasty tomahawk pork chops in your oven? You want them nice and juicy, not dry? Yes, you absolutely can cook these thick, bone-in chops right in your oven to get a tender, flavorful meal. This guide will show you exactly how to make delicious oven baked tomahawk pork chops that are perfectly cooked every time.
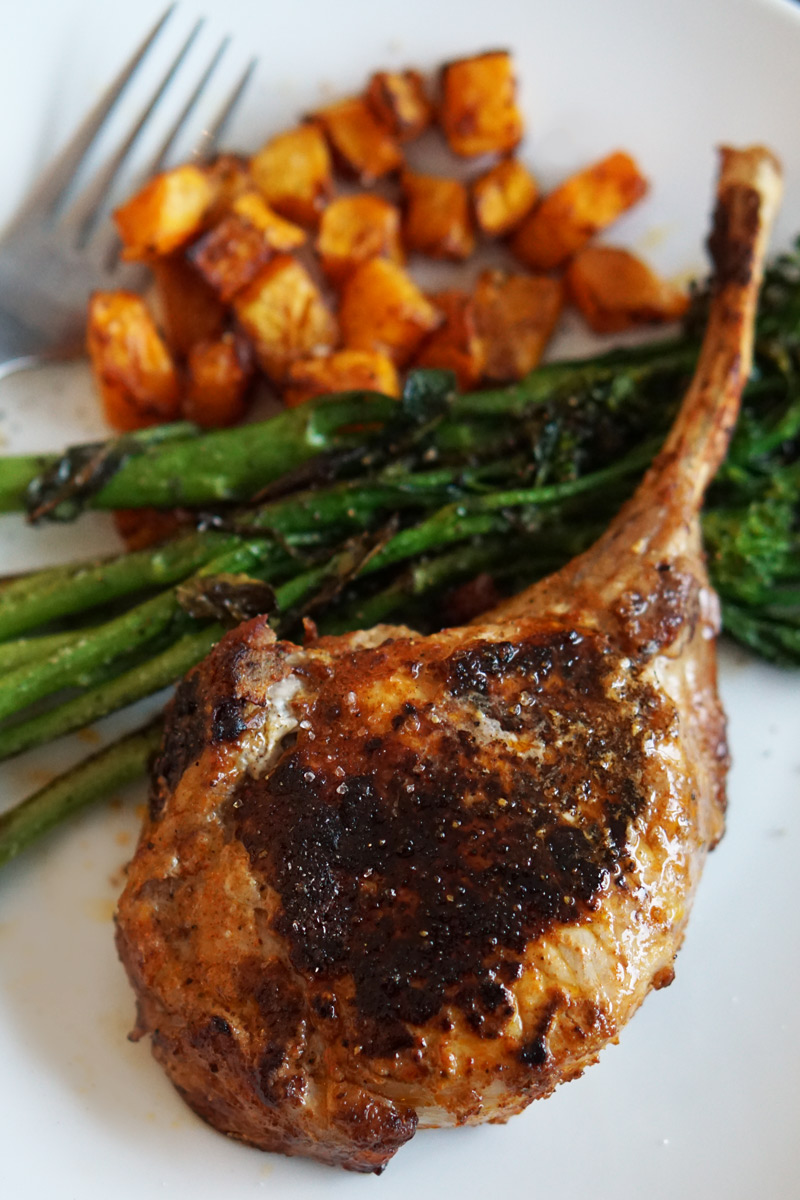
Image Source: afoodloverskitchen.com
What are Tomahawk Pork Chops?
Imagine a regular pork chop.
Now, add a long, impressive bone still attached.
That is a tomahawk pork chop!
They look like the small version of a beef tomahawk steak.
These chops are usually very thick.
They come from the rib section of the pig.
The long bone is left on and cleaned.
This makes them look fancy.
It also helps the meat cook more evenly near the bone.
Why Cook These Chops in the Oven?
Cooking a thick cut pork chop oven style has many good points.
Ovens give steady heat.
This helps the thick chops cook through without burning the outside.
It is less hands-on than cooking on the stove the whole time.
You can put the chop in the oven and let it cook.
This frees you up to make sides.
The oven can also help create a nice outer crust.
This happens especially if you sear the chop first.
Or you can use the oven for a gentle cook.
Then you finish with a sear.
This is called the reverse sear method.
Both ways work well in the oven.
They can help you get juicy pork chops.
Getting Your Chops Ready
Good results start with good prep.
This is very important for thick chops.
You need to take a few steps before cooking.
These steps make a big difference.
They help the chop cook right.
They also help it taste its best.
Bringing the Chops to Room Temp
Do not cook a cold chop straight from the fridge.
This is a common mistake.
Cold meat cooks unevenly.
The outside can overcook while the inside is still cold.
Take your tomahawk chops out of the fridge.
Do this about 30 to 60 minutes before you cook.
Let them sit on the counter.
They should be covered lightly.
This lets the chill leave the meat.
It helps the chop cook more evenly all the way through.
This step is simple but important.
Drying the Surface Well
Wet meat does not brown well.
You want a nice crust on your chop.
A dry surface helps this happen.
Use paper towels.
Pat the pork chops all over.
Get them as dry as you can.
Pay attention to all sides.
Dry the bone too.
This step helps you get a great sear.
A good sear adds lots of flavor.
Seasoning Your Pork Chops
Seasoning is key to taste.
You want the flavor to go into the meat.
For thick chops, you can be generous.
What kind of seasoning for pork chops is best?
It depends on what you like.
Salt and pepper are a must.
Use coarse salt like kosher salt.
It adds flavor and helps form a crust.
Freshly ground black pepper is great too.
Simple Salt and Pepper
This is the basic way.
It lets the pork flavor shine.
Sprinkle salt all over the chop.
Use more salt than you think you need.
Some salt will fall off during cooking.
Pat the salt into the meat.
Do the same with pepper.
Make sure all sides are covered.
This simple mix is often enough.
Using a Pork Rub
Many people like to use a rub.
A rub is a mix of dried spices.
Common ingredients are:
* Paprika
* Garlic powder
* Onion powder
* Brown sugar (for a little sweetness)
* Chili powder
* Cumin
* Dried herbs like thyme or rosemary
Mix your favorite spices in a bowl.
Rub this mix all over the dry pork chop.
Press it into the meat.
Cover every part, except maybe the clean bone tip.
Let the rub sit on the chop for a bit.
This helps the flavors soak in.
You can season right before cooking.
Or you can season 15-20 minutes ahead.
Some people season even longer.
This is called dry brining.
It can help make the meat more juicy.
For dry brining, season the chop.
Put it back in the fridge on a wire rack.
Leave it there for a few hours or overnight.
The salt pulls out moisture.
Then the moisture goes back in with the salt and spices.
This makes the meat taste better inside.
But for just before cooking, 15-20 minutes is fine.
Just make sure the surface is dry again right before you sear.
Choosing Your Cooking Method
There are two main ways to cook thick chops in the oven.
You can sear first, then bake.
Or you can bake first (reverse sear), then sear.
Both methods work for oven baked tomahawk pork chops.
They give slightly different results.
Method 1: Sear First, Then Oven
This is a classic way to cook thick meats.
You get a great crust right away.
Then the oven cooks the inside gently.
Steps for Sear First:
1. Get your chop ready. Let it sit out. Pat it dry. Season it well.
2. Heat up an oven-safe pan. Cast iron is best. Get it hot over medium-high heat.
3. Add a little oil with a high smoke point. Grapeseed oil or vegetable oil works.
4. Carefully place the seasoned chop in the hot pan. It should sizzle loudly. This is the sear.
5. Sear for 2-3 minutes on one side. Don’t move it! This builds the crust.
6. Flip the chop. Sear the other side for 2-3 minutes.
7. Sear the edges too. Use tongs to hold the chop. Brown all sides. This step is important for flavor. Sear tomahawk pork chops well.
8. While searing, heat your oven. Set the bone-in pork chop oven temp. A good temp is 375°F (190°C).
9. Once seared, put the pan with the chop into the hot oven.
10. Now the oven does the rest. How long to cook tomahawk pork chops? It depends on thickness and oven. A 1.5 to 2-inch thick chop might take 10-20 minutes.
11. Use a meat thermometer. This is very important. Stick it into the thickest part of the meat. Avoid hitting the bone.
12. Cook until the tomahawk pork chop internal temp is right. For safe pork, the temp should reach 145°F (63°C).
13. Take the pan out of the oven when the temp is reached.
14. This method gives a nice crust and finishes the cook in the oven.
Method 2: Reverse Sear in the Oven
This method is great for very thick chops.
It cooks the inside first slowly and evenly.
Then you add the sear at the end.
This often results in a more evenly cooked inside from edge to edge.
The center stays very juicy.
Steps for Reverse Sear:
1. Get your chop ready. Let it sit out. Pat it dry. Season it well. If dry brining, this is a good method to use it with.
2. Heat your oven to a lower temperature. Set the bone-in pork chop oven temp to 250°F (120°C). This low temp is key for the slow cook. This is great for thick cut pork chop oven cooking.
3. Place the seasoned chop on a wire rack. Put the rack over a baking sheet. This allows air to move around the chop. It helps it cook evenly.
4. Put the baking sheet with the chop into the low oven.
5. Now the chop cooks slowly. How long to cook tomahawk pork chops this way? It takes longer than the sear-first method. A 1.5 to 2-inch chop could take 30-50 minutes or even more.
6. Use a meat thermometer often. Check the tomahawk pork chop internal temp. Stick it into the thickest part. Avoid the bone.
7. Cook until the internal temp is about 10-15 degrees below your final target. For 145°F target, cook until it reaches 130°F – 135°F (54°C – 57°C). The temperature will rise during the sear and resting.
8. Take the chop out of the low oven.
9. Now, get ready to sear. Heat up an oven-safe pan (like cast iron) on your stove over medium-high heat. Get it very hot.
10. Add a little oil to the hot pan.
11. Carefully place the chop in the pan. Sear for 1-2 minutes per side. You are just adding color and crust now. The inside is already cooked.
12. Sear the edges quickly too. This final sear gives you that nice browned outside. This is the reverse sear pork chops part.
Both methods work well.
The reverse sear often gives a more consistent pink center.
The sear-first method is a bit faster overall.
Choose the one you like best!
Hitting the Right Internal Temp
Knowing when your pork chop is done is crucial.
You want it cooked enough to be safe.
You also want it juicy and tender.
The USDA says pork is safe at 145°F (63°C).
This temperature gives you slightly pink meat in the center.
It is very juicy and tender.
Overcooking past 145°F can make the meat dry.
Use a good meat thermometer.
An instant-read thermometer is best.
Insert it into the thickest part of the chop.
Make sure the tip is in the meat.
Do not touch the bone.
The bone heats up faster than the meat.
Touching it will give a false high reading.
Check the temperature in a couple of places to be sure.
Pull the chop from the oven or pan when it hits 145°F (63°C).
Remember, the temperature will rise a little as it rests. This is called carryover cooking.
Resting Your Pork Chop
This step is non-negotiable!
Do not skip resting time.
It is just as important as the cooking.
When meat cooks, the juices are pushed towards the center.
If you cut the chop right away, all the juices will run out.
You will end up with dry meat on your plate.
Resting lets the juices settle back into the meat.
They spread out again.
This makes the chop much more juicy and tender.
How to Rest
Take the chop off the heat.
Place it on a cutting board or a plate.
Cover it loosely with foil.
Do not wrap it tightly.
Loose foil keeps it warm but lets steam escape a little.
This stops the crust from getting soft.
How much pork chop resting time is needed?
For thick tomahawk chops, rest for at least 10-15 minutes.
For very thick chops, even longer is fine.
Use this time to finish sides or set the table.
Resist the urge to cut into it early.
This resting period is key to juicy pork chops.
Making Your Chops Extra Juicy
Getting juicy pork chops is the goal.
Here is a summary of things that help:
* Start with good chops: Look for chops with some marbling (little white flecks of fat in the meat). Fat adds flavor and keeps meat moist. Bone-in chops are often more juicy too. The bone protects the nearby meat.
* Bring to room temp: Helps even cooking. Even cooking means less chance of dry spots.
* Season well: Especially with salt. Salt helps the meat hold onto moisture. Dry brining helps even more.
* Don’t overcook: This is the biggest one! Use a thermometer. Cook only to 145°F (63°C). Slightly pink is perfect.
* Rest the meat: Let those juices settle back in.
* Use a good recipe: Following steps like these helps you get a juicy pork chops recipe result every time.
* Consider brining: A wet brine (soaking the chop in salt water) can also add moisture. However, dry brining is often easier for thick chops and gives a better crust.
Step-by-Step Guide: Sear First in the Oven
This method works well and is faster than reverse sear.
Here is a simple breakdown:
Ingredients:
* 1-2 tomahawk pork chops (about 1.5 to 2 inches thick)
* 2 teaspoons coarse salt (like kosher salt)
* 1 teaspoon black pepper
* Other seasonings or pork rub you like
* 1 tablespoon cooking oil (like grapeseed or vegetable)
Equipment:
* Paper towels
* Small bowl for seasoning
* Heavy, oven-safe pan (like cast iron)
* Meat thermometer (instant-read is best)
* Baking sheet (optional, just in case of drips)
* Wire rack (optional for resting)
* Foil
Instructions:
- Prep the Chops: Take chops from fridge 30-60 mins before cooking. Pat them very dry with paper towels.
- Season: Mix salt, pepper, and other desired seasonings. Rub all over the dry chops. Press it on well.
- Preheat Oven: Heat oven to 375°F (190°C).
- Heat Pan: Put your oven-safe pan on the stove over medium-high heat. Let it get hot for a few minutes. It should be very hot but not smoking.
- Add Oil: Pour the oil into the hot pan. Swirl it around.
- Sear Chops: Carefully place chops in the hot oil. You should hear a loud sizzle. Sear for 2-3 minutes on the first side. Don’t move them!
- Flip and Sear: Flip the chops. Sear for another 2-3 minutes on the second side.
- Sear Edges: Use tongs to hold the chops on their sides. Sear all the edges for about 1 minute each. Make sure all sides are browned nicely. This is the sear tomahawk pork chops step.
- Move to Oven: Carefully move the hot pan with the seared chops into the preheated 375°F (190°C) oven. This is part of the bone-in pork chop oven temp cooking.
- Bake: How long to cook tomahawk pork chops in the oven now? Start checking after about 10-12 minutes for a 1.5-inch chop. For a 2-inch chop, it could take 15-20 minutes or even a bit longer.
- Check Temp: Use your meat thermometer. Insert it into the thickest part of the meat, away from the bone. You are looking for a tomahawk pork chop internal temp of 145°F (63°C).
- Remove: Take the pan out of the oven as soon as the temp hits 145°F (63°C). The cooking time is done.
- Rest: Move the chops to a clean plate or wire rack. Cover loosely with foil. Let them rest for 10-15 minutes. This is the pork chop resting time.
- Slice and Serve: After resting, slice the chops against the grain if desired, or serve them whole. Enjoy your juicy pork chops recipe success!
Step-by-Step Guide: Reverse Sear in the Oven
This method gives a very even cook inside. It is great for thick chops.
Ingredients:
* 1-2 tomahawk pork chops (about 1.5 to 2 inches thick or more)
* 2 teaspoons coarse salt (like kosher salt)
* 1 teaspoon black pepper
* Other seasonings or pork rub you like
* 1 tablespoon cooking oil (like grapeseed or vegetable)
Equipment:
* Paper towels
* Small bowl for seasoning
* Baking sheet
* Wire rack (must fit inside the baking sheet)
* Heavy, oven-safe pan (like cast iron)
* Meat thermometer (instant-read is best)
* Foil
Instructions:
- Prep the Chops: Take chops from fridge 30-60 mins before cooking. Pat them very dry with paper towels.
- Season: Mix salt, pepper, and other desired seasonings. Rub all over the dry chops. Press it on well. This seasoning for pork chops adds great flavor.
- Preheat Oven (Low): Heat oven to a low temp: 250°F (120°C). This is the bone-in pork chop oven temp for the slow cook.
- Place on Rack: Put the seasoned chops on a wire rack set inside a baking sheet. This is how you cook a thick cut pork chop oven style using reverse sear.
- Slow Bake: Put the baking sheet with the chops into the 250°F (120°C) oven.
- Check Temp Often: How long to cook tomahawk pork chops at this low temp? It takes longer. Start checking the temperature after about 30 minutes. For a 1.5-inch chop, it might take 40-50 minutes or more. For a 2-inch chop, maybe an hour or longer.
- Cook to Target: Cook until the tomahawk pork chop internal temp reaches about 130°F to 135°F (54°C to 57°C). Remember, it will cook more later.
- Remove from Oven: Take the baking sheet out of the oven. The chops will look pale but cooked inside. Let them rest for 5-10 minutes while you heat your pan.
- Heat Pan (Stove): Put your oven-safe pan on the stove over medium-high heat. Get it very hot.
- Add Oil: Pour the oil into the hot pan.
- Sear Chops: Carefully place the chops in the hot oil. Sear for 1-2 minutes per side. You are just adding color now. Sear tomahawk pork chops until they have a nice brown crust.
- Sear Edges: Quickly sear the edges for about 30 seconds each.
- Final Rest: Move the seared chops to a clean plate or wire rack. Cover loosely with foil. Let them rest for another 5-10 minutes. This is the pork chop resting time after the reverse sear.
- Slice and Serve: After resting, slice or serve whole. You should have a beautiful, evenly cooked, juicy pork chops recipe result!
Table: Cooking Times and Temps Summary
This table shows general times. Always use a thermometer!
| Method | Initial Oven Temp | Sear? | Cook Until Internal Temp | Final Rest Time | Approximate Total Cook Time (1.5″ chop) |
|---|---|---|---|---|---|
| Sear First | 375°F (190°C) | Yes, before oven | 145°F (63°C) | 10-15 mins | 15-25 minutes (plus rest) |
| Reverse Sear | 250°F (120°C) then Sear | Yes, after low temp oven | 130-135°F (54-57°C) | 5-10 mins (plus sear) | 45-70 minutes (plus rest) |
Note: These times are estimates. Always use a meat thermometer to know for sure.
Important Details for Success
A few extra tips help make your oven baked tomahawk pork chops perfect.
Choosing Your Pan
An oven-safe pan is a must.
Cast iron pans are excellent.
They hold heat very well.
This gives a great sear.
They can go straight from the stove top into the oven.
Other heavy pans can work too.
Check that the handle is also oven-safe.
Some pan handles are plastic and will melt.
If your handle is not oven-safe, you can just sear the chop.
Then move the chop carefully from the pan to a baking sheet or oven-safe dish.
Then put that dish in the oven.
Using a Meat Thermometer Properly
We already talked about this.
But it is worth saying again.
It is the single best way to avoid dry pork.
Insert the tip into the thickest part.
Go into the side of the chop if that helps.
Make sure it is not touching bone or fat pockets.
The reading should be only of the muscle meat.
Check in at least two spots to be sure.
Different parts of the chop can cook at slightly different speeds.
Pull the chop when the lowest reading in the thickest part hits your target temp.
This ensures the whole chop is cooked to at least that temp.
Why Resting Works
During cooking, the muscle fibers tighten.
This squeezes the juices towards the center.
Think of it like squeezing a sponge.
When you take the meat off the heat, the muscle fibers relax.
This lets the juices flow back out.
They go back through the meat.
If you cut too soon, the juices run onto the board.
The meat fibers are still tight.
They can’t hold onto the juice.
Resting gives the fibers time to relax.
They can then absorb those juices again.
This keeps the juice inside the meat.
Your first bite will be much more moist.
Serving Your Tomahawk Chops
Once rested, your tomahawk pork chops are ready.
They look impressive on the plate.
You can serve them whole.
Or you can slice the meat off the bone.
Slicing against the grain makes the meat more tender to chew.
Serve with your favorite side dishes.
Roasted vegetables, mashed potatoes, or a simple salad go well.
The presentation with the long bone is beautiful.
It makes a meal feel special.
This juicy pork chops recipe is sure to impress.
Common Questions About Cooking Tomahawk Pork Chops
Here are answers to some common questions people ask.
h5 How Thick Should a Tomahawk Chop Be?
They are usually cut very thick.
Look for chops that are at least 1.5 inches thick.
Many are 2 inches thick or more.
Their thickness is part of what makes them special.
It also requires cooking methods that handle thick cuts well.
Cooking a thick cut pork chop oven style is perfect for this.
h5 Can I Grill or Smoke Tomahawk Pork Chops?
Yes! They are great on the grill or smoker too.
Many people use a reverse sear method on the grill or smoker.
They cook it low and slow over indirect heat.
Then they finish with a quick sear over high heat.
The oven method is just one way.
It is a great option when you can’t use outside cooking.
Or when you want less fuss.
h5 What If My Chop Is Thinner?
A tomahawk chop is usually thick.
But if you have a thinner bone-in chop (under 1.5 inches), the cooking times will be shorter.
The sear-first method might be better.
You might even just sear it and finish on the stove top.
For a thinner bone-in pork chop oven temp of 375°F (190°C) is still fine.
But the time in the oven will be much less.
Always, always use your meat thermometer!
A thinner chop might reach 145°F in only 5-10 minutes in the oven after searing.
h5 What is Carryover Cooking?
Carryover cooking is when meat keeps cooking after you take it off the heat.
The outside of the meat is hotter than the inside.
This heat moves inward.
It raises the internal temperature even more.
For a thick chop, the temp can rise by 5-10°F (3-6°C) during resting.
This is why you pull the chop from the heat just below the final target temp.
For 145°F target, pulling at 140°F (60°C) is often good with sear-first.
For reverse sear, pulling at 130-135°F (54-57°C) is better.
The final sear adds more heat before resting.
Using a thermometer helps you figure out your own carryover cooking.
h5 Can I Use Butter to Sear Instead of Oil?
Butter can burn easily at high heat.
Searing needs high heat for a good crust.
It is better to use an oil with a high smoke point for the main sear.
You can add a knob of butter at the very end of the sear.
Or you can melt butter and pour it over the chop while it rests.
Some people like to add garlic and herbs to the butter in the pan after searing.
Then they spoon this flavored butter over the chop.
This adds extra flavor.
h5 How Do I Store Leftovers?
Let the chop cool down completely.
Store any leftovers in an airtight container.
Keep them in the fridge.
They are usually good for 3-4 days.
To reheat, you can gently warm slices in a pan or in the oven.
Be careful not to dry them out when reheating.
Low heat is best for reheating meat.
h5 Can I Add Aromatics While Cooking?
Yes, you can add things for extra flavor.
When searing, you can add crushed garlic cloves, sprigs of fresh rosemary, or thyme to the pan.
Let them cook in the oil for the last minute of searing.
Tilt the pan and spoon the oil and herb mixture over the chops.
This adds a wonderful smell and taste.
Do this just before putting the pan in the oven (sear-first method).
Or do it during the final sear (reverse sear method).
h5 What Kind of Seasoning is Best?
The best seasoning for pork chops is personal.
Salt and pepper are the base.
Beyond that, think about the flavors you like.
Garlic powder and onion powder are common in rubs.
Paprika adds color and mild flavor.
Brown sugar adds sweetness which goes well with pork.
Herbs like thyme, rosemary, or sage work well.
Spices like cumin or chili powder add warmth.
You can buy pre-made pork rubs.
Or mix your own.
Experiment to find your favorite mix!
Final Thoughts on Cooking Tomahawk Chops
Cooking these big chops might seem hard.
But using the oven makes it simple.
Follow these steps.
Focus on getting the chop ready.
Season it well.
Choose your cooking method (sear first or reverse sear).
Most importantly, use a meat thermometer.
Cook to 145°F (63°C).
Rest the meat.
These steps are the secret to juicy, tender pork chops.
You will get delicious oven baked tomahawk pork chops.
Enjoy making this special meal!
It’s a juicy pork chops recipe you’ll want to make again.
The rich flavor and tender meat are worth it.
Good luck and happy cooking!