
How do you check speaker impedance? You can measure speaker impedance simply by using a common tool called a multimeter. This tool helps you do a speaker resistance measurement. This check tells you important things about your speaker. It helps you know if your speaker is good or bad. It also helps you match it correctly with music players or amps. This guide will show you how to check speaker ohms with multimeter. We will look at how to test speaker with multimeter. This includes the speaker voice coil resistance test. This is a basic speaker health test.
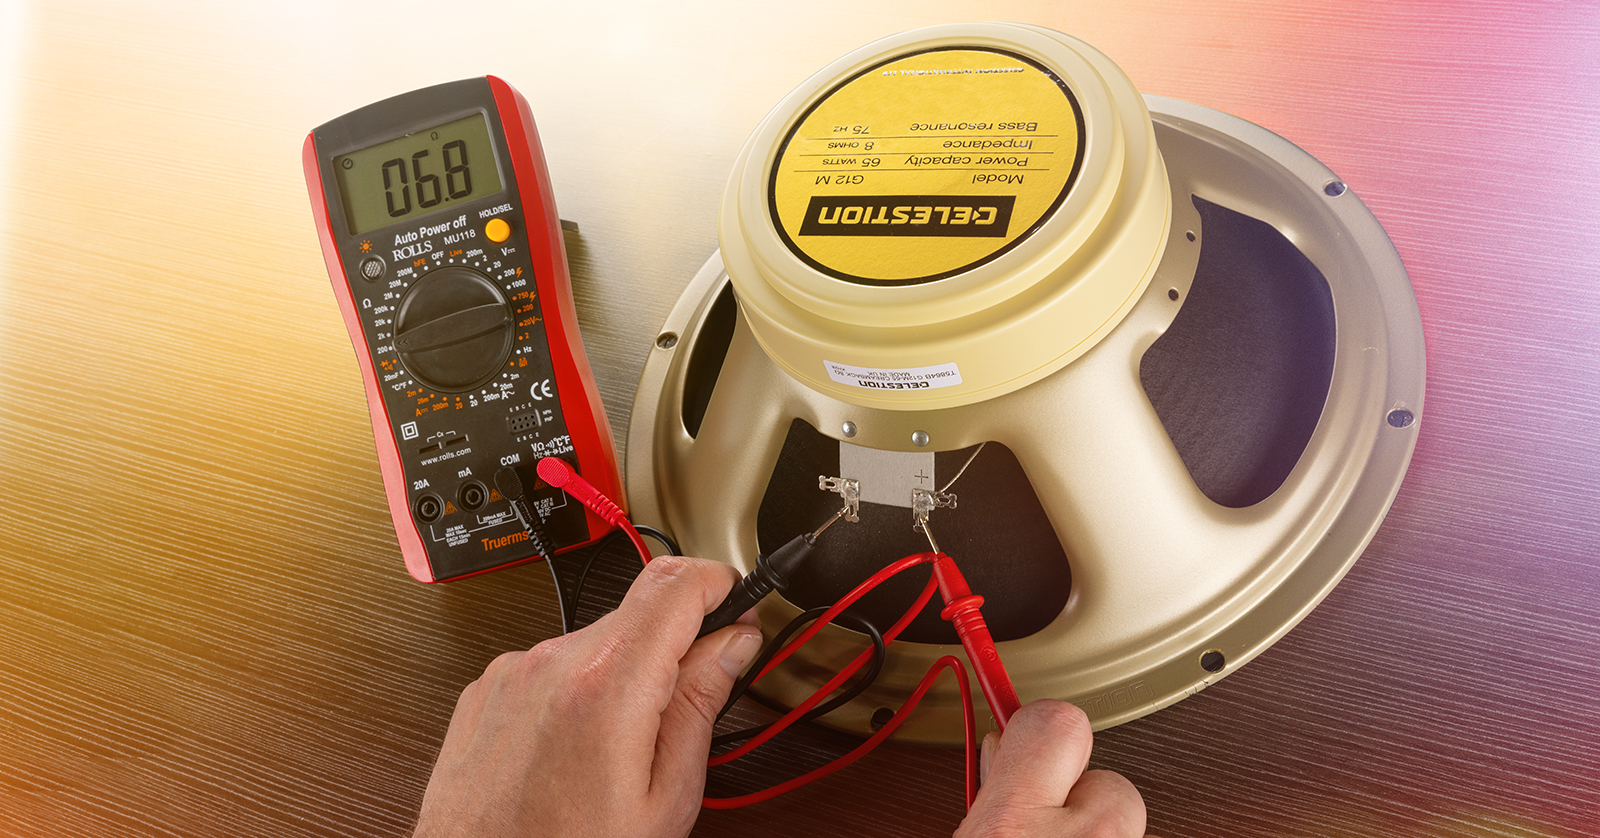
Image Source: www.sweetwater.com
Figuring Out What Speaker Impedance Is
Let’s talk about speaker impedance. What is it? Think of electricity flowing like water in a pipe. Impedance is like how much the pipe pushes back on the water flow. A higher number means more pushback. A lower number means less pushback.
Speaker impedance is a measure of how much a speaker resists the flow of electrical current. It is measured in units called ohms. It’s shown with the Greek letter omega (Ω). Common speaker impedance numbers are 4 ohms, 8 ohms, or 16 ohms.
This number is important because it tells you how much work your music player or amp needs to do to power the speaker.
Why Checking Speaker Impedance Matters
Why should you check the impedance of your speaker? There are a few good reasons.
- Matching Your Gear: You need to match amplifier impedance matching speakers. Using a speaker with the wrong impedance can hurt your amp or your speaker. An amp has a number of ohms it can handle. The speaker’s number must work with the amp’s number.
- Checking Speaker Health: A simple test can tell you if the speaker is likely broken or not. This is a quick speaker health test. If the number is very high or very low, the speaker might be bad.
- Finding Speaker Info: Sometimes, a speaker does not have the impedance number written on it. You can check it to find out. This helps you know how to use it.
- Testing New or Used Speakers: If you buy a speaker, checking its impedance is a good first step. It makes sure the speaker is what the seller said it is.
The Difference Between Impedance and DC Resistance
This part can be a little tricky, but we can make it simple.
- Impedance (Z): This number changes depending on the sound frequency. It is the total resistance to the flow of electricity when music is playing. It includes both simple resistance and other things called reactance. This is hard to measure with just a simple tool at home.
- DC Resistance (Rdc): This is the simple resistance when a steady, non-changing electricity (like from a battery or a multimeter) flows through the speaker wire coil. This is what a multimeter measures directly. This is the DC resistance speaker impedance check.
The good news is, the DC resistance is close enough for most checks. It gives you a good idea of the speaker’s normal impedance. The DC resistance is almost always lower than the stated impedance.
For example, a speaker listed as 8 ohms will usually have a DC resistance between 5 and 7 ohms. A 4-ohm speaker might show a reading between 2 and 3.5 ohms.
So, when you test speaker with multimeter, you are doing a speaker voice coil resistance test. You are measuring its DC resistance. This number helps you guess the speaker’s actual impedance.
Tools You Will Need
To do a speaker resistance measurement, you only need one main tool.
The Multimeter
This is a tool that measures different electrical things. It can measure voltage (the push of electricity), current (how much electricity flows), and resistance (how much something fights the flow). For checking speakers, you need the resistance part. This is like using an ohmmeter speaker check.
Multimeters can be digital or analog.
* Digital Multimeter: These have a screen that shows numbers. They are usually easier to read.
* Analog Multimeter: These have a needle that points to a number on a scale.
Either type works. A digital one is often simpler for beginners.
What Your Multimeter Has
Your multimeter will have:
* A dial or buttons to pick what you want to measure (like ohms, volts, amps).
* Different places to plug in wires (called jacks or ports).
* Two wires (called test leads). One is usually red, and one is black. They have metal tips.
Make sure your multimeter can measure resistance (ohms). Most do. It will have a symbol like the omega (Ω) or say “Ohms” or “RESISTANCE” on the dial or screen.
Getting Ready to Test Your Speaker
Before you test, do these simple steps.
- Turn Off Everything: If the speaker is hooked up to an amp or music player, turn the power off first. Unplug it from the wall if you can. Safety comes first!
- Unhook the Speaker: Carefully disconnect the wires from the speaker’s terminals (the spots where the wires connect). There are usually two terminals, often red and black.
- Place the Speaker: Put the speaker on a flat, steady surface. Make sure you can easily get to the connection spots.
- Look at the Terminals: See the two metal spots where the wires connect. These are where you will touch the multimeter wires.
Steps for Checking Speaker Ohms with Multimeter
Here are the simple steps to do the ohmmeter speaker check. This is how to measure speaker impedance using the DC resistance method.
Step 1: Get Your Multimeter Ready
- Turn the multimeter on.
- Find the part that measures resistance (ohms). It might have an Ω symbol.
- Turn the dial to the resistance setting.
- Pick a range. Multimeters often have different ranges for ohms (like 200Ω, 2kΩ, 20kΩ). For speakers, the range around 200 ohms (200Ω) or maybe 2k ohms (2000Ω) is usually best. Start with 200Ω if it has it. If the number on the screen says ‘OL’ or ‘1’ when you don’t touch anything, it means the resistance is higher than the range you picked. Try a higher range. If you get a number close to zero when you touch the leads together, the 200Ω range is likely good.
Step 2: Plug in the Test Leads
- The black lead usually goes into the port marked “COM” (common).
- The red lead usually goes into the port marked with the ohms symbol (Ω) or “VΩmA”. Look for the ohms symbol.
Step 3: Connect to the Speaker Terminals
- Hold the speaker steady.
- Touch the metal tip of the red test lead to one of the speaker’s connection terminals.
- Touch the metal tip of the black test lead to the other speaker connection terminal.
- It does not matter which lead goes to which terminal for this test. You just need to make a good connection to both spots. Make sure the metal tips touch the metal terminals directly.
Step 4: Read the Number
- Look at the multimeter screen. A number should appear. This number is the DC resistance of the speaker’s voice coil.
- Write this number down. It will be in ohms (Ω).
Step 5: Note the Reading
Write down the number you see. For example, you might see “6.2”. This means 6.2 ohms.
Step 6: Turn Off the Multimeter
When you are done, turn off the multimeter to save its battery.
Making Sense of Your Reading
Now you have a number. What does it mean? Remember, this number is the DC resistance. It’s usually a bit lower than the speaker’s listed (nominal) impedance.
Use this general rule: The DC resistance (Rdc) is usually about 60% to 80% of the nominal impedance (Z).
Here is a table to help you figure it out:
Table 1: Typical DC Resistance Readings
| Listed (Nominal) Impedance (Z) | Typical DC Resistance Reading (Rdc) |
|---|---|
| 4 ohms | 2.5 to 3.5 ohms |
| 6 ohms | 3.5 to 5 ohms |
| 8 ohms | 5 to 7 ohms |
| 16 ohms | 10 to 13 ohms |
Note: These are typical ranges. The actual reading can be slightly different based on the speaker design.
If your reading falls in these ranges, your speaker’s voice coil is likely okay. For example, if your reading is 6.5 ohms, it’s very likely an 8-ohm speaker. If you get 3 ohms, it’s likely a 4-ohm speaker.
Grasping the Results for Speaker Health Test
The DC resistance test is a simple speaker health test. The reading you get tells you about the speaker’s voice coil. The voice coil is a key part inside the speaker.
- Very Low Reading (Close to Zero): If the multimeter shows a number very close to 0 ohms (like 0.1 or 0.2 ohms), it might mean the voice coil wires are shorted together. This is bad. The speaker is likely broken.
- Very High Reading or ‘OL’: If the multimeter shows a very high number (like many thousands of ohms) or displays “OL” (Over Limit) or “1” on a digital meter, it means the circuit is open. This often means the voice coil wire is broken. This is also bad. The speaker is likely broken.
- Reading within Expected Range: If your reading is in the typical range (like 5-7 ohms for an 8-ohm speaker), the voice coil is likely fine electrically. This does not guarantee the speaker sounds perfect (the cone could be torn, etc.), but the electrical part is working. This is a good sign for the speaker voice coil resistance test.
So, this simple test helps you quickly check the main electrical part of the speaker.
Deciphering Amplifier Impedance Matching Speakers
Checking impedance is very important for matching speakers to amplifiers or receivers.
- Amps Have Limits: Your amp has a minimum impedance it can handle. This is usually written near the speaker connections or in the manual. It might say something like “Supports speakers 4Ω – 16Ω” or “Use with 8Ω speakers minimum”.
- Too Low Impedance: If you connect a speaker with a lower impedance than your amp can handle, the amp has to work too hard. It’s like trying to push too much water through a pipe that’s too narrow. This can cause the amp to overheat and possibly break. For example, connecting a 4-ohm speaker to an amp that says “8Ω minimum” is risky.
- Too High Impedance: If you connect a speaker with a higher impedance than your amp is designed for, the amp will not be damaged, but you will get less power. The speaker will not play as loud. An 8-ohm speaker on an amp designed for 4 ohms will work but might not sound as strong. A 16-ohm speaker on a typical home audio amp will play quietly.
Using your measured DC resistance to find the likely nominal impedance helps you make sure you are pairing your speakers safely with your amp. This is key for proper amplifier impedance matching speakers.
Detailed Steps for Using a Multimeter for Speaker Testing
Let’s break down the steps for using a multimeter for speaker testing again, but with even more detail to make it super clear.
H4: Getting Your Workspace Ready
- Power Off: Turn off any device connected to the speaker. Pull out power cords. Safety first!
- Disconnect Wires: Carefully take off the speaker wires from the speaker itself. There are usually two spots, maybe red and black. Some speakers have clips you press, others have screws you loosen. Be gentle.
- Clear Space: Put the speaker where you can work easily. Make sure it is steady and won’t fall.
- Look at Speaker Terminals: See the two metal connectors. These are the target spots for your multimeter’s probes.
H4: Setting Up Your Multimeter for Ohms
- Get the Multimeter: Have your multimeter ready.
- Turn It On: Press the power button if it has one.
- Find Ohm Setting: Look for the symbol Ω on the dial or buttons. Or it might say “Ohms” or “Resistance”.
- Select Ohms: Turn the dial or press the button to pick the ohms setting.
- Choose Range (If Needed): Some multimeters make you pick a range. For speaker testing, a range around 200 ohms (like ‘200Ω’) is usually good. If you see ‘OL’ or ‘1’ after picking 200Ω, try the next higher range (like ‘2kΩ’ or ‘2000Ω’). If your meter is ‘auto-ranging’, it does this step for you.
- Plug in Leads: Put the black lead into the port marked “COM”. Put the red lead into the port marked with Ω or “VΩmA” (look for Ω).
H4: Connecting Leads to Speaker for Test
- Hold Leads: Hold one test lead (say, the red one) by the plastic handle.
- Touch First Terminal: Touch the metal tip of the red lead firmly to one of the speaker’s metal connection terminals.
- Hold Other Lead: Pick up the black test lead by its handle.
- Touch Second Terminal: Touch the metal tip of the black lead firmly to the other speaker connection terminal.
- Good Contact: Make sure the metal tips are touching the metal terminals well. They should not touch each other or any other metal parts of the speaker frame.
H4: Reading the Speaker Resistance Measurement
- Look at the Screen: Watch the multimeter screen.
- Wait for Number: A number should appear and stop changing after a moment. This is the DC resistance.
- Write it Down: Write down the number you see. Include the unit (Ohms, Ω). Example: “Reading: 6.1 Ω”.
- Note Fluctuation: The number might jump around a tiny bit. Wait for it to settle.
H4: Finishing Up
- Remove Leads: Take the test leads away from the speaker terminals.
- Turn Off Multimeter: Turn off your multimeter.
- Reconnect Speaker: If the speaker is good, you can hook it back up to your system correctly.
This set of steps covers the using a multimeter for speaker testing process in detail. It is a key part of checking speaker ohms with multimeter.
Other Ways to Measure Impedance (Quick Look)
While the multimeter test is simple and good for checking DC resistance, finding the true, frequency-dependent impedance curve is more complex.
- Software and Test Tones: People who design speakers or are serious hobbyists use computers, special software, an audio amp, and test tones. They play tones through the speaker and use the software to measure the current and voltage at different frequencies. This creates a graph showing the impedance at each frequency. This is the proper how to measure speaker impedance method in a technical sense, but it’s not a simple test for most people at home.
- Specialized Meters: There are some meters made specifically for measuring speaker impedance, but they are usually more costly than a standard multimeter.
For most checks, like a speaker health test or figuring out the likely nominal impedance for amplifier impedance matching speakers, the simple multimeter DC resistance test is enough.
Making Sure Your Amplifier and Speakers Work Together
The goal of checking impedance is often to ensure you have amplifier impedance matching speakers.
Let’s think about the amp’s requirements.
* Minimum Impedance: The most critical number is the minimum impedance your amp can handle. If it says “8Ω minimum”, you must use speakers that are 8 ohms or higher (like 16 ohms). Using 4-ohm speakers is usually not safe.
* Using Multiple Speakers: If you connect more than one speaker to a single output on your amp (like connecting two speakers to the “Left” channel), you change the total impedance the amp sees.
* Parallel Connection: Connecting speakers in parallel lowers the total impedance. For two speakers of the same impedance, the total is half of one speaker’s impedance. Two 8-ohm speakers in parallel make a 4-ohm load. This is common. Connecting two 4-ohm speakers in parallel makes a 2-ohm load, which most home amps cannot handle safely.
* Series Connection: Connecting speakers in series raises the total impedance. For two speakers, the total is the sum of their impedances. Two 8-ohm speakers in series make a 16-ohm load. This is less common in home audio.
Knowing the nominal impedance (estimated from your DC resistance test) is vital if you plan to connect multiple speakers to one amp channel.
Troubleshooting Common Ohmmeter Speaker Check Results
Sometimes, when you do an ohmmeter speaker check, you get a strange result. Here is what some common results mean:
- Reading is OL (Over Limit) or 1: This means the resistance is higher than the meter can measure on that setting.
- Possible Cause 1: The speaker wire (voice coil) is broken somewhere. This is an “open circuit”. The speaker is bad.
- Possible Cause 2: Your test leads are not making good contact with the speaker terminals. Make sure they are touching the metal firmly.
- Possible Cause 3: Your multimeter range is set too low. Try a higher resistance range (like 2kΩ or 20kΩ). If it still reads OL on the highest range, the speaker is definitely open.
- Reading is Close to 0 Ohms (like 0.1, 0.2): This means there is almost no resistance.
- Possible Cause 1: The speaker voice coil wires are touching each other somehow (a “short circuit”). The speaker is bad.
- Possible Cause 2: Your test leads are touching each other instead of the speaker terminals.
- Possible Cause 3: Your multimeter might need calibration or has an issue. But usually, a working meter will show a small number (like less than 0.5) when the leads are touched together, then a higher number when connected to a good speaker. If it stays near 0 on the speaker, it’s likely the speaker is shorted.
- Reading Jumps Around and Doesn’t Settle:
- Possible Cause: Poor contact between the test leads and the speaker terminals. Wiggle the leads or clean the terminals slightly. If it still jumps, there might be a loose connection inside the speaker, which usually means it’s faulty.
These troubleshooting tips help you interpret the speaker voice coil resistance test results better.
The Importance of Speaker Voice Coil Resistance Test
The voice coil is like the engine of the speaker. It is a coil of wire that moves the speaker cone when electricity flows through it from the amp.
The DC resistance test is a direct test of this wire coil.
* If the wire is broken, the reading is OL/open.
* If the insulation on the wire is melted and wires are touching, the reading is near zero/shorted.
* If the wire is okay, you get a reading in the expected range.
This is why the simple multimeter check is such a useful speaker health test. It quickly tells you if the heart of the speaker’s electrical system is working.
Final Thoughts on Checking Speaker Impedance
Checking speaker impedance, or more accurately, its DC resistance, is a simple but powerful task. It requires only a basic multimeter and a few minutes of your time.
By performing a speaker resistance measurement, you gain valuable information. You can confirm the likely impedance of an unknown speaker. You can do a basic speaker health test to see if the voice coil is working. Most importantly, you can make sure you are doing proper amplifier impedance matching speakers to protect your equipment.
Using a multimeter for speaker testing is easy once you know how. Just set it to ohms, connect the leads to the speaker terminals, and read the number. Compare this number to the typical ranges to estimate the speaker’s nominal impedance.
This ohmmeter speaker check should be part of your routine when dealing with new, old, or potentially faulty speakers. It is a quick way to test speaker with multimeter and avoid potential problems.
Frequently Asked Questions (FAQ)
H4: What is a “nominal” impedance?
Nominal impedance is the average or stated impedance number for a speaker (like 4 or 8 ohms). The speaker’s actual impedance changes as the sound frequency changes, but the nominal number is a simple way to describe it for matching purposes. Your multimeter measures DC resistance, which is related to, but different from, this nominal impedance.
H4: Can I hurt my speaker or multimeter by doing this test?
No, not if you do it right. The multimeter sends a very small amount of power (usually less than what a small battery uses) to measure resistance. This will not hurt the speaker’s voice coil. Just make sure the speaker is disconnected from your amp or receiver first.
H4: My multimeter reading is exactly 0 ohms. Is that good?
No, a reading of exactly or very close to 0 ohms usually means the speaker’s voice coil is shorted. This means the wires are touching when they shouldn’t be. The speaker is likely damaged and should not be used.
H4: My multimeter reading is “OL” or very high. Is that good?
No, “OL” or a very high reading (on the highest ohms range) means there is an open circuit. This usually means the voice coil wire is broken. The speaker is likely damaged and will not produce sound.
H4: My reading is 6.3 ohms. What is the speaker’s impedance?
A DC resistance of 6.3 ohms strongly suggests that the speaker is rated as an 8-ohm speaker. The DC resistance is usually 60-80% of the nominal impedance. 6.3 is within the typical range (5-7 ohms) for an 8-ohm speaker.
H4: Can I use this test on any type of speaker?
Yes, you can use this DC resistance test on most standard dynamic speakers, including woofers, midranges, tweeters, and full-range speakers. It works on car speakers, home stereo speakers, guitar speakers, and pro audio speakers.
H4: Does this test tell me if the speaker sounds good?
No, this test only checks the electrical connection of the voice coil. It tells you if that part is likely working or broken. It does not tell you if the speaker cone is damaged, if the suspension works right, or how good the speaker sounds. It’s an electrical health check, not a sound quality test.
H4: My amp needs 8-ohm speakers. I measured my speaker and got 6 ohms. Is that okay?
If your amp requires an 8-ohm minimum and your meter shows 6 ohms DC resistance, it strongly suggests you have a 6-ohm nominal speaker. While some amps might handle a 6-ohm speaker when rated for 8 ohms, it is generally safer to use a speaker that gives a reading in the typical range (5-7 ohms) for an 8-ohm speaker, or a speaker clearly labeled as 8 ohms or higher. Connecting a speaker with too low an impedance can harm your amp. Check your amp’s manual carefully.
H4: My speaker is labeled 8 ohms, but I measured 5.5 ohms. Is it broken?
No, this is likely normal. A reading of 5.5 ohms DC resistance is well within the typical range (5-7 ohms) for a speaker rated at 8 ohms nominal impedance. The DC resistance is expected to be lower than the nominal impedance. This test suggests the speaker’s voice coil is fine.