
How long does it take a mini fridge to defrost? There is no single answer, as it depends on several things like how much ice is in it and the temperature of the room, but you can expect the process to take anywhere from 2 to 24 hours or even longer for a heavily frosted unit. It usually takes at least a few hours for most mini fridges to defrost. The time changes based on many factors, like how much ice has built up inside. A thick layer of ice will take much longer to melt than a thin layer. The warmth of the room where the fridge is also makes a big difference. A cold room slows down the melting. A warm room helps the ice melt faster.
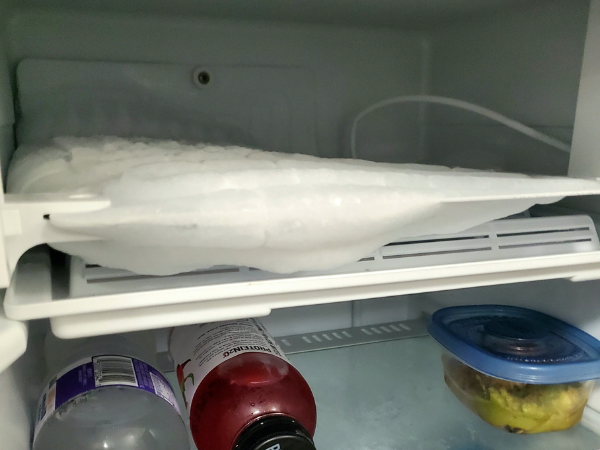
Image Source: www.collegeboxes.com
Why Your Mini Fridge Needs Defrosting
Your mini fridge works hard to keep things cold. Over time, ice can build up inside. This happens when moist air gets into the fridge. The cold air makes this moisture freeze. It sticks to the walls and shelves. This ice buildup is normal. But too much ice is a problem.
Too much ice takes up space. This means less room for your food and drinks. Ice also makes the fridge work harder. The cooling system has to push through the ice. This uses more electricity. It can make the fridge less cold. Some parts might get too cold. Other parts might not be cold enough. This is not good for your food. Ice buildup can also block vents. Air needs to move inside the fridge. Blocked vents stop the air flow. This makes the fridge less efficient. It can even damage the fridge over time. Knowing the signs mini fridge needs defrosting helps you keep it running well.
Signs It’s Time to Defrost
How do you know when your mini fridge needs defrosting? There are clear signs to look for.
- Thick Ice Layer: The most obvious sign is a thick layer of ice. It might be on the back wall. It might be in the freezer section. If the ice is more than a quarter inch thick, it’s time.
- Less Space Inside: Ice buildup shrinks the space. You might notice you can’t fit as much food. The ice takes up too much room.
- Fridge Door Doesn’t Seal Well: Ice can push against the door seal. This stops the door from closing tightly. Warm air gets in more easily. This makes more ice! It’s a bad cycle.
- Fridge Runs Constantly: When there’s too much ice, the fridge works harder. It might run almost all the time. This uses more energy.
- Food Not Staying Cold: The fridge might not cool well anymore. This can happen even if the motor runs a lot. Ice blocks the cooling power.
- Visible Frost on Outside: Sometimes, frost might even appear on the outside of the fridge. This means the seal is bad or ice is pushing the door open.
If you see these signs, plan to defrost your mini fridge soon. Don’t wait too long. Dealing with a lot of ice takes more time.
Steps for the Mini Fridge Defrosting Process
Defrosting a mini fridge is not hard. It takes time and some steps. This is how to do a manual defrost mini fridge.
h4 Steps to Start Defrosting
- Empty the Fridge: Take out all food and drinks. Put them in a cooler bag or another fridge. This keeps your food safe.
- Unplug the Fridge: This is very important. Find the power cord. Pull it out of the wall socket. Leaving mini fridge unplugged stops it from trying to cool. It lets the ice melt naturally. It is also safe. You don’t want water near electricity.
- Open the Door: Leave the fridge door wide open. This lets warm air get in. The warm air helps melt the ice.
- Protect Your Floor: Melting ice turns into water. A lot of water can come out. Place towels or shallow pans around the bottom of the fridge. This catches the water. Some mini fridges have a drain hole. Make sure a pan is under this hole if yours has one.
h4 Waiting for the Ice to Melt
Now you wait. The ice needs time to melt. This is the longest part of the mini fridge defrosting process.
- Be Patient: Don’t rush this part. Let the natural temperature melt the ice.
- Check on It: Look at the fridge sometimes. See how the ice is melting. Change out towels or empty pans as they fill with water.
- Large Ice Chunks: As the ice melts, large pieces might break off. You can gently remove these. Be careful not to use force. Don’t scrape hard.
h4 Finishing the Defrosting
When all the ice is gone, the defrosting is almost done.
- Clean Inside: Use a cloth and mild soap and water. Wipe down the inside walls and shelves. This cleans away any dirt or leftover water. Dry everything well.
- Dry Thoroughly: Make sure the inside is completely dry. Use a dry towel. Water left inside can turn into new ice right away.
- Check the Drain: If your fridge has a drain hole, make sure it’s clear. You can use a pipe cleaner to gently push through it.
- Clean the Outside: Wipe down the outside of the fridge.
h4 Restarting the Fridge
Now your fridge is clean and ice-free.
- Close the Door: Make sure the door is closed tightly.
- Plug It Back In: Put the power cord back into the wall socket.
- Let It Cool: Let the fridge run for an hour or two. This lets the inside get cold again.
- Put Food Back: Once the fridge is cold, put your food back inside.
These steps cover how to defrost small refrigerator. Following them helps your fridge work better.
What Affects Defrost Time
The time it takes for a mini fridge to defrost can change a lot. Many things play a role. Knowing these helps you guess how long it might take. It also helps you prepare.
h4 Thickness of Ice Buildup
This is the biggest factor. A very thick layer of ice takes much longer to melt. Ice is frozen water. It takes heat to turn it back into liquid water. More ice needs more heat and more time. If you only have a light frost, it might melt in 2-4 hours. If you have inches of ice, it could take 12-24 hours or more. Dealing with defrost ice buildup mini fridge is mainly about waiting for this ice to melt.
h4 Room Temperature
The temperature of the room matters a lot. A warm room helps ice melt faster. A cold room makes it melt slower. If you defrost your fridge in a heated house, it will be quicker than in a cold garage. If it’s summer and the room is warm, the ice will melt quickly. If it’s winter and the room is cool, it will take more time.
h4 Room Airflow
Good airflow in the room helps. If the room air can move around the fridge and into the open door, it brings more heat to the ice. A stuffy room might slow things down a little.
h4 Fridge Size
A bigger mini fridge might hold more ice. This would likely take longer to defrost. A very small personal cooler fridge might defrost faster than a larger compact fridge with a freezer section.
h4 Freezer Compartment Size
Many mini fridges have a small freezer inside. This section usually gets the most ice. The time to defrost small freezer compartment depends on how full of ice it is. This part often takes the longest to clear.
h4 Using Heat Sources (Use with Caution!)
Some people try to speed up defrosting. They might use a fan or even a hairdryer. Using gentle heat can help. But you must be very careful. Too much heat can damage the plastic inside the fridge. Never use boiling water. Never use sharp tools to chip ice. We will talk more about speeding up later. Using outside heat changes the defrost time.
Here is a simple look at factors and time:
| Factor | More of It / Higher Value | Less of It / Lower Value | Expected Defrost Time |
|---|---|---|---|
| Ice Thickness | Thick | Thin | Longer |
| Room Temperature | Warm | Cold | Shorter |
| Room Airflow | Good | Poor | Might be Longer |
| Fridge Size | Larger | Smaller | Might be Longer |
| Using Fans | Yes | No | Shorter |
Remember, these are general ideas. Each fridge and situation is different.
How to Speed Up Mini Fridge Defrosting
Waiting for ice to melt can take a long time. If you need your fridge back quickly, you might want to speed things up. There are safe ways to do this. There are also unsafe ways. Always use safe methods.
h4 Safe Ways to Make it Faster
- Use a Fan: Point a regular electric fan at the open fridge door. The moving air helps bring warm room air to the ice. This can make the melting go faster. It’s a simple and safe method.
- Place Warm Water Inside (Carefully): Fill a bowl or pot with warm, not boiling, water. Place it inside the empty fridge or freezer compartment. The steam and heat from the water will help warm the inside of the fridge. This melts the ice faster. Close the door for a short time to keep the heat in. Check and change the water as it cools. Make sure the container is stable and won’t tip! Put a towel underneath it just in case.
- Use a Hairdryer (Low Heat, From a Distance): This should be done with great care. Use a hairdryer on a low heat setting. Keep it moving. Hold it far away from the plastic parts. Do not point it directly at one spot for too long. The goal is to warm the air inside, not melt the plastic. Make sure the power cord is far away from any water. This method needs constant attention.
- Increase Room Temperature: If possible, turn up the heat in the room where the fridge is. A few extra degrees can help speed things up.
h4 Things NOT to Do
Some things should never be done to speed up defrosting. They can damage your fridge or be dangerous.
- Do Not Use Sharp Objects: Never use a knife, ice pick, or screwdriver to chip or scrape ice. You can easily puncture the cooling lines inside the walls. This will break your fridge permanently.
- Do Not Use Boiling Water: Very hot water can crack or warp the plastic lining of the fridge. Use only warm or hot tap water, not boiling.
- Do Not Use Electric Heaters Inside: Do not put electric heaters or ovens inside the fridge. This is dangerous and can damage the unit.
- Do Not Leave Unattended with Heat Sources: If you are using a hairdryer or hot water, stay with the fridge. This helps prevent accidents.
Using safe methods can noticeably speed up mini fridge defrosting. But even with these helps, it still takes time. Don’t expect ice to vanish in minutes if there’s a lot of it.
Defrost Ice Buildup Mini Fridge: Focus on the Problem
The main reason you defrost is to get rid of the ice buildup. This ice is the problem. It forms because of moisture getting into the cold air. Every time you open the door, warm, moist air enters. This air hits the cold surfaces inside. The moisture freezes. It adds layer after layer.
h4 Why Ice Forms and How to Stop It
- Opening the Door: Opening the door less often helps. Quick openings are better than long ones.
- Door Seal: A bad door seal lets warm air leak in constantly. Check your door seal (gasket). Make sure it’s clean. Make sure it isn’t cracked or bent. You can test the seal by closing the door on a piece of paper. If the paper pulls out easily, the seal might be bad.
- Putting Warm Food Inside: Putting hot or warm food straight into the fridge adds a lot of moisture to the air inside. Let food cool down before putting it in the fridge.
- Humid Air: If you live in a place with high humidity, more moisture is in the air that enters the fridge. This can lead to faster ice buildup.
Preventing ice buildup helps reduce how often you need to defrost. It keeps your fridge running well between defrosts.
When you are defrosting, the goal is to turn that frozen water back into liquid. Then you clean it up. The thicker the ice, the longer it takes to melt. Patience is key when dealing with a lot of defrost ice buildup mini fridge. Letting it melt naturally is the safest way. Speeding up methods just add heat to help the melting happen faster.
Time to Defrost Small Freezer Compartment
Many mini fridges have a small box inside. This is the freezer compartment. It’s usually the coldest part. This is where ice builds up the fastest and thickest. The time to defrost small freezer compartment is often the main factor in how long the whole defrosting process takes.
h4 Why the Freezer Gets So Much Ice
The freezer area is kept much colder than the main fridge area. This extreme cold makes moisture freeze onto its surfaces very quickly. Also, the freezer door (if it has one) or the main fridge door lets in warm air. This warm air’s moisture heads straight for the coldest spot – the freezer.
h4 Defrosting the Freezer Section
When you defrost the whole fridge, the freezer section is included.
- Open its Door: If the freezer has its own small door, open it wide during defrosting.
- Focus Heat (Carefully): If you are using a fan or warm water, you can try to direct the help towards the freezer section. Place the bowl of warm water right inside the empty freezer box if possible.
- Expect It to Take Longer: Don’t be surprised if the main fridge compartment is clear of ice first. The freezer area will likely still have thick ice. It might need extra time.
- Gentle Ice Removal: As ice loosens in the freezer, you can gently pull it out. Do not chip or pry. Only remove ice that is clearly separating from the walls.
The total time to defrost small freezer compartment can easily be several hours, maybe 4 to 12 hours for a moderate buildup, and much longer for a very heavy one. It often dictates the overall defrost time for the entire mini fridge.
Water Cleanup After Fridge Defrost
Defrosting means melting ice. Melting ice turns into water. A lot of water can collect. Water cleanup after fridge defrost is a very important step. If you don’t clean the water well, it can cause problems.
h4 Why Proper Cleanup Matters
- Prevents New Ice: Any water left inside will freeze again when you turn the fridge back on. This starts the ice buildup process again right away.
- Prevents Smells: Standing water can lead to bad smells or mildew.
- Protects Floors: If water overflows your towels or pans, it can damage your flooring.
- Safety: Water near electrical cords is dangerous.
h4 Steps for Water Cleanup
- Collect Melting Water: You should have already put towels or pans down. Keep checking them. Empty pans when they get full. Replace wet towels with dry ones.
- Sop Up Inside Water: Once the ice is melted, there will be water inside the fridge. Use absorbent towels to soak up all this water from the bottom and shelves.
- Wipe Walls and Ceiling: Water drops might be on the walls and ceiling. Wipe these down completely.
- Check the Drain: Many mini fridges have a small drain hole inside, usually at the back or bottom. This is meant to let defrost water flow to a tray near the compressor, where it evaporates. Make sure this drain isn’t blocked. Use a thin, flexible tool like a pipe cleaner or straw to gently clear it. Clean the drain hole.
- Empty and Clean the Drip Tray: Some mini fridges have a drip tray outside, usually at the back near the motor. This tray catches water from the drain hole. This water usually evaporates on its own from the heat of the motor. But if there was a lot of ice, the tray might overflow, or it might be dirty. Check this tray. If it’s full, empty it. Clean it if needed. Make sure it’s placed back correctly.
- Dry Everything: Use dry towels or a cloth to dry every surface inside the fridge. Pay extra attention to corners and the bottom. Everything should feel completely dry.
- Clean Around the Fridge: Check the floor around the fridge for any water spills. Clean and dry the floor area completely.
Good water cleanup after fridge defrost ensures a fresh start for your fridge. It helps prevent quick refreezing and keeps your fridge clean.
Compact Refrigerator Defrosting Tips
Defrosting a compact refrigerator, or mini fridge, is simple but needs care. Here are some extra compact refrigerator defrosting tips to make the job easier and safer.
h4 Planning and Preparation
- Pick a Good Time: Choose a time when you don’t need to use the fridge for several hours. Overnight is often a good time, if the room temperature is suitable.
- Have Supplies Ready: Get towels, pans, and maybe a fan ready before you start. Have a cooler or a friend’s fridge ready for your food.
- Check the Manual: Look at your mini fridge’s instruction manual. It might have specific defrosting instructions or tips for your model.
h4 During Defrosting
- Be Patient: Natural melting is the safest. Resist the urge to chip ice forcefully.
- Monitor Water: Keep a close eye on the water collection. Don’t let pans overflow.
- Ensure Ventilation: Keep the room aired out if possible. This helps with air circulation, which aids melting slightly.
h4 After Defrosting
- Clean Thoroughly: Don’t skip the cleaning step. A clean fridge smells better and is more hygienic.
- Dry Completely: Make sure it’s bone dry inside before plugging it back in.
- Check Door Seal: Once clean, check the door seal again. Make sure it’s clean and sits flat all the way around. This helps prevent ice buildup later.
- Let It Cool Down: Wait an hour or two after plugging it in before putting food back. This lets the fridge reach a safe temperature.
h4 Preventing Future Buildup
These tips help for the current defrost. But you can also try to slow down how fast ice builds up again.
- Don’t Open Door Too Often: Every time you open it, moist air gets in.
- Close Door Quickly: Don’t leave the door open for long periods.
- Check Door Seal Often: Clean it and make sure it seals well.
- Cool Hot Food First: Let hot food cool a bit before putting it in the fridge.
- Cover Liquids: Liquids in open containers add moisture to the fridge air as they evaporate. Store liquids in closed bottles or covered containers.
Using these compact refrigerator defrosting tips makes the task less of a hassle. It also helps extend the time before you need to defrost again. Regular defrosting keeps your mini fridge working its best.
Interpreting How Often to Defrost
There is no fixed rule for how often you need to defrost your mini fridge. It depends on several things.
- How Much You Use It: If you open and close the door many times a day, more moist air gets in. This means ice builds up faster.
- Where It Is Located: If the room is very humid, ice will build up faster.
- How Good the Door Seal Is: A poor seal lets warm, moist air in all the time.
- What You Store Inside: Storing lots of uncovered liquids or warm food often adds moisture.
You should defrost your mini fridge when you see the signs we talked about earlier. The main sign is when the ice is about a quarter inch thick. For some mini fridges used heavily, this might happen every few months. For others used less often in dry places with good seals, it might only be needed once a year or even less often. Check your fridge regularly. Don’t wait until the ice is inches thick. Defrosting a small amount of ice is much faster and easier than a large block.
Consider defrosting a part of your regular cleaning routine. Maybe plan to check for ice every month. If you see frost starting, you can deal with it before it becomes a big problem.
Manual Defrost Mini Fridge: Why Most Need It
Most mini fridges are “manual defrost” models. This means they don’t have a system to melt the ice automatically. Larger refrigerators often have auto-defrost features. These features briefly warm the cooling coils at set times. This melts the frost before it can build up thick. The water drains away to a tray.
Mini fridges are usually simpler. They cost less to make. Adding an auto-defrost system would make them more complex and expensive. It would also use more energy. So, most mini fridges are made so you have to defrost them yourself. This is the “manual defrost” type.
This is why you need to unplug it and let the ice melt. The fridge doesn’t do it for you. Knowing you have a manual defrost mini fridge means you need to check for ice and plan to defrost it yourself when needed. It’s part of owning this type of appliance. It’s not a fault, just how they are designed.
Is There Such a Thing as Auto-Defrost Mini Fridges?
Yes, a few mini fridge models do have auto-defrost. They are less common than manual defrost ones. These models work like larger fridges. They run cycles to melt frost. If you have one of these, you won’t see thick ice buildup. You also won’t need to manually defrost it. You will just need to clean out the water tray sometimes. But if you bought a standard, lower-cost mini fridge, it is almost certainly a manual defrost type. Check your manual or the fridge’s features if you are not sure.
Grasping the Full Defrosting Picture
So, putting it all together, the total time for the mini fridge defrosting process depends on the amount of ice, the room temperature, and whether you use methods to speed it up.
- A small amount of frost might take just 2-4 hours.
- A moderate amount of ice might take 5-10 hours.
- A very heavy ice buildup could take 12-24 hours or even longer.
Adding a fan or a bowl of warm water might cut down the time, perhaps by a few hours depending on the situation. But it still takes time for the ice to physically change from solid to liquid.
The process involves unplugging, emptying, opening the door, waiting for melting, managing the water, cleaning, drying, and restarting. Cleanup, especially water cleanup after fridge defrost, is just as crucial as the melting itself.
Recognizing the signs mini fridge needs defrosting early saves you time later. A little ice is faster to melt than a lot. Using compact refrigerator defrosting tips like planning and careful water management makes the job easier. And remember, for a manual defrost mini fridge, this maintenance is necessary to keep it working well and using energy efficiently.
The time to defrost small freezer compartment is often the longest part of the whole process because that’s where most ice collects.
By understanding these points, you can better manage the defrosting of your mini fridge. It’s a necessary task for these appliances. It ensures they stay cold, your food stays fresh, and you don’t waste electricity.
Frequently Asked Questions (FAQ)
h4 Can I leave my mini fridge unplugged for a long time?
Yes, you can leave your mini fridge unplugged for a long time. Many people unplug them when not in use, like during holidays or between school years. Just make sure it’s completely dry inside before storing it unplugged to prevent mold or bad smells. Leaving it unplugged is required for defrosting.
h4 How do I know if the ice is completely melted?
Look closely inside. There should be no white frost or ice on the walls or in the freezer area. The surfaces should look like clean plastic or metal, maybe with water drops, but no solid ice. Run your hand gently over the surfaces (if they are clean) to feel if any hard spots are left under water.
h4 What if my fridge doesn’t have a drain hole?
Some very simple mini fridges might not have a drain hole inside. In this case, all the melting water will just collect at the bottom of the fridge cavity. You will need to use towels or a sponge to soak up all this water by hand. Be extra careful to get every bit of water out before cleaning and drying.
h4 Can I put salt on the ice to melt it faster?
No, do not use salt. Salt can damage the surfaces inside your fridge. Stick to safe methods like warm air (fan), warm water in a bowl, or a hairdryer on low heat from a distance.
h4 My fridge smells bad after defrosting. What should I do?
A bad smell usually means it wasn’t cleaned well or wasn’t dried completely. Clean the inside again using baking soda mixed with water. A few tablespoons of baking soda in a quart of water works well. Wipe everything down, rinse with clean water, and dry thoroughly. Leaving an open box of baking soda inside after it’s dry can help absorb smells. Make sure any drain holes or trays were cleaned too.
h4 Is defrosting bad for the mini fridge?
No, defrosting is necessary and good for the mini fridge. It helps it run correctly and efficiently. Not defrosting when needed is bad for the fridge and can cause damage over time.
h4 How often should I defrost my mini fridge?
Defrost when the ice is about a quarter inch thick. This could be every few months to once a year, depending on how the fridge is used and the conditions. Check it regularly to know when it’s needed.
h4 What temperature should the room be for fastest defrosting?
A warmer room helps. Room temperature around 70-75°F (21-24°C) is good. Much colder will slow it down. Much warmer might speed it up more, but also consider your comfort.
h4 What is the difference between frost and ice buildup?
Frost is a thin, white layer that forms first. Ice buildup is when this frost gets thicker and harder, becoming a solid block of ice. Defrosting is needed when the frost becomes a noticeable ice layer.