
Roasting Hatch chile peppers brings out their best flavor. It makes them soft and smoky. You can use them in many dishes. How long roast green chiles? Usually, green chiles need about 20 to 30 minutes in the oven to get properly roasted, turning them every 10 minutes. The exact time depends on the size of the chiles and your oven.
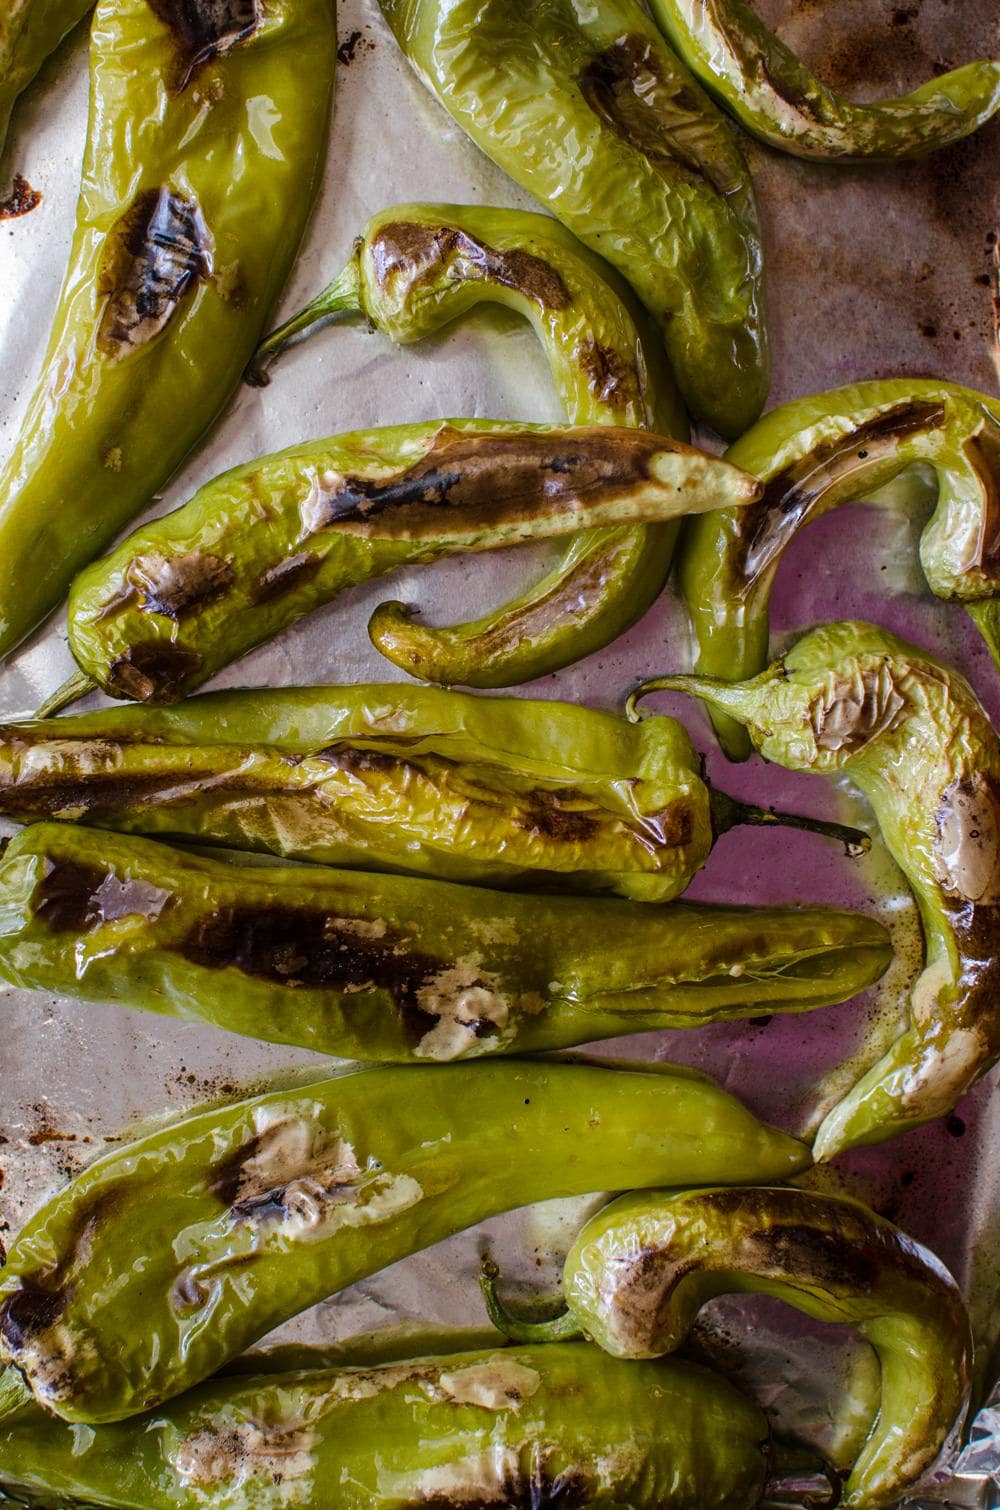
Image Source: www.theflavorbender.com
What Are Hatch Chile Peppers?
Hatch chiles are special peppers. They grow in the Hatch Valley area of New Mexico. This region has unique soil and climate. These things give Hatch chiles their special taste. They are known for a smoky, earthy flavor. They also have a heat level that can vary a lot. Some are mild. Some are very hot.
Hatch chiles are harvested in late summer. This time is often called “Chile Season” in New Mexico. People love to roast them. Roasting unlocks their deep flavor. It also makes their tough skin easy to remove.
Why Roast Hatch Chiles in the Oven?
There are many ways to roast chiles. You can use a grill. You can use a stovetop burner. But roasting in the oven is easy. It lets you cook a large batch at once. It’s also great for even heating. The oven method gives a nice, smoky char. It’s a popular way for many home cooks. It’s often seen as the best way roast chiles oven method for convenience and good results.
Roasting changes the pepper. The heat softens the flesh. It loosens the skin. It develops a deep, complex flavor. This roasted flavor is key to many classic New Mexico green chile recipes.
Getting Chiles Ready for Roasting
Before you roast, you need to get the chiles ready. This step is simple but important. It’s part of preparing chiles for roasting.
Choosing Your Chiles
Pick chiles that look good. They should be firm. Their skin should be smooth and shiny. Avoid chiles with soft spots or wrinkles. Hatch chiles come in different heat levels. Think about how hot you want your food. Mild, medium, hot, and extra hot options are usually available during chile season.
Washing the Chiles
Wash the chiles under cool running water. Gently rub off any dirt. Make sure they are clean.
Drying the Chiles
Dry the chiles completely. You can use paper towels. Wet chiles won’t char well. Drying helps them roast better.
A Quick Safety Note
Some people find pepper oils can bother their skin. It’s a good idea to wear gloves. This is especially true if you have sensitive skin. Wash your hands well with soap and water after handling chiles, even if you wore gloves. Be careful not to touch your eyes or face.
Setting Up Your Oven for Roasting
The oven is a great tool for roasting chiles. You need the right heat. You also need the right setup. This is all about the hatch chile roasting process in the oven.
Selecting the Roasting Temperature
What is the right roasting temperature hatch chiles need? A high temperature is best. This helps char the skin quickly. It cooks the inside at the same time. Most people use a temperature between 400°F and 450°F (200°C to 230°C). Some even go up to 500°F (260°C). Higher heat means faster roasting and more charring. Let your oven heat up fully before you start.
Preparing the Baking Sheets
You need one or two baking sheets. Line them with foil or parchment paper. This makes clean-up much easier. You don’t need to oil the pan. The chiles have natural oils.
Arranging the Chiles
Place the dry chiles on the prepared baking sheets. Lay them in a single layer. Make sure they don’t touch much. This helps them roast evenly. If the pan is too crowded, they will steam instead of roast.
The Oven Hatch Chile Roasting Process
Now it’s time to roast! Put the baking sheets in your hot oven.
Initial Roasting Time
Put the pan in the oven. Let the chiles roast for about 10-15 minutes. Watch them. The skin should start to blister and blacken.
Turning the Chiles
After 10-15 minutes, take the pan out. Use tongs to turn each chile over. You want all sides to get charred. Put the pan back in the oven.
Finishing the Roast
Let them roast for another 10-15 minutes. Keep watching them. The chiles are done when the skin is mostly blackened and blistered. The chile itself should look softened. Remember, how long roast green chiles takes depends on size and temperature. It might take 20 minutes total for smaller chiles. It might take 30 minutes or more for larger ones. Don’t worry if some spots are more blackened than others. This char adds great smoky flavor.
Total Roasting Time
Generally, the hatch chile roasting process in the oven takes about 20 to 30 minutes at 400-450°F. The key is getting good charring on most of the skin.
Softening Chiles for Easier Peeling
This step is very important. It makes peeling roasted hatch peppers much easier.
Why Steam?
After roasting, the chile skins are loose. But they can still be hard to peel. Putting the hot chiles in a closed space traps steam. This steam helps the skins lift away from the flesh.
The Steaming Method
As soon as the chiles come out of the oven, put them in a bowl. Cover the bowl tightly. You can use plastic wrap or a lid. Another good way is to put the hot chiles in a clean paper bag. Roll the top of the bag shut. Let the chiles steam for at least 15-20 minutes. You can even leave them for up to an hour. They will cool down during this time, which also makes peeling safer.
Letting Chiles Cool
Let the chiles cool completely in the steaming container. This cooling time is just as important as the steaming time for easy peeling.
Removing the Skins and Seeds
Now comes the part about peeling roasted hatch peppers. It’s messy but simple after steaming.
Peeling Technique
Once the chiles are cool enough to touch, take them out one by one. The skin should peel off easily. Just use your fingers. If a piece of skin sticks, you can use a small knife to scrape it gently. Don’t worry about getting every single bit of skin off. Small pieces are fine.
Removing Seeds and Stem
After peeling, hold the chile by the stem end. Gently tear or cut near the top to remove the stem. You can then cut a slit down the side of the chile. Open it up. Most seeds will be inside. You can scrape out the seeds and the veins (the white ribs) with your finger or a spoon. The veins hold a lot of heat, so removing them makes the chile milder. Keep them in if you like it hot.
Keeping the Juice
As you peel and seed, a flavorful juice might come out. You can save this juice. It’s great to add back to whatever dish you make with the chiles.
Storing Roasted Hatch Chiles
Once roasted, peeled, and seeded, you need to store your chiles. Proper storage keeps them fresh. It also lets you enjoy them long after chile season. This is about storing roasted hatch chiles.
Short-Term Storage (Refrigerator)
If you plan to use the chiles within a few days, store them in the fridge. Put them in an airtight container or a zip-top bag. They will keep in the refrigerator for 3-5 days.
Long-Term Storage (Freezer)
Freezing roasted green chiles is the best way to keep them for a long time. They freeze very well.
There are a few ways to freeze them:
* Whole Chiles: Put peeled and seeded whole chiles in a freezer bag. Remove as much air as possible.
* Chopped Chiles: Chop the roasted chiles into the size you will likely use them. Put the chopped chiles into freezer bags or small containers.
* Chile “Bricks”: For larger amounts, you can pack chopped chiles tightly into freezer bags. Flatten the bag into a thin layer. This makes it easy to break off pieces later.
* Ice Cube Trays: For small portions, chop finely and put into ice cube trays. Freeze until solid. Then transfer the frozen cubes to a freezer bag. Each cube is a small, ready-to-use amount.
Properly frozen roasted Hatch chiles can last for a year or even longer. Make sure the container is airtight to prevent freezer burn.
Using Roasted Hatch Chiles
Roasted Hatch chiles are incredibly versatile. They add flavor to so many foods. Let’s talk about using roasted hatch chiles.
Classic Uses
Roasted Hatch chiles are a key part of New Mexico green chile recipes. The most famous is Green Chile Stew. It’s a hearty dish with pork or chicken, potatoes, and lots of green chile. Other classics include Green Chile Cheeseburgers and Green Chile Enchiladas.
More Ideas
But don’t stop there!
* Add chopped chiles to scrambled eggs or omelets.
* Mix into dips like queso or salsa.
* Put them on top of pizza or tacos.
* Stir into soups, stews, or chili (red or green!).
* Blend into sauces or marinades.
* Use them in cornbread or savory muffins.
* Make a compound butter with roasted chiles to put on steak or bread.
* Add to macaroni and cheese for a spicy kick.
Roasted Hatch chiles add a unique smoky, earthy heat. They work well in many different cuisines.
Comparing Roasting Methods
We focused on the oven method. But how does it compare? Is it really the best way roast chiles oven versus other methods?
Oven Roasting
- Pros: Easy for large batches, even cooking, less hands-on than stovetop, creates good char.
- Cons: Takes longer than direct heat, doesn’t get as smoky as a grill might.
Grill Roasting
- Pros: Adds extra smoky flavor from the grill, can char quickly.
- Cons: Have to do smaller batches, requires outdoor grill access, more attention needed to prevent burning.
Stovetop Broiling/Roasting
- Pros: Very fast, works for small amounts, gets very charred skin.
- Cons: Requires constant attention, can be messy, need good ventilation.
For most home cooks doing a batch of chiles, the oven method offers the best balance of ease, batch size, and results. It’s a great option for the main hatch chile roasting process at home.
Tips for Roasting Success
Here are some extra tips for great results when you roast Hatch chiles in your oven.
- Watch Your Oven: All ovens are different. Some run hotter or cooler. Keep an eye on your chiles the first time you roast. Adjust time as needed.
- Don’t Fear the Black: You want the skin to be mostly black and blistered. That’s how it peels off easily. Don’t think they are burned if the skin is black. The inside is protected.
- Steam Well: Don’t skip the steaming step. It’s crucial for easy peeling. Be patient and let them steam and cool fully.
- Use Gloves: Seriously, use gloves when peeling and seeding. Chili oils can cause a long-lasting burn on your skin.
- Ventilation: Roasting chiles can create some smoke and fumes. It’s a good idea to open a window or turn on your kitchen fan.
- Batch Size: Don’t overcrowd the pan. Roast in batches if needed. Overcrowding leads to steaming, not roasting.
Summarizing the Oven Roasting Steps
Here is a quick look at the steps for the best way roast chiles oven method.
| Step | Action | Key Point |
|---|---|---|
| Get Ready | Wash and dry chiles. Wear gloves. | Clean, dry chiles roast best. |
| Set Up Oven | Preheat oven to 400-450°F. Line baking sheets. | High heat for charring. Easy cleanup. |
| Arrange Chiles | Place chiles in a single layer on pans. | Don’t crowd. |
| First Roast | Roast for 10-15 minutes. | Skin starts to blister. |
| Turn Chiles | Use tongs to turn each chile. | Get char on all sides. |
| Finish Roast | Roast another 10-15 minutes. Watch for mostly blackened skin. | How long roast green chiles varies. |
| Steam | Put hot chiles in a covered bowl or paper bag. Let steam 15+ mins. | Makes peeling roasted hatch peppers easy. |
| Cool | Let chiles cool completely in the steam container. | Safer handling, easier peeling. |
| Peel and Seed | Remove skin, stem, and seeds (optional). Save juice. | Use gloves. Scrape gently. |
| Store | Refrigerate for short use, freezing roasted green chiles for long. | Proper storage keeps them fresh. |
| Use | Add to New Mexico green chile recipes and other dishes. | Enjoy the flavor! |
This table provides a quick guide to the oven hatch chile roasting process.
Interpreting Roasting Outcomes
What should perfectly roasted chiles look like? How do you know they are ready? This is part of comprehending the roasting process.
The skin should be wrinkled and significantly blackened. It might not be 100% black, but a good amount of char is needed. The chile itself will feel soft when you touch it with tongs. It won’t be firm like a raw pepper. There might be some liquid released onto the pan – that’s normal. The smell in your kitchen will be wonderfully smoky and spicy.
Don’t worry if a few chiles didn’t char perfectly. You can still peel them. The steaming helps a lot even without perfect charring. If you plan to use them in a stew or sauce where appearance doesn’t matter as much, small bits of skin are okay. For dishes where they are more visible, take more care when peeling.
Fathoming Different Hatch Chile Varieties
Hatch chiles are known for their heat range. This heat comes from a compound called capsaicin. It’s mostly in the veins and seeds. When you roast them, the heat level doesn’t change much. But the flavor gets deeper and smokier.
- Mild: Great for a subtle flavor boost without much heat.
- Medium: A noticeable warmth that is pleasant for most people.
- Hot: A good kick! Makes your mouth tingle.
- Extra Hot: These are seriously spicy. Use them if you love heat.
When choosing chiles for roasting, think about who will eat them. You might roast a mix of heat levels. You can keep them separate after roasting. Or you can mix them for a range of heat.
Deciphering the Storage Times
Knowing how long roasted chiles last is key. This is part of storing roasted hatch chiles properly.
- Refrigerator: As mentioned, they last 3-5 days. Make sure they are in a sealed container. This keeps them fresh and stops their smell from getting into other foods.
- Freezer: When frozen right, they can last for 12 months or more. Freezer bags designed for freezing work best. Push out all the air before sealing. This helps prevent freezer burn. Freezer burn makes food dry and changes its texture.
When you want to use frozen chiles, take out the amount you need. You can let them thaw in the fridge overnight. Or you can add them directly to hot dishes like soups or stews. They will thaw quickly in the heat.
Using Frozen Roasted Hatch Chiles
How do you use chiles after freezing roasted green chiles? It’s easy. They are ready to use as soon as they are thawed. The roasting and peeling are already done.
- Add chopped frozen chiles directly to simmering stews or chili.
- Thaw and add to casseroles before baking.
- Thaw and mix into dips, scrambled eggs, or sauces.
- Make a batch of classic New Mexico green chile recipes any time of year using your frozen stash.
Having frozen roasted chiles is like having a taste of New Mexico ready whenever you want it. It makes cooking with them very convenient.
The Importance of Dry Chiles for Roasting
We said earlier to dry the chiles before putting them in the oven. Why is this important for the hatch chile roasting process?
Water on the surface of the chiles will turn to steam in the hot oven. Steam cooks food differently than dry heat. If the chiles are wet, they will steam first. This prevents the skin from getting the good char and blisters you need for easy peeling. Drying them lets the hot oven air hit the skin directly. This causes the necessary charring. So, take an extra moment to pat them dry. It makes a difference.
Frequently Asked Questions (FAQ)
Q: Do I have to peel the roasted chiles?
A: Yes, you really should peel them. The skin of roasted chiles is tough and not pleasant to eat. It’s mostly removed during the hatch chile roasting process by charring and steaming.
Q: What if some skin won’t come off when peeling?
A: Don’t worry about getting every tiny bit of skin. Small specks are okay. If larger pieces are stuck, you didn’t steam them long enough, or they didn’t char well in that spot. You can gently scrape with a knife or just accept a little skin.
Q: Can I roast different sizes of Hatch chiles at the same time?
A: Yes, but keep an eye on them. Smaller chiles will roast faster than larger ones. You might need to remove the smaller ones from the oven earlier. This affects how long roast green chiles takes for each size.
Q: Can I roast other types of peppers this way?
A: Yes! This method works well for other similar peppers. Anaheim peppers, Poblano peppers, and bell peppers can all be roasted in the oven using a similar process.
Q: Is it okay if the chiles overlap a little on the pan?
A: Try your best to keep them in a single layer with space between them. Overlapping causes them to steam instead of roast and char. If you have too many, roast them in batches. This helps with the hatch chile roasting process.
Q: How spicy are Hatch chiles after roasting?
A: Roasting doesn’t change the heat level much. It intensifies the flavor. The heat level depends on the specific chile variety you chose. If you want less heat, remove the seeds and the white veins inside the chile when peeling.
Q: How long can I keep frozen roasted chiles?
A: When sealed well to prevent freezer burn, freezing roasted green chiles can keep them good for 12 months or even longer.
Q: What are some easy New Mexico green chile recipes?
A: Besides Green Chile Stew, easy options include adding roasted chiles to quesadillas, making a quick green chile sauce for eggs, or mixing them into cornbread batter.
Conclusion
Roasting Hatch chile peppers in your oven is a simple process. It gives you delicious, smoky chiles. These are perfect for many dishes. By following these steps – from preparing chiles for roasting to getting the right roasting temperature hatch chiles need, minding how long roast green chiles, peeling roasted hatch peppers, storing roasted hatch chiles, and freezing roasted green chiles – you can enjoy the taste of Hatch Valley all year. The oven method is often seen as the best way roast chiles oven for home cooks. It lets you easily make a big batch for all your favorite New Mexico green chile recipes and beyond. Enjoy the wonderful flavor of roasted Hatch chiles!