
Image Source: i.ytimg.com
Step-by-Step How To Remove Air Conditioner Clutch
Taking off your car’s air conditioner clutch is a job you might do if your AC clutch not engaging right, or if you need to fix or replace the AC compressor clutch replacement. This guide will show you how to remove air conditioner clutch parts safely. It covers car AC clutch removal, step by step.
Why the AC Clutch Matters
Your car’s air conditioner system uses a compressor. This compressor pushes the cool air. The clutch is like a switch. It connects the engine’s power to the compressor. When you turn on the AC inside your car, the clutch locks. This makes the compressor spin. If the clutch is bad, the compressor does not spin. Then your AC does not blow cold air.
Grasping the Parts
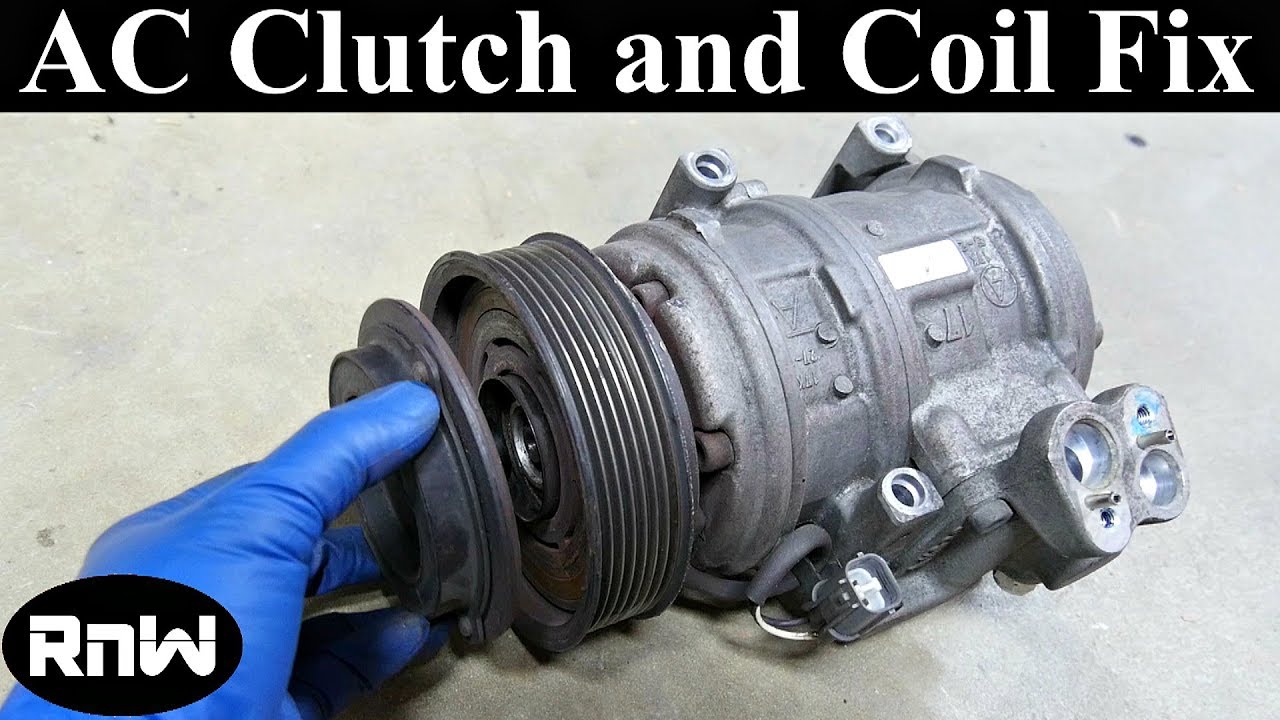
The AC clutch is made of a few main parts.
There is a pressure plate or hub. This is the part you often see spinning when the AC is off.
There is a pulley. This pulley spins all the time the engine is running. A belt turns it.
Inside the pulley is a coil. This is an electromagnet.
When you turn on the AC, power goes to the coil. The coil makes a magnetic field.
This magnetic field pulls the pressure plate to the pulley.
Now the pressure plate, pulley, and the front of the compressor spin together.
This makes the compressor work.
To remove AC compressor pulley or the clutch, you need to take off these parts.
Is Your AC Clutch Bad?
How do you know if you need car AC clutch removal?
Here are some signs:
* Your AC does not get cold.
* You turn on the AC, but you do not hear a click sound from the compressor area. This click is the clutch locking.
* You see the center part of the clutch spinning, but the pulley is not spinning with it when the AC is on. This is usually the opposite; the pulley spins, and the center spins when the AC is on. If the center is trying to spin alone, something is wrong.
* The clutch looks worn out. Maybe it has rust or looks burned.
* Sometimes the clutch makes noise when the AC is on or off.
If you see these things, you might need a new AC compressor clutch replacement. Or you might just need to remove AC compressor pulley and clutch to see what is wrong.
Safety First
Working on a car can be risky. You must be safe.
Always turn off the car. Take the key out.
Disconnect the battery. Remove the negative cable first. This stops power from flowing.
The AC system has high pressure. Do NOT open any AC lines. This job is just about the clutch on the outside. You do not need to let the gas out of the AC system. That job needs special tools and training. The gas can hurt you and the air.
Wear safety glasses. Things can break or fly off.
Wear gloves. This protects your hands.
Work in a well-lit place.
Make sure the car cannot roll. Use wheel chocks.
If you need to lift the car, use jack stands. Never trust just a jack.
Tools Needed
You need certain tools to remove AC compressor clutch. Having the right tools makes the job easier and safer.
Here is a list of tools needed to remove AC clutch:
h4 Table of Tools
| Tool Name | Why You Need It | Picture Idea (Not an actual picture) |
|---|---|---|
| Socket Wrench Set | To turn bolts and nuts | Wrench with sockets |
| Ratchet | Goes with sockets | Ratchet handle |
| Extension Bar | To reach bolts far away | Long metal bar |
| Metric Sockets | Most car parts use metric sizes | Sockets marked 10mm, 13mm, etc. |
| Standard Sockets | Some older cars or parts use standard sizes | Sockets marked 1/2 inch, 9/16 inch |
| Open-End/Box Wrench Set | For holding nuts or turning bolts in tight spots | Wrenches with open and closed ends |
| Retaining Ring Pliers | To take off a special clip called a snap ring | Pliers with small tips |
| Flathead Screwdriver | For prying or holding | Screwdriver with a flat tip |
| AC Clutch Puller Tool | Special tool to pull the clutch parts off | Tool kit with specific puller pieces |
| AC Clutch Spanner Wrench | Special tool to hold the pulley still | Wrench with pins or pegs |
| Dead Blow Hammer | To gently tap parts loose | Hammer with a rubber or plastic head |
| Torque Wrench | To tighten bolts correctly when putting back | Wrench with a gauge or click |
| pry bar (small) | For gentle lifting or separating | Small metal bar |
You can often rent or borrow the AC clutch puller tool and AC clutch spanner wrench from an auto parts store. Buying them might cost more than you need for just one job. An automotive AC clutch repair often needs these specific tools.
Finding the AC Compressor
The AC compressor is usually on the front of the engine. It will have belts going to it. It will also have metal tubes (lines) going to it. These lines carry the AC gas. Do not touch these lines. The clutch is on the front of the compressor, where the belt is.
Starting the Removal
Okay, let’s start the car AC clutch removal. Remember safety first. Battery is unplugged.
h4 Step 1: Get to the Compressor
You need space to work. Look at where the compressor is.
Maybe you need to take off a plastic cover under the car.
Maybe you need to take off a wheel and an inner fender cover.
Each car is different. Find the best way to reach the front of the compressor.
h4 Step 2: Take Off the Dust Cap
There is often a small cap in the center of the clutch. It might be plastic or metal.
You might need a small flathead screwdriver to gently pry it off. Be careful not to scratch anything.
This cap hides a bolt or nut.
h4 Step 3: Remove the Center Bolt
Look inside after taking off the cap. You will see a bolt or a nut.
This bolt or nut holds the clutch hub (pressure plate) onto the compressor shaft.
This bolt is often tight. When you try to turn the bolt, the whole clutch will want to spin.
You need to hold the clutch still.
This is where the AC clutch spanner wrench is very useful. It has pins that fit into holes on the clutch hub or pulley. This lets you hold it firm while you turn the center bolt.
If you do not have the spanner wrench, sometimes you can use a different tool to hold the clutch. Some people use a strap wrench. Or sometimes you can wedge a pry bar gently to stop it from spinning. Be careful not to damage the clutch or the pulley if you do this.
Use your socket wrench and the right size socket to turn the center bolt or nut counter-clockwise.
It might take some effort.
Once it is loose, unscrew it all the way. Keep this bolt safe. It is important for putting the new clutch back.
h4 Step 4: Remove the Clutch Hub (Pressure Plate)
Now the center bolt is out. The clutch hub is the front part.
It might slide right off.
Or it might be stuck a little.
Do not just yank it.
This is where the AC clutch puller tool kit often comes in.
A clutch puller kit has different pieces. It usually has a plate or legs that grab the outside edge of the clutch hub. Then it has a screw that pushes against the center shaft of the compressor.
You put the right parts of the puller tool onto the clutch hub.
You tighten the center screw of the puller tool. As you tighten it, it pushes the clutch hub off the shaft.
Turn the screw slowly. The clutch hub should start to move forward.
Keep tightening until the clutch hub comes free.
If you do not have a specific AC clutch puller tool, sometimes a general puller can work. But be careful not to damage the part.
In some cases, it is not stuck much. You might be able to gently and evenly pry behind the hub with two large screwdrivers. Go slowly and pry a little bit on one side, then a little bit on the other side. Walk it off evenly. Do NOT bend the clutch hub. If you bend it, you cannot use it again. Using the proper puller is best.
Once the clutch hub is off, set it aside.
h4 Step 5: Remove the Retaining Ring
After the clutch hub is off, you will see a large snap ring or retaining ring.
This ring holds the pulley onto the compressor body.
You need retaining ring pliers to take this off.
There are two types of retaining ring pliers: internal and external. You need the kind that makes the tips spread apart when you squeeze the handles. This is for an external ring.
Find the ends of the snap ring. They will have small holes.
Put the tips of your retaining ring pliers into these holes.
Squeeze the handles. This will open the ring.
Carefully pull the ring out of the groove it sits in.
Keep this ring safe. It is important for putting things back. These rings can fly away, so be careful.
h4 Step 6: Remove the Pulley
Now the snap ring is out. The pulley is the next part to come off.
The pulley has a bearing inside it. This bearing lets it spin freely when the clutch is not locked.
The pulley should slide straight off the front of the compressor shaft.
It might be a little stuck from dirt or rust.
You can try to wiggle it.
You can try pulling it straight forward evenly.
Sometimes, a gentle tap with a rubber mallet or dead blow hammer on the front center of the pulley helps to shock it loose. Tap straight on. Do NOT hit the edge of the pulley hard.
Make sure you are pulling or tapping straight. You do not want to damage the compressor shaft.
If it is very stuck, you might need to use a puller tool again. Some puller kits come with attachments to remove AC compressor pulley too. They grab the back edge of the pulley.
Once the pulley is off, set it aside. Look inside it at the bearing. Does the bearing feel rough? Does it make noise when you spin it? If yes, the bearing might be bad. Often, if the bearing is bad, the whole pulley and clutch need to be replaced.
h4 Step 7: Remove the Coil
The last main part of the clutch assembly is the electromagnetic coil.
The coil sits around a part of the compressor body.
It has a wire or connector coming out of it.
First, disconnect the wire plug for the coil. This plug is usually near the compressor. Push the release clip and pull the plug apart.
The coil is held on by something. Look closely.
It might be held by more snap rings (usually smaller ones).
Or it might be held by bolts (AC compressor bolt removal might be needed here, but usually these bolts just hold the coil, not the main compressor).
Look for bolts on the front of the compressor body around where the coil sits. There might be 3 or 4 bolts.
Use your socket wrench to remove these bolts if they are there. Keep them safe.
If it is held by a snap ring, use your retaining ring pliers again to remove it.
Once the bolts or snap ring are removed, the coil should lift off.
It might be a little stuck. Wiggle it gently.
Make sure the wire harness is free so you can lift the coil away.
Be careful with the old coil and wire.
Inspecting the Parts
Now you have all the main parts of the automotive AC clutch off.
Look at them carefully.
* Clutch Hub (Pressure Plate): Look at the surface that touches the pulley. Is it smooth? Is it worn down? Is it warped (bent)?
* Pulley: Look at the surface that touches the clutch hub. Is it smooth? Is it worn? Spin the bearing inside. Is it smooth and quiet? Or is it rough, noisy, or wobbly? A bad bearing means you usually need a new pulley assembly.
* Coil: Look at the plastic body of the coil. Is it cracked or burned? Look at the wire and connector. Is it damaged?
* Compressor Shaft: Look at the end of the shaft where the clutch hub sits. Is it clean? Is the keyway (a small slot for a key that helps the hub spin with the shaft) okay?
* Shim(s): When you took the clutch hub off, did any thin washers (shims) fall out? These shims set the gap between the clutch hub and the pulley. Keep track of them! You need them to set the gap correctly when you install a new clutch. New clutch kits usually come with new shims.
Understanding what is wrong with the old parts helps you know if you need a full AC compressor clutch replacement or just a part.
Deciphering the Gap
The gap between the clutch hub and the pulley when the AC is off is very important. This is called the air gap.
If the gap is too big, the magnetic field from the coil might not be strong enough to pull the hub to the pulley. The clutch won’t engage. This is one reason an AC clutch not engaging.
If the gap is too small, the clutch hub might rub on the pulley all the time, even when the AC is off. This causes wear and heat.
The shims you might have found control this gap.
When you install a new clutch, you will need to measure this gap and add or remove shims from the kit to get the gap just right. The correct gap size is usually given in the repair manual for your car or the instructions that come with the new clutch kit. It is usually a very small space, like the thickness of a few pieces of paper.
Putting a New Clutch Back On (Briefly)
This guide is about removing the clutch. But knowing how it goes back helps.
Putting a new clutch back is mostly the reverse of taking it off.
1. Install the new coil. Make sure the wire goes the right way. Put back the bolts or snap ring. Connect the wire plug.
2. Slide the new pulley onto the shaft.
3. Install the pulley retaining ring (snap ring) using your retaining ring pliers. Make sure it sits fully in its groove. Tug on the pulley to make sure it is held by the ring.
4. Now install the clutch hub (pressure plate). This is where setting the gap comes in. You will need to slide the hub on with some shims behind it. Then you might need to use the center bolt (or a special tool in the puller kit) to push the hub fully onto the shaft.
5. Once the hub is on, measure the air gap between the hub and the pulley using a feeler gauge. Check the gap at several points around the clutch.
6. If the gap is wrong, you need to take the clutch hub back off (using the puller maybe, or just pulling it) and change the shims behind it. Add shims to make the gap bigger. Remove shims to make the gap smaller. This part can take time and patience.
7. Once the gap is correct, install the center bolt securely. Use your torque wrench to tighten this bolt to the car maker’s spec. Do NOT just guess how tight. This bolt holds the clutch on and is very important. Use the AC clutch spanner wrench or other tool to hold the clutch still while you tighten the bolt.
8. Put the dust cap back on.
9. Put back any parts you removed to get access (covers, wheels, etc.).
10. Reconnect the battery.
11. Test the AC.
Common Issues During Removal
Sometimes things do not go as planned during car AC clutch removal.
* Stuck Center Bolt: The center bolt can be very tight. Make sure your socket fits well. Use a good ratchet or breaker bar. Make sure your tool to hold the clutch (like the AC clutch spanner wrench) is holding firm.
* Stuck Clutch Hub: If the hub will not come off, double check that the center bolt is completely removed. Make sure you are using the AC clutch puller tool correctly. Sometimes a little penetrating oil around the shaft can help, but be careful not to get it on the belt or pulley surfaces.
* Stuck Pulley: The pulley bearing can rust onto the compressor body. Gentle heat from a heat gun (not a torch!) around the inner metal part of the pulley might help it expand slightly. Again, a puller designed to remove AC compressor pulley is the best tool here. Do not hit it hard with a metal hammer.
* Stripped Bolt Head: If you start to strip the head of the center bolt or the coil bolts, stop! You will need a bolt extractor tool.
* Dropped Parts: Snap rings, shims, and small bolts love to fall into hard-to-reach places. Work in a clean area. Put bolts and parts right into a magnetic tray or marked containers as you take them off.
Taking your time is key. If something is stuck, stop and figure out why. Do not just force it hard. You can break the compressor itself, which is a much bigger and more expensive problem.
When to Replace the Whole Compressor
This guide is for removing just the clutch. But sometimes the compressor itself is bad.
Signs of a bad compressor include:
* Loud noises from the compressor area when the AC is on.
* The compressor locking up and not spinning at all (this might shred the belt).
* Refrigerant leaking from the compressor body (not the clutch area).
* The clutch area is damaged because the compressor shaft is wobbly.
If the compressor itself is bad, replacing only the clutch will not fix your problem. You will need a full AC compressor replacement. This is a harder job because it involves opening the sealed AC system, letting out the refrigerant, and requires special machines to vacuum and recharge the system after installing the new compressor. It is often a job for a professional mechanic.
However, if only the clutch is bad (the compressor works and holds pressure, but the clutch is worn, burned, or the coil is bad), then just replacing the AC compressor clutch replacement is the right repair.
Interpreting the Cost and Time
How much does it cost to do car AC clutch removal and replacement?
* Parts: A new AC clutch kit (hub, pulley with bearing, coil, shims, snap rings) can cost anywhere from $100 to $300 or more, depending on your car and the brand of the part.
* Tools: If you need to buy the AC clutch puller tool and AC clutch spanner wrench, that can add $50 to $150 or more. Renting them is usually cheaper.
* Your Time: For someone new to this, removing the clutch might take 1-3 hours. Putting a new one on, including setting the gap, could take another 1-3 hours or more. A pro might do it faster.
Doing it yourself saves you the labor cost that a mechanic would charge. This job might cost $300-$600 or more in labor at a shop, plus the parts. So, doing it yourself can save a lot of money. But it takes time and effort.
Choosing a New Clutch
If you are doing an AC compressor clutch replacement, make sure you get the right clutch for your specific car’s make, model, year, and engine. There are many types of automotive AC clutch designs.
Look at the part number on your old compressor or clutch if possible.
Use a reputable auto parts store or online seller.
Sometimes, buying a new clutch kit includes all the parts you need (hub, pulley, coil, etc.). This is often easier than trying to buy just one part.
Some kits might be aftermarket (not made by the car company). They can be cheaper. Read reviews to see if they are good quality.
Fathoming the Process Recap
Let’s quickly review the main steps for how to remove air conditioner clutch:
1. Make the work area safe. Disconnect the battery.
2. Get access to the compressor clutch.
3. Remove the small dust cap from the center.
4. Hold the clutch hub still using a spanner wrench or similar tool. Remove the center bolt or nut that holds the hub on. Keep it safe.
5. Use an AC clutch puller tool or carefully pry evenly to remove the clutch hub (pressure plate) from the shaft. Watch for shims behind it. Keep shims safe.
6. Use retaining ring pliers to remove the large snap ring that holds the pulley on.
7. Pull or gently tap the pulley straight off the compressor body. Inspect the bearing.
8. Disconnect the coil wire plug. Remove the bolts or smaller snap ring holding the coil on.
9. Remove the coil from the compressor body.
10. Inspect all the removed parts to see why the clutch was bad.
This process lets you replace a bad clutch hub, pulley bearing, or coil without opening the sealed AC system. If the issue is one of these external clutch parts, this is the right repair.
Frequently Asked Questions (FAQ)
h4 Do I need to drain the AC refrigerant to remove the clutch?
No, you do not need to drain the refrigerant. The clutch is on the outside of the compressor. You are not opening any of the sealed refrigerant lines or parts. This is a big advantage of just replacing the clutch.
h4 Can I use a regular puller instead of an AC clutch puller tool?
Maybe, but it depends on the specific puller and the clutch design. A dedicated AC clutch puller tool kit is designed to fit the clutch parts correctly and pull them off without causing damage. Using the wrong puller can damage the clutch parts or the compressor shaft. Renting the correct tool is often the best option if you don’t want to buy it.
h4 What is an AC clutch spanner wrench used for?
An AC clutch spanner wrench is used to hold the clutch hub or pulley still while you loosen or tighten the center bolt or nut. It stops the whole assembly from spinning while you work on the fastener.
h4 My AC clutch is not engaging, does that mean I need a new clutch?
Not always. An AC clutch not engaging can be caused by several things. It could be a bad clutch coil (part of the clutch), too large of an air gap (needs adjustment with shims), low refrigerant charge (the system has a pressure switch that stops the clutch from engaging if pressure is too low), a bad pressure switch, a bad AC relay, a blown fuse, or a problem with the AC control unit inside the car. Removing the clutch lets you check the coil and bearing, but other electrical or system pressure checks might be needed too.
h4 How do I know which way the snap rings come off?
Retaining rings or snap rings sit in a groove. They have ends with holes or tabs. Look at the pliers you have. If they spread open when you squeeze them, they are for external rings (like the pulley ring). If they close when you squeeze them, they are for internal rings. The rings on AC clutches are almost always external, so you need pliers that spread open. Put the tips in the holes and spread the ring open enough to lift it out of its groove.
h4 How tight should I make the center bolt when putting the new clutch on?
The center bolt that holds the clutch hub on is very important. It must be tightened to a specific torque value given by the car maker. This value is in your car’s repair manual. You must use a torque wrench to tighten it correctly. If it is too loose, the clutch might slip or fall off. If it is too tight, it can damage the compressor bearing or shaft.
h4 What are the shims for?
The shims are thin washers that go behind the clutch hub on the compressor shaft. They set the air gap between the clutch hub and the pulley when the clutch is not engaged. Getting this gap right is critical for the new clutch to work properly. The correct gap size is usually given in the instructions that come with a new clutch kit or in the car’s repair manual.
Doing this job yourself is possible. It needs patience and the right tools. Go slow. Follow the steps. Be safe. Good luck fixing your automotive AC clutch!