
Can you cook ribs in the oven and then finish them on the grill? Absolutely! This popular two-step rib cooking method combines the best of both worlds. It allows you to achieve incredibly tender and juicy ribs indoors, away from the unpredictable elements, and then impart that smoky, char-grilled flavor and beautiful crust that only grilling can provide. This guide will walk you through creating the best oven grilled ribs, ensuring your backyard ribs oven grill experience is a resounding success.
Oven baked ribs are fantastic on their own, but adding that final kiss of flame elevates them to a whole new level. This process is often referred to as a reverse sear ribs oven technique when applied to ribs, though it’s more about building internal tenderness before the high-heat finishing. Many people also enjoy smoked then grilled ribs, which follows a similar principle – a slow cook followed by a high-heat sear. Our method focuses on oven-braising or slow-roasting in the oven for maximum tenderness before hitting the grill.
This detailed guide will cover everything you need to know to master juicy ribs oven grilled and achieve truly tender ribs oven grill. We’ll delve into rib selection, preparation, the crucial oven stage, and the finishing touches on the grill. Get ready to impress your friends and family with fall-off-the-bone perfection!
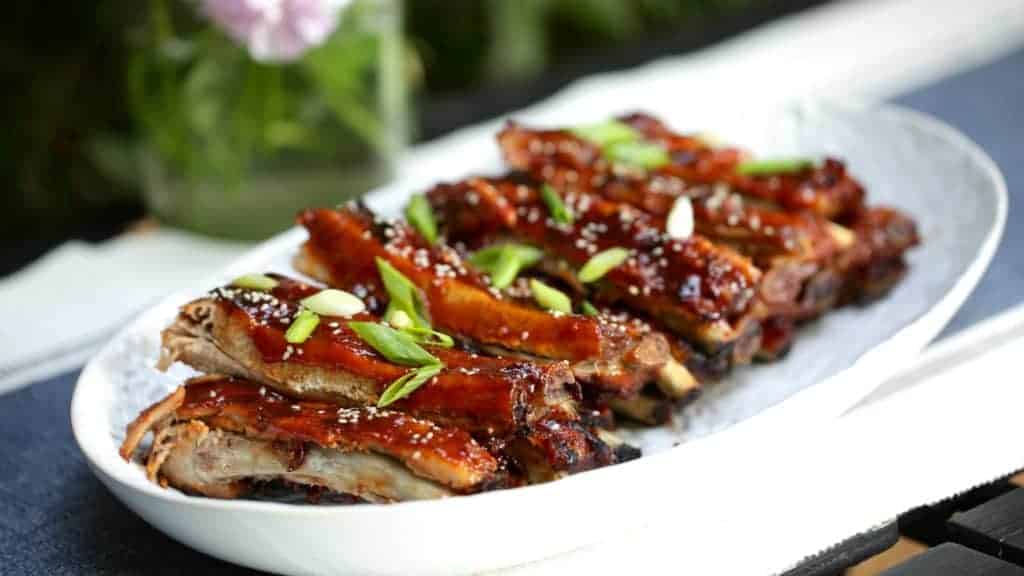
Image Source: entertainingwithbeth.com
Choosing the Right Ribs
The type of ribs you choose significantly impacts the final outcome. For this oven then grill method, pork ribs are typically the go-to.
Pork Rib Varieties
- Baby Back Ribs: These are the most tender and leanest pork ribs. They cook faster than spare ribs. Their smaller size makes them easy to handle and cook evenly.
- Spare Ribs: Larger and meatier than baby backs, spare ribs have more fat, which translates to richer flavor and juicier results. They require a bit longer to cook.
- St. Louis Style Ribs: These are trimmed spare ribs, cut into a uniform rectangular shape. They offer a good balance of meat, fat, and bone, and are excellent for this oven then grill method.
Selecting Quality Ribs
Look for ribs with:
- Good Marbling: Small flecks of fat within the meat are key to moisture and flavor.
- A Nice Red Color: Avoid ribs that look gray or dried out.
- Even Thickness: This helps with consistent cooking.
- The Membrane Removed: This thin, silvery skin on the bone side can become tough and chewy. It’s best to remove it before cooking.
Preparing Your Ribs for Cooking
Proper preparation is vital for achieving tender ribs oven grill. This includes seasoning and applying any rubs.
Removing the Membrane
This is a crucial step for oven baked ribs and any rib preparation.
- Locate the Membrane: On the bone side of the ribs, you’ll find a thin, papery membrane.
- Get Underneath: Slide a butter knife or a thin spatula under the membrane at one end.
- Grip and Pull: Grab the membrane with a paper towel (for a better grip) and pull it off. It should come off in one or a few large pieces. If it tears, just continue working at it.
Applying Your Rib Rub
A good rub acts as a flavor enhancer and helps form a delicious crust.
Basic Pork Rib Rub Recipe
This is a versatile rub that complements pork beautifully.
- 1/4 cup brown sugar
- 2 tablespoons paprika
- 1 tablespoon chili powder
- 1 teaspoon garlic powder
- 1 teaspoon onion powder
- 1 teaspoon salt
- 1 teaspoon black pepper
- 1/2 teaspoon cayenne pepper (optional, for heat)
How to Apply the Rub
- Pat Dry: Pat the ribs completely dry with paper towels. This helps the rub adhere better.
- Generous Coating: Sprinkle the rub liberally over all sides of the ribs. Gently press it into the meat to ensure it sticks.
- Rest (Optional but Recommended): For deeper flavor, let the seasoned ribs rest for at least 30 minutes at room temperature, or preferably, refrigerate them, uncovered, for a few hours or overnight. Refrigeration helps dry out the surface, promoting a better bark.
The Oven Stage: Building Tenderness
The oven stage is where the magic of fall-off-the-bone tenderness begins. We’ll aim for a low-and-slow cook to break down the connective tissues.
Oven Method 1: The Braise (for Maximum Tenderness)
This method uses liquid to steam and tenderize the ribs.
Ingredients:
- Ribs (prepared as above)
- 1 cup of liquid (apple cider, broth, or even cola work well)
- Aluminum foil
Equipment:
- Baking sheet
- Oven
Instructions:
- Preheat Oven: Preheat your oven to 300°F (150°C).
- Arrange Ribs: Place the seasoned ribs on a baking sheet, bone-side down.
- Add Liquid: Pour the liquid around the ribs on the baking sheet.
- Wrap Tightly: Cover the baking sheet tightly with aluminum foil, creating a seal to trap the moisture.
- Bake: Bake for 2 to 3 hours, depending on the thickness and type of ribs. Baby backs will likely be closer to 2 hours, while spare ribs might need 3 hours or more. The ribs are ready for the next stage when they are very tender. You should be able to easily bend a rack without it breaking, and the meat should be pulling away from the bone.
Oven Method 2: The Slow Roast (for a Better Bark in Oven)
This method focuses on slow cooking without added liquid, allowing a crust to form. This is closer to a reverse sear ribs oven approach where you build tenderness slowly.
Equipment:
- Baking sheet
- Wire rack (optional, but recommended for even air circulation)
- Oven
Instructions:
- Preheat Oven: Preheat your oven to 275°F (135°C).
- Arrange Ribs: Place the seasoned ribs directly on the baking sheet, or on a wire rack set inside the baking sheet, bone-side down.
- Bake: Bake for 3 to 4 hours. The goal here is to cook the ribs until they are tender but not mushy. You should be able to twist a bone, and it should come out cleanly, or the meat should easily pull away from the bone. The internal temperature should reach around 195-200°F (90-93°C).
Checking for Doneness in the Oven
Regardless of the oven method, the key is tenderness.
- The Bend Test: Gently lift a rack of ribs from the middle. If they bend easily and the meat cracks, they are likely tender.
- The Bone Twist: Try to twist a bone. If it turns easily and the meat pulls away, they are ready.
- Probe Test: Insert a toothpick or skewer into the meat between the bones. It should slide in with very little resistance.
The Grill Stage: Flavor and Finish
This is where you add the smoky char and delicious glaze that makes grilled ribs so irresistible. This is the finish ribs on grill stage that brings it all together.
Grilling Setup
- Two-Zone Grilling: Set up your grill for two-zone cooking. This means having a hot side and a cooler side. This is essential for finishing ribs without burning them.
- Charcoal Grill: Pile coals to one side.
- Gas Grill: Turn the burners on one side to high, and leave the other side off or on low.
Applying the Glaze
A good glaze adds a sticky, sweet, and savory coating.
Simple BBQ Glaze Recipe
- 1 cup your favorite BBQ sauce
- 2 tablespoons honey or maple syrup
- 1 tablespoon apple cider vinegar
- 1 teaspoon Worcestershire sauce
- Pinch of red pepper flakes (optional)
How to Glaze
- Mix Ingredients: Combine all glaze ingredients in a small saucepan.
- Simmer: Heat gently over low heat until the honey or syrup is dissolved and the glaze is slightly thickened. Do not boil vigorously.
- Apply: Brush the glaze generously onto the tenderized ribs during the last 15-20 minutes of grilling.
Grilling the Ribs
- Preheat Grill: Preheat your grill to medium-high heat (around 400-450°F or 200-230°C) for the initial searing, then adjust for two-zone cooking.
- Grill Indirectly: Place the oven-tenderized ribs on the cooler side of the grill, bone-side down.
- Close Lid: Close the grill lid. This helps them absorb smoky flavor and cook evenly.
- Grill Time: Grill for about 10-15 minutes on the indirect heat side.
- Flip and Glaze: Flip the ribs. Now, brush them liberally with your prepared BBQ glaze. Grill for another 10-15 minutes, brushing with glaze once more if desired.
- Direct Heat Sear (Optional): For an extra crispy bark and char, you can briefly move the glazed ribs over the direct heat for 1-2 minutes per side, watching them very carefully to prevent burning. This is where you get that beautiful caramelized finish.
- Resting: Once they look perfect, remove the ribs from the grill and let them rest for 10-15 minutes before cutting. This allows the juices to redistribute, ensuring maximum juiciness.
Alternative Finishing Techniques: Smoked Then Grilled Ribs
If you have a smoker, you can certainly adapt this. The principle is the same: smoke for tenderness, then grill for the char and glaze.
- Smoke: Smoke your seasoned ribs at a low temperature (225-250°F / 107-120°C) until they are tender. This can take anywhere from 3 to 5 hours, depending on the ribs and your smoker. Use wood like hickory, oak, or applewood for flavor.
- Grill: Once tender, transfer the smoked then grilled ribs to a preheated grill with two-zone cooking. Glaze and finish as described above. This is a fantastic way to get a deep smoky flavor profile before the final grilled sear.
Tips for Success: Oven Grilled Rib Perfection
Here are some key takeaways to ensure your juicy ribs oven grilled are a triumph:
- Don’t Rush: Tenderness takes time. Be patient with the oven stage.
- Monitor the Grill Closely: The glaze can burn quickly, especially over direct heat. Keep a close eye on your ribs during the grilling phase.
- Experiment with Rubs and Glazes: Once you’ve mastered the basic technique, feel free to try different spice blends and sauce combinations.
- Internal Temperature is Your Friend: While the bend and twist tests are good indicators, an instant-read thermometer can give you confidence. Aim for around 200-205°F (93-96°C) internal temperature for ultimate tenderness.
Troubleshooting Common Issues
Ribs Are Still Tough After the Oven
- Reason: Not enough cooking time or temperature.
- Solution: Return them to the oven, wrapped tightly, and increase the cooking time. Ensure your oven temperature is accurate.
Ribs Are Too Dry
- Reason: Overcooking in the oven, or not enough fat in the ribs.
- Solution: For future cooks, try the braising method in the oven which adds moisture. Ensure you’re using ribs with good marbling. When grilling, don’t overcook them on the direct heat.
Glaze is Burning on the Grill
- Reason: Too much sugar in the glaze, or grilling over direct heat for too long.
- Solution: Reduce the sugar in your glaze. Always use indirect heat for most of the grilling time, and only briefly use direct heat for searing, watching carefully.
Serving Your Masterpiece
Once rested, cut the ribs between the bones. Serve hot with your favorite sides like coleslaw, potato salad, or cornbread. Prepare for rave reviews! This two-step rib cooking method is truly a game-changer for achieving that perfect balance of tender, juicy, and smoky-charred goodness. Your backyard ribs oven grill adventure will never be the same.
Frequently Asked Questions (FAQ)
Q1: Do I have to remove the membrane from ribs?
A1: Yes, it is highly recommended. The membrane is a thin, papery layer on the bone side of the ribs. If left on, it can become tough and chewy, detracting from the overall texture and enjoyment of the ribs, especially in oven baked ribs.
Q2: How long should I cook ribs in the oven?
A2: For tender ribs oven grill, cooking time varies. Generally, you’ll cook them in the oven for 2-4 hours at a low temperature (275-300°F or 135-150°C) until they are tender. Baby back ribs typically take 2-3 hours, while spare ribs might need 3-4 hours or more. The key is to check for tenderness, not just time.
Q3: Can I grill ribs without finishing them in the oven first?
A3: Yes, you can grill ribs directly. However, the oven then grill method is preferred for achieving ultimate tenderness, especially if you want fall-off-the-bone results without the risk of burning them on the grill. Grilling directly often requires more skill to manage heat and prevent the outside from burning before the inside is cooked through.
Q4: What temperature should the grill be to finish ribs?
A4: For the finishing stage, you want to cook the ribs over medium-high heat (around 400-450°F or 200-230°C), using a two-zone setup. This allows you to sear and glaze the ribs without overcooking them on the cooler side.
Q5: How do I know when ribs are done on the grill?
A5: After the oven stage, the ribs are already tender. On the grill, you’re looking for a beautiful glaze that’s slightly caramelized and slightly sticky. The meat should still be pulling away from the bone easily. Watch carefully to prevent burning, especially if using a sweet glaze.
Q6: Can I use this method for beef ribs?
A6: While this guide focuses on pork ribs, the two-step rib cooking principle can be applied to beef ribs. However, beef ribs typically require longer cooking times, both in the oven and potentially on the smoker (if using a smoked then grilled ribs approach), due to their denser structure. Adjust cooking times accordingly.
Q7: What makes ribs fall off the bone?
A7: Ribs “fall off the bone” when the connective tissues and collagen within the meat have been slowly rendered down into gelatin. This happens during a low-and-slow cooking process, whether in the oven or a smoker. The oven baked ribs stage is crucial for this breakdown.
Q8: What’s the best wood for smoking ribs?
A8: For pork ribs, popular wood choices include hickory, oak, apple, and cherry wood. Hickory provides a strong, classic smoky flavor. Fruitwoods like apple and cherry offer a milder, sweeter smoke that complements pork well. The choice often comes down to personal preference for the smoked then grilled ribs profile.