
Yes, you can dry wood in your kitchen oven. People dry small pieces of wood in ovens for many reasons. It helps wood dry faster than just waiting. This is good if you need wood quickly for a project. Drying wood helps stop it from cracking or changing shape later. It makes wood ready to use for things like carving or building small items. Drying wood in kitchen oven is a common DIY wood drying method. It needs low heat and time.
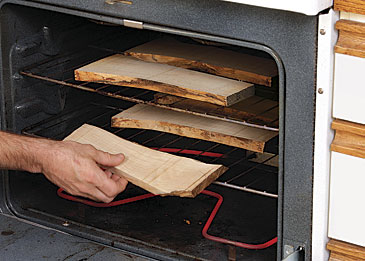
Image Source: images.finewoodworking.com
Grasping Why Wood Needs Drying
Wood holds water. A tree uses water to live and grow. Even after a tree is cut, the wood inside still has water. This is called green wood. Drying green wood in oven is one way to get this water out.
Why take the water out?
* Wood shrinks as it dries. If you build something with wet wood, it will shrink later. This can make joints loose. It can make parts not fit anymore.
* Wet wood can rot. It can grow mold or fungus. Dry wood lasts much longer.
* Wet wood is weaker. Drying makes wood stronger.
* Wet wood is heavy. Dry wood is lighter.
* Paint or glue does not work well on wet wood.
* For oven drying wood for carving, dry wood carves cleaner. It is less likely to split in ways you do not want.
Drying wood is important. It makes the wood stable. Stabilizing wood in oven means making it less likely to move or change shape later.
Weighing Different Drying Methods
There are several ways to dry wood.
* Air Drying: This is slow. You stack wood outside or in a shed. Air moves around it. Water slowly leaves the wood. It takes months or even years. It is cheap. It does not use much energy. But it takes a long time.
* Kiln Drying: This uses big heated rooms. It dries wood much faster than air drying. It uses heat and controlled air flow. This is how most wood for building is dried. Kiln drying wood vs oven drying is about scale and speed. Kilns are big and for lots of wood. Ovens are small and for small amounts. Kiln drying is faster and reaches lower moisture levels than air drying usually does.
* Oven Drying: This is what we are talking about. You use a regular oven. It is good for small pieces. It is much faster than air drying for these small pieces. It gives you control over heat.
DIY wood drying methods include air drying small pieces or using an oven. Oven drying is faster if you need wood soon.
Getting Your Wood Ready for the Oven
Before you put wood in the oven, you need to do some things.
* Cut the wood: Cut the wood to the size you need. Wood dries faster when it is smaller. Thicker pieces take much longer.
* Remove bark: Take the bark off the wood. Bark can hold bugs. It can also slow drying.
* Weigh the wood: Weigh your wood before drying. Write the weight down. You will weigh it again later. This helps you know if water is leaving.
* Seal the ends: This is very important for preventing wood cracking when drying. The ends of wood dry fastest. When ends dry too fast, they shrink fast. This can cause splits along the end of the wood. You can use special end grain sealant. You can also use melted wax. Old paint or glue can work in a pinch, but sealants made for wood are best. Put the sealant thickly on both ends of the wood piece.
Setting Up for Oven Drying
You need a few things.
* Your oven. A kitchen oven works fine.
* A baking sheet or oven-safe tray.
* Small pieces of wood or blocks. These will lift your wood off the tray. This lets air move around the wood.
* A scale to weigh the wood. A kitchen scale is fine for small pieces.
* Something to seal the ends (sealant, wax).
* Maybe an oven thermometer to check the oven’s real heat. Oven dials are not always exact.
The Oven Drying Steps
Here is how to dry wood using an oven:
Step 1: Prepare the Wood
- Cut wood to size.
- Peel off bark.
- Weigh each piece. Write weight and date on the wood or on a list.
- Seal the ends thickly. Let the sealant dry if needed.
Step 2: Set Up the Oven
- Place your oven rack in the middle of the oven.
- Put your baking sheet on the rack.
- Place small support blocks (like small scraps of dry wood or pieces of ceramic tile) on the baking sheet.
- This creates space under your wood.
Step 3: Place Wood in Oven
- Put your prepared wood pieces on top of the support blocks.
- Make sure pieces are not touching each other. Air needs to flow around them.
- Leave space between the wood and the oven walls.
Step 4: Set the Temperature
- This is key for oven drying wood temperature. You need very low heat. Too much heat, too fast, will cause cracks.
- The ideal temperature for drying wood slowly in an oven is often between 180°F and 200°F (about 82°C to 93°C).
- Some people go even lower, around 150°F (65°C), especially for thin or delicate pieces.
- Do not go above 220°F (105°C). High heat dries the outside too fast. This locks water inside. It causes stress and cracking.
- Set your oven to the lowest possible setting if it is around this range. If your oven’s lowest setting is higher than 200°F, you might need a different method or be extra careful.
- Using an oven thermometer helps you know the true heat.
Step 5: Dry the Wood
- Close the oven door.
- Many people leave the oven door cracked open a little bit. You can do this by putting a wooden spoon or a small block of wood in the door.
- Why leave the door open? Water leaves the wood as steam. If the oven door is closed tightly, the steam stays inside. The air in the oven gets wet. Wet air cannot take much more water from the wood. Leaving the door open lets the wet air escape. It lets drier air from the room enter. This helps the drying process.
- Let the wood dry for several hours.
- How long to oven dry wood depends on many things:
- The type of wood. Some woods hold more water. Some release it slower.
- The size of the wood. Thicker pieces take much longer than thin ones.
- How wet the wood was at the start (drying green wood in oven takes longer than wood that is already partly dry).
- The oven temperature.
- How much the door is open.
- The humidity in your room.
Step 6: Check and Weigh
- After a few hours (maybe 4-6 hours for small pieces), turn the oven off.
- Let the wood cool down completely while still inside the oven. This helps prevent sudden changes that can cause cracks.
- Take the wood out once it is cool.
- Weigh each piece again.
- Compare the new weight to the first weight. If the weight is less, water has left the wood.
- Put the wood back in the oven. Repeat the drying process (turn oven on low, leave door cracked, wait hours).
- Keep doing this cycle: Heat -> Cool in oven -> Weigh -> Repeat.
Step 7: Know When It Is Dry Enough
- The wood is dry enough when its weight stops changing.
- Weigh it after a drying cycle and cooling.
- Dry it again. Cool it. Weigh it again.
- If the weight is the same (or very, very close) as the last time, the wood is likely as dry as it will get in your home’s air.
- How dry do you need it?
- For carving or small projects, drying until the weight is stable is usually enough. This matches the moisture level of the air in your home.
- Very dry wood is needed for some uses, but be careful. Drying too much, too fast, causes problems.
Getting the Oven Drying Wood Temperature Right
Setting the correct heat is the most important part of oven drying wood right the first time.
* Start low. Maybe 180°F (82°C).
* For very thin pieces (less than 1 inch thick), you might even start at 150°F (65°C).
* If your wood is thicker (more than 1 inch), keeping the temperature low is even more critical to avoid preventing wood cracking when drying. The outside dries fast, while the inside is still very wet. This difference causes stress and splits.
* Never rush the heat. High heat seems faster, but it damages the wood.
How Long Does It Take? How Long to Oven Dry Wood?
There is no single answer. It varies a lot.
* Thin pieces (less than 1/2 inch thick): Might take just 4-8 hours in total drying time, done in cycles over a day or two.
* Medium pieces (1 inch thick): Could take 12-24 hours of total drying time, done in cycles over a few days.
* Thicker pieces (more than 1 inch): This gets harder in a kitchen oven. It could take many days of cycles. For thick wood, air drying first is often better, then oven drying to finish.
Remember, this is total drying time inside the warm oven. You must include cool-down time between heating cycles. A cycle might be:
* 4-6 hours in the warm oven (180°F – 200°F) with door cracked.
* Turn oven off. Let wood cool inside for several hours (or overnight).
* Weigh.
* Repeat.
So, even for a thin piece that needs 8 hours of oven drying wood temperature, the whole process might take 2-3 days including cooling time.
Preventing Wood Cracking When Drying
Cracking is the biggest problem when drying wood too fast. Here is how to help stop it:
* Seal the ends: This is number one. Use a good end grain sealer or wax. Apply it well.
* Use low heat: Never use high heat. Stick to the ideal temperature for drying wood range of 180°F-200°F, or even lower.
* Dry slowly: Do not try to dry wood all in one go, especially thicker pieces. Use cycles of heating and cooling.
* Leave oven door cracked: This lets wet air out. It helps the wood dry more evenly from the inside out, not just the surface.
* Avoid big changes: Do not take hot wood out of the oven into cool room air. Let it cool down slowly inside the oven.
* Consider thickness: Oven drying works best for small or thin pieces. Very thick pieces (like large turning blanks) are much more likely to crack in an oven. Air drying first is often better for these.
Drying Green Wood in Oven: Special Points
Green wood has a lot of water. Drying it in an oven needs extra care.
* Start with the lowest temperature possible (150°F-180°F).
* Seal the ends perfectly. Green wood is very prone to cracking as it loses water fast.
* Use shorter heating cycles. Maybe 2-3 hours at first.
* More frequent weighing helps you track the water loss.
* Be patient. Drying green wood in oven will take longer than drying wood that is already partly dry.
Oven Drying Wood for Carving and Other Uses
Why use an oven for certain projects?
* Carving: Dry wood carves cleaner. It gives you more control. Oven drying wood for carving small blocks or branches works very well. It makes the wood stable so your finished carving does not crack later.
* Small Craft Projects: Making small boxes, toys, or other items where wood movement could be a problem.
* Wood Turning (Small Blanks): For turning small bowls or spindles. Drying helps prevent the finished piece from warping or cracking. Stabilizing wood in oven is key here.
* Testing Wood: Drying a small piece quickly lets you see how that type of wood behaves as it dries.
For larger projects like furniture or building walls, you need kiln-dried wood or very well air-dried wood. An oven is not practical or possible for large boards.
Using Your Kitchen Oven for Wood
Using your home oven is convenient for small wood pieces.
* Cleanliness: Make sure your oven is clean before and after. Wood dust is not good to mix with food.
* Smell: Drying wood can make a smell. It is usually a nice woody smell, but be aware. Make sure your kitchen is well-aired.
* Dedicated Use: If you do a lot of wood drying, you might want a small, cheap toaster oven just for wood. This keeps wood dust out of your main oven. A toaster oven can work well for very small pieces.
* Temperature Check: As mentioned, use an oven thermometer to know the real oven drying wood temperature. Home ovens can be off by many degrees.
Deciphering Moisture Content
Wood moisture content (MC) is how much water is in the wood compared to the weight of the dry wood itself.
* Formula: (Wet weight – Dry weight) / Dry weight * 100%
* Example: Wood weighs 100g wet. After drying until stable, it weighs 90g. The water lost is 10g. The dry weight is 90g. MC = (10g / 90g) * 100% = 11.1%
* Green wood can have MC from 30% to over 200% (meaning the water weighs more than the wood!).
* Air-dried wood usually gets down to 12-18% MC, depending on the climate.
* Wood dried in a heated home is usually around 6-10% MC.
* Oven drying aims to get the wood to the moisture level of your home’s air. When the weight stops changing, it is usually at this level. This is often 6-10% MC.
You can buy a wood moisture meter. You stick probes into the wood. It gives you a reading. This is easier than weighing, but meters can be less accurate, especially for very wet or very dry wood. Weighing is the most reliable method for DIY drying.
Considering Potential Risks
- Fire: Wood is flammable. You are using heat. While the recommended temperatures (150-200°F) are low, be cautious. Do not use higher temperatures. Do not leave the oven unattended for very long periods. Make sure there are no loose fibers or sawdust near the heating element.
- Cracking: We talked about this a lot. It is a high risk if you do not follow the low heat, slow drying, and end sealing steps.
- Warping: Wood can twist or bend as it dries, especially if the grain is not straight. Drying slowly and evenly helps reduce this. Making sure air flows all around the piece is important.
Comparing Kiln Drying Wood vs Oven Drying More Closely
| Feature | Kiln Drying | Oven Drying (Kitchen) |
|---|---|---|
| Scale | Large batches, commercial | Small pieces, DIY |
| Equipment | Special heated chambers, controls | Standard kitchen oven |
| Speed | Fast (days for boards) | Faster than air drying for small pieces (hours/days for small pieces) |
| Temperature | Controlled, often higher than oven drying for speed, but carefully managed stages | Low (150-200°F), less precise control |
| Humidity | Controlled (can add steam) | Depends on room and door crack |
| End Result | Very dry (6-8% MC), stable | Dry to home’s MC (6-10%), stable for small uses |
| Cost | High setup cost, energy use | Low setup cost (already have oven), energy use for small scale |
| Wood Size | Large boards, beams, lots of wood | Small pieces, carving blocks, turning blanks |
| Risk of Cracking | Present if not done right, but controls help | High if done too fast or hot |
So, kiln drying wood vs oven drying shows that they are for different jobs. A kiln is for lumber production. An oven is for hobbyists and small parts.
Other DIY Wood Drying Methods
Besides air and oven drying, what else can people do?
* Microwave Drying: This is fast but risky. High chance of cracking, splitting, and even starting fires inside the wood. Not recommended for beginners or valuable pieces.
* Freezing: Freezing green wood can help stabilize it before drying. The ice crystals break down some wood cells. This can help water leave later. You freeze it, then let it thaw and dry, maybe air drying then oven drying.
* Using Silica Gel: For very small, delicate pieces, you can put them in a sealed container with silica gel packets. The gel pulls moisture from the air, which pulls it from the wood. This is slow and for tiny items.
Oven drying is one of the most common and effective DIY wood drying methods for small parts when you need them relatively quickly.
Final Tips for Success
- Start with less valuable wood until you get the hang of it.
- Use a written log or notes. Write down weight, date, time in oven, temperature used for each cycle. This helps you learn what works for different types and sizes of wood.
- Check the wood often, especially in the first few cycles. Look for signs of cracking or splitting. If you see cracks starting, lower the temperature more or shorten the cycles.
- Be patient. Rushing wood drying almost always leads to problems.
By following these steps and keeping the temperature low, you can use your oven to successfully dry small pieces of wood. This helps you get wood ready for your projects faster and ensures it stays stable over time. Oven drying wood right the first time is possible with care and attention to heat and time.
Frequently Asked Questions
Q: Can I use my regular kitchen oven to dry wood?
A: Yes, you can use a regular kitchen oven. It works well for small pieces of wood.
Q: What is the best temperature for drying wood in an oven?
A: The ideal temperature for drying wood in an oven is low, usually between 180°F and 200°F (82°C to 93°C). Never go above 220°F (105°C).
Q: How long does it take to oven dry wood?
A: How long to oven dry wood varies greatly. Thin pieces might take 4-8 hours of total oven time over 1-3 days. Thicker pieces take much longer, possibly days or a week of cycles. It is done when the wood’s weight stops changing.
Q: Does oven drying wood make it stronger?
A: Yes, drying wood makes it stronger and more stable. Water in the wood makes it weaker and prone to change shape.
Q: How do I stop wood from cracking when drying it in the oven?
A: Key steps for preventing wood cracking when drying include sealing the ends of the wood with wax or sealant, using very low oven temperatures (180-200°F), drying in cycles with cooling periods, and leaving the oven door slightly open.
Q: Can I dry green wood in the oven?
A: Yes, you can dry green wood in oven, but it requires extra care. Start with even lower temperatures (150-180°F) and shorter heating cycles. Seal the ends very well. Green wood has a lot of water and is more likely to crack.
Q: How do I know if the wood is dry enough?
A: The wood is dry enough when its weight stops changing between drying cycles. Weigh it before a cycle, dry it, cool it, weigh again. If the weight is the same as the last cycle, it is stable for your home’s conditions.
Q: Is kiln drying wood vs oven drying the same thing?
A: No. Kiln drying wood vs oven drying shows they are different. Kiln drying uses large, controlled chambers for large amounts of wood. Oven drying uses a standard oven for small pieces. Kiln drying is for commercial lumber; oven drying is a DIY method for small crafts or carving wood.
Q: Is it safe to dry wood in a kitchen oven?
A: Yes, it is safe if done carefully. Use very low temperatures (150-200°F). Do not use high heat. Keep an eye on the oven, especially at first. Ensure the oven is clean before and after use.