
Image Source: soundcertified.com
Connect Wires: How To Extend Speaker Wire Using Connectors
Can you extend speaker wire? Yes, you absolutely can extend speaker wire, and using speaker wire connectors is a common and effective way to do it. Many people need to know how to join speaker wires when setting up a new room layout or placing speakers further from their amplifier or receiver. While you can solder speaker wire, connectors offer a quicker and often just as reliable method, especially for home theater speaker wiring. This post will guide you through extending speaker wire the right way, focusing on using various speaker wire connectors and touching on important points like speaker wire gauge and using a wire stripping tool.
Why Extend Speaker Wire?
Sometimes, the factory-length speaker wire just isn’t long enough.
Maybe you:
- Moved your furniture.
- Got a new, bigger TV stand.
- Want to place surround sound speakers further back in the room.
- Need to run wires along walls or under carpets.
Extending the wire lets you put your speakers exactly where you want them for the best sound and room look.
Ways to Join Speaker Wires
There are a few main ways to splice speaker wire and make it longer.
Using Connectors
This is often the easiest and most popular method. You use small parts designed to join two pieces of wire end-to-end.
- Pros: Simple, fast, usually secure if done right, many types available.
- Cons: Adds a small connection point that could fail, requires the right connector and tools.
Soldering
This method uses heated solder to melt and join the metal strands of the wires together.
- Pros: Creates a very strong electrical connection, can be quite durable.
- Cons: Needs special tools (soldering iron, solder), takes practice, requires heat shrink tubing for insulation.
Twisting Wires (Not Recommended)
Simply twisting the ends of the wires together and taping them is possible but not a good idea.
- Pros: Doesn’t need special tools (just hands and tape).
- Cons: Poor electrical connection, can come loose easily, not safe (tape can unwrap), looks messy, can hurt sound quality.
This guide focuses on using speaker wire connectors because they offer a good mix of ease, reliability, and performance for most home audio setups.
Choosing the Right Speaker Wire
Before you extend, make sure you have the right wire. The thickness of the wire matters. This is called speaker wire gauge.
Grasping Speaker Wire Gauge
Wire gauge tells you how thick the wire is. The lower the gauge number, the thicker the wire.
- Thicker wire (lower gauge like 12 or 14 gauge) is better for longer runs because it loses less signal over distance.
- Thinner wire (higher gauge like 16 or 18 gauge) is fine for shorter distances (under 25-50 feet depending on the speaker).
Using wire that is too thin for a long run can reduce the power getting to your speaker. This can make the sound weaker or less clear.
Here’s a simple guide for common gauges:
| Speaker Wire Gauge | Recommended Max Distance (Approx.) | Common Use |
|---|---|---|
| 18 Gauge | Up to 25 feet | Small speakers, short runs |
| 16 Gauge | Up to 50 feet | Most satellite speakers |
| 14 Gauge | Up to 80 feet | Bookshelf/floorstanding |
| 12 Gauge | 100+ feet | High power, very long runs |
Note: These are general guides. Check your speaker or receiver manual if unsure.
When extending, it is best to use the same gauge or thicker wire for the extension. Using thinner wire for the extension will limit the performance to that thinner wire’s capacity.
Types of Speaker Wire Connectors
There are many speaker wire connectors available. Each type joins the wires in a different way. Knowing the types helps you pick the best one for your needs.
Crimp Connectors
These are very popular for how to join speaker wires. They require a special tool to squeeze or “crimp” them onto the wires.
Butt Splice Connectors
These are a type of crimp connector designed specifically to join two wires end-to-end.
- Appearance: Small metal tubes, often inside a plastic sleeve.
- How they work: You push a stripped wire end into one side, crimp it firmly, then push the other stripped wire end into the other side and crimp it.
- Pros: Create a strong physical connection, can be insulated (some have heat shrink built-in), good electrical contact if crimped well.
- Cons: Requires a crimping tool, cannot be easily undone.
There are different types of butt splice connectors and crimp connectors for audio:
- Uninsulated: Just a metal tube. You need to insulate it yourself after crimping (like with electrical tape or heat shrink).
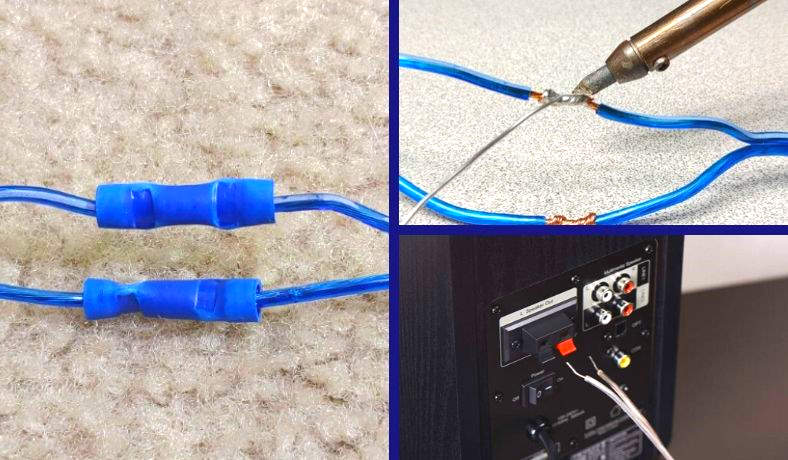
- Nylon/Vinyl Insulated: The metal tube is inside a colored plastic sleeve. The color often tells you the wire gauge it fits (e.g., red for 22-18 gauge, blue for 16-14 gauge, yellow for 12-10 gauge).
- Heat Shrink Insulated: The plastic sleeve is made of heat-shrink material. After crimping, you heat the sleeve (with a heat gun or lighter carefully) and it shrinks tightly around the wire and connector. This provides excellent insulation and moisture resistance.
How to Use Butt Splice Crimp Connectors
- Prepare: Turn off your audio system. Unplug everything for safety.
- Cut: Cut the speaker wire where you need to extend it.
- Strip Wire: Use a
wire stripping toolto remove about 1/2 inch (1 cm) of insulation from the end of each of the four wire ends you will join (two from the original wire, two from the extension wire). Be careful not to cut the small metal strands. - Twist Strands: Lightly twist the exposed wire strands together on each end to keep them neat.
- Insert Wire: Take one
butt splice connector. Push one stripped wire end fully into one side of the connector until the insulation meets the connector. - Crimp One Side: Place the connector in your crimping tool’s correct size slot (check the tool instructions and connector color/size). Squeeze the tool handles firmly until the connector is tightly crimped onto the wire. Give it a gentle tug to ensure it’s secure.
- Insert Other Wire: Take the wire you are joining to the first one. Push its stripped end fully into the other side of the same
butt splice connector. - Crimp Other Side: Crimp this side of the connector onto the second wire, just like you did the first side. Tug gently to check.
- Repeat: Do the same for the other wire pair (joining the positive wire from the original run to the positive wire of the extension, and the negative to the negative). It’s crucial to keep polarity straight (positive to positive, negative to negative). Speaker wire often has markings like a stripe, rib, or different color insulation on one wire to help tell them apart.
- Insulate (if needed): If using uninsulated connectors, wrap each finished splice securely with high-quality electrical tape, covering all exposed metal. If using heat shrink connectors, heat the sleeve evenly until it shrinks tightly.
- Test: Connect your speakers and receiver/amp and test the audio.
Screw Terminal Connectors (Terminal Blocks)
These use screws to hold the wires in place.
- Appearance: Usually a block of plastic or ceramic with metal terminals and screws.
- How they work: You strip the wire end, insert it into a slot or under a plate, and tighten a screw to clamp down on the wire.
- Pros: Easy to use, don’t require special tools other than a screwdriver, connections can be undone and redone.
- Cons: Can be bulky, screw can loosen over time, exposed metal parts if not in an enclosure.
How to Use Terminal Blocks
- Prepare: Turn off and unplug everything.
- Cut and Strip: Cut wires and strip about 1/4 to 1/2 inch (0.5 to 1 cm) of insulation from each end. Twist strands.
- Connect: Loosen the screw on one terminal block slot. Insert the stripped wire end fully. Tighten the screw firmly onto the wire.
- Join: On the same terminal block slot, insert the end of the wire you are joining it to (from the extension cable). Tighten the screw firmly. (Note: Some terminal blocks have separate slots for each wire, others allow two wires per slot).
- Repeat: Connect the other pair of wires to a separate terminal on the block, keeping polarity correct.
- Secure: If the block isn’t enclosed, consider putting it in a small project box for safety and neatness.
- Test: Reconnect and test sound.
Binding Posts / Barrier Strips
Similar to terminal blocks, often found on receivers or speakers themselves.
- Appearance: Posts with caps you unscrew, or strips with screws and barriers between terminals.
- How they work: Wires (bare or with banana plugs/spades) attach to the posts or under the screws.
- Pros: Secure connection, can use various termination types (bare wire, plugs), durable.
- Cons: Can be bulky, primarily used for connecting gear, less common for in-line wire joining unless using a specialized joining block.
Push-In Connectors
These are quick and easy.
- Appearance: Small plastic blocks with levers or holes.
- How they work: You strip the wire and push it into a hole or lift a lever, insert the wire, and close the lever.
- Pros: Very fast, no tools needed (besides stripper), reusable (lever types).
- Cons: May not hold very thick or very thin wires securely, can sometimes come loose. Wago connectors are a popular brand of lever-style push-in connectors suitable for solid or stranded wire.
How to Use Push-In Connectors (Wago style)
- Prepare: Turn off and unplug audio.
- Cut and Strip: Cut wires. Strip about 1/2 inch (1 cm) of insulation.
- Connect: Choose a connector with enough ports (usually 2 per connection). Open the lever for one port. Insert the stripped wire fully. Close the lever firmly.
- Join: Open the lever for the adjacent port on the same connector. Insert the stripped end of the wire you are joining. Close the lever. The internal metal bar connects the two ports.
- Repeat: Use a second connector for the other wire pair (negative to negative).
- Test: Reconnect and test.
Preparing the Wires
Proper wire preparation is key for any connector type.
Using a Wire Stripping Tool
A wire stripping tool is essential. Don’t use scissors or a knife, as they can easily cut the wire strands or damage the insulation unevenly.
- Find the correct hole on the stripper for your
speaker wire gauge. - Place the wire in the hole so the jaws are where you want the insulation to end (about 1/2 inch from the tip).
- Gently squeeze the handles to cut the insulation.
- Pull the tool towards the end of the wire to slide the cut insulation off.
- Inspect the wire: All insulation should be gone, and the metal strands should be intact. If strands are cut, strip and try again.
Keeping Polarity Correct
Speaker wire has two conductors: positive (+) and negative (-). These must connect correctly from the amplifier/receiver to the speaker.
- If you mix them up (reverse polarity) on one speaker, it will play “out of phase.” This makes the bass sound weak and the overall sound strange.
- If you mix them up on all speakers, they are still “in phase” with each other, but the system’s overall phase might be reversed (usually not a big deal unless you have multiple audio systems playing together or complex setups).
Speaker wire usually has a way to tell the wires apart:
- A stripe on one wire.
- A rib or ridge on the insulation of one wire.
- Different colored insulation (less common for standard speaker wire).
- Text printed along one wire.
Pay close attention when stripping and connecting. Always connect the striped/ribbed/marked wire from the original run to the striped/ribbed/marked wire of the extension, and the plain wire to the plain wire.
Step-by-Step Guide: Using Butt Splice Connectors (Crimp)
This is a detailed look at using one of the most common types of crimp connectors for audio.
Tools and Materials Needed:
- Original speaker wire
- Extension speaker wire (same or thicker gauge)
Butt splice connectors(correct size for your wire gauge, insulated recommended)Wire stripping tool- Crimping tool suitable for insulated butt splices
- (Optional) Electrical tape or heat source (heat gun/lighter) for extra insulation/heat shrink connectors
The Process:
h5 Step 1: Plan Your Wire Run
Decide exactly where the wire needs to go. Measure the length you need for the extension. Add a little extra slack.
h5 Step 2: Power Off Your System
Safety first! Turn off your receiver or amplifier and unplug it from the wall.
h5 Step 3: Prepare the Original Wire
Locate the end of the original speaker wire you need to extend. Use your wire stripping tool to remove about 1/2 inch of insulation from both wires at the point you will make the splice. Gently twist the exposed wire strands together.
h5 Step 4: Prepare the Extension Wire
Take your new extension wire. Strip about 1/2 inch of insulation from the end you will join to the original wire. Twist the strands. Make sure you can identify which wire is positive and which is negative on both the original and extension wires. Mark them if needed (e.g., with a small piece of tape).
h5 Step 5: Insert Wire into Connector (First Side)
Pick one wire from the original run (say, the positive one). Take a butt splice connector that matches your wire gauge. Push the stripped end of the wire fully into one end of the connector. Make sure no insulation goes inside the connector, only the bare wire strands.
h5 Step 6: Crimp the First Side
Place the end of the butt splice connector with the wire inserted into the correct crimping slot on your crimping tool. Squeeze the handles firmly until the crimp tool cycles or makes a solid crimp. You should see the connector visibly squeezed onto the wire. Give the wire a gentle tug to confirm it is held tightly.
h5 Step 7: Insert Wire into Connector (Second Side)
Take the corresponding wire from your extension piece (the positive one). Push its stripped end fully into the other end of the same butt splice connector you just crimped. Ensure only bare wire enters the connector.
h5 Step 8: Crimp the Second Side
Place this end of the connector into your crimping tool’s slot and crimp it firmly. Tug the wire to check the connection. You have now joined the two positive wires.
h5 Step 9: Repeat for the Second Wire Pair
Take the remaining two wires (the negative ones). Use another butt splice connector and repeat steps 5 through 8 to join the negative wire from the original run to the negative wire of the extension. Double-check that you are joining negative to negative.
h5 Step 10: Insulate the Connections
If you used insulated connectors, they provide basic insulation. If you used heat-shrink butt splices, apply heat evenly with a heat gun or carefully with a lighter until the sleeves shrink tightly around the wires. If you used uninsulated connectors, wrap each finished splice generously and securely with high-quality electrical tape. Cover all exposed metal entirely.
h5 Step 11: Secure the Wires
The splices will create a small bulge in the wire. You can use electrical tape or zip ties to lightly bundle the two spliced wires together a few inches away from the splice points to keep them neat.
h5 Step 12: Test the Connection
Connect your speakers back to your receiver/amp. Plug in the power and turn the system on. Test the audio in the speaker(s) you extended. Listen for clear sound. If there is no sound or the sound is distorted, turn off the power immediately and re-check your connections, especially the polarity and the crimps.
Comparing Connectors vs. Soldering
You might wonder if you should solder speaker wire instead of using speaker wire connectors.
Soldering Speaker Wire
To solder speaker wire, you would:
- Strip the wires.
- Twist the strands together very tightly.
- Heat the twisted strands with a soldering iron.
- Apply solder to the heated strands so it melts and flows into the twist.
- Allow to cool.
- Slide heat shrink tubing over the joint and heat it to insulate.
Pros of Soldering:
- Excellent electrical connection if done right.
- Can be very durable.
- Less bulky than some connectors.
Cons of Soldering:
- Requires learning the skill of soldering.
- Needs tools (soldering iron, solder, heat shrink, heat source).
- Takes more time than crimping or push-in connectors.
- Applying too much heat can damage wire insulation further up.
Which Method is Better?
For most home audio uses, quality speaker wire connectors like properly crimped butt splices are perfectly fine and offer a reliable connection. They are much easier and faster than soldering for beginners.
Soldering is often preferred in professional audio, car audio (due to vibration), or when the absolute best possible connection is desired and you have the skills and tools.
For the average person extending speaker wire behind their TV or across a room, using good crimp connectors for audio or quality push-in connectors is sufficient.
Considering an Audio Cable Extension Kit
Sometimes, you can avoid splicing altogether. An audio cable extension kit might include:
- Pre-made speaker cables with connectors (like banana plugs or spade connectors).
- A joining block or coupler that has terminals for both the original and extension cables.
Pros of Kits:
- Can be very easy if connectors match your gear.
- No cutting or stripping needed if cables have pre-attached ends.
- Joining blocks can be neat.
Cons of Kits:
- May not be available for all wire gauges.
- Can be more expensive than just buying wire and connectors.
- The pre-made lengths might not be exactly what you need.
Check if an audio cable extension kit is an option for your specific situation before you start cutting your wires.
Final Tips for Home Theater Speaker Wiring
When dealing with home theater speaker wiring, you might have many wires. Keep them organized!
- Label your wires at both ends (e.g., “Front Left +”, “Front Left -“).
- Use wire ties or sleeves to bundle wires neatly, especially if running them along baseboards or through walls.
- Plan your route carefully to avoid running wires near power cables, which can cause interference.
- For in-wall runs, use approved speaker wire rated for in-wall use (often marked CL2 or CL3).
- Ensure your connections are secure but don’t pull on the wires excessively after connecting.
Potential Issues and How to Avoid Them
Poor Connection / Signal Loss
- Cause: Wires not stripped properly, not enough bare wire in the connector, connector not crimped/tightened firmly, wrong size connector for the wire gauge.
- Fix: Double-check your stripping and crimping/tightening. Ensure the connector size matches the wire. Give connections a gentle tug test.
Wrong Polarity
- Cause: Mixing up positive and negative wires on one or more speakers.
- Fix: Carefully identify positive and negative wires on both original and extension cables before connecting. Use markings on the wire. Re-do connections if polarity is wrong.
Loose Connections
- Cause: Crimp not strong enough, screw terminals vibrating loose, push-in connector not fully engaged.
- Fix: Ensure crimps are firm. Periodically check screw terminals. Use high-quality push-in connectors.
Damaged Wires
- Cause: Cutting strands while stripping, bending wire too sharply, physical damage after installation.
- Fix: Use the correct
wire stripping tooland technique. Avoid sharp bends. Protect wires from damage.
Frequently Asked Questions (FAQ)
h4 Can I use any electrical connector for speaker wire?
It’s best to use connectors designed for audio or low-voltage wiring, especially crimp connectors for audio or butt splices sized for specific wire gauges. Standard electrical connectors (like wire nuts for house wiring) are not ideal for the fine strands of speaker wire and can result in poor connections and reduced sound quality.
h4 Does extending speaker wire hurt sound quality?
If done properly with good quality wire and secure connectors, extending speaker wire usually has no noticeable effect on sound quality for typical home distances. A poor connection or using wire that is too thin for the distance is what can hurt the sound.
h4 How long can I make speaker wire?
The maximum length depends on the speaker wire gauge and your speaker/amplifier. Thicker wire (lower gauge) can run much further than thinner wire. Refer to the gauge chart above. For very long runs (100+ feet), consider 12 gauge wire.
h4 Do I need to match the wire brand when extending?
No, you don’t need to match the brand. You just need to match or exceed the speaker wire gauge and ensure it’s copper or copper-clad aluminum speaker wire.
h4 What tools do I need besides connectors?
You will definitely need a wire stripping tool and, if using crimp connectors, a crimping tool. For screw terminals, you need a screwdriver.
h4 Is electrical tape enough to insulate splices?
High-quality electrical tape, wrapped tightly and securely over all exposed metal, can work. However, heat-shrink tubing or connectors with built-in heat shrink offer better, more durable, and moisture-resistant insulation, especially for home theater speaker wiring that might be hidden in walls or floors.
h4 Where can I buy speaker wire connectors?
You can find speaker wire connectors at electronics stores, hardware stores, online retailers, and sometimes at big box stores that sell audio equipment. Look for butt splice connectors, crimp connectors for audio, or wire terminals.
Extending speaker wire doesn’t have to be difficult. By choosing the right speaker wire connectors, using a proper wire stripping tool, and following these steps, you can successfully extend your wires and place your speakers exactly where you want them for the best audio experience.